
Happy Sunday folks! We hope you are enjoying the long weekend and staying safe. This week we have a short and sweet link up so you can get right back to sunbathing, resting, eating, playing, swimming or all of the above. Let’s get into it. This week’s home tour is brought to us from sight unseen and we are still obsessing over the epert mixing of modern and vintage art, shapes, and sculptural furniture. It is pure magic plus the interview with designer Sara Rydberg Nilsson is 100% worth the read. From Emily: Just when I thought I was only wearing jean shorts I am now into jean skirts. This one sits on hips in a way that’s good and strangely flattering. I thought the pleats on the front would add volume in an area where I wouldn’t want more volume but it actually does the opposite. From Ryann: My niece who is 5 months old and perfect LOVES this little pacifier toy that I got her for Christmas. She is always holding it and sleeping with it and it is the most precious thing ever. Now, I realize it is her favorite now because it is attached to her pacifier so any tips on the next toy to get her when she gets older?? I am trying to win the auntie gift game over here so recs welcome and encouraged Also from Ryann: I really need to share this photo by photographer Lia Clay Miller and implore someone to purchase it so I can live vicariously through you. It is a part of a series in collaboration with The Real Real and a portion of the proceeds will go to NAACP. I am so into her work and hope to one day showcase it in my home (but for now, would absolutely love to see it in someone else’s!). From Jess: Not sure if “healthy” and “soda” are meant to be in the same sentence but if they ever were it would be in reference to Olipop. I am a big lover of root beer but don’t love the loads of sugar and general icky feeling I get after drinking it (or any soda for that matter). But I decided to try Olipop’s “root beer” which is actually a sparkling tonic that apparently supports digestive health… and is only 2g of sugar. Is it exactly like the real stuff? no. But it does taste great and really hits the spot when you just want to mix it up. 10/10 From Caitlin: There’s a 100% chance that as you read this, I’m still cackling over this TikTok about the real estate market. “Please, this is the eighth apple I’ve tried to buy” gets me every time. From Mallory: I was desperate for a new phone case and while I want to buy this one eventually, but my old one was so gross and I knew I needed something (ANYTHING) else and quick since I need to mentally prepare to spend $60 on a phone case. So instead I bought this cute one in yellow from H&M and I’m PLEASANTLY surprised. It’s super soft and fully covers the corners of your phone so you don’t have to worry (as much) about the screen shattering in comparison to the ones that don’t cover the edges. If you’re in need of a new case I highly recommend these because they come in multiple colors and look great for the price. Oh and you can also buy it with the airpods case which is cool too. That’s all from team EHD but if you are enjoying a long morning in bed might we suggest perusing our Memorial Day sales roundup? There are some great steals that you don’t want to miss. Until next time! xx Opening Image Credit: Design by Sara Rydberg Nilsson of Studio Hilda | Photo by Jonas Ingerstedt | Via Sight Unseen The post The Link Up: Emily’s New Summer Staple, The Teething Toy Ryann’s 5 Month Old Niece Loves, & A Cute And Affordable Phone Case appeared first on Emily Henderson. Originally from Emily Henderson https://ift.tt/3yIa8TL
0 Comments

Helping our kids feel independent and develop autonomy during Covid has obviously been hard. We are alone, together. Up next in the post-Covid emotional roller coaster is the oh so fun ‘separation anxiety’ segment of this ride making the move to Oregon harder (what with the rental house + new school + making new friends). But these kids are craving independence and at 5 1/2 and 7 1/2 we are starting to trust them (as much as I think you can). They seem to be making good decisions without us – we can overhear them, we get a sense of it all. So we decided to let them have the house to themselves while we went on a “date”. We talked about it all week, they had to show us extra good judgement, show us how they would call us in emergency (we would give them one of our phones as we don’t have a home phone) and promise to just make themselves sundaes and watch a parent approved show. They were ABSOLUTELY giddy with excitement and couldn’t stop talking about it the whole week. They are such a team and nothing makes us happier than them plotting without us – not against us but with eachother. I’m a big free range parent advocate (for our family, you do whats best for yours) and after years of “helicopter deprogramming” Brian is now, too. I’ve read a lot of articles, listen to podcasts, etc, about treating kids older than they are when it comes to responsibility – giving them more than you think they can handle, (or than is convenient to you) which helps them grow their confidence and independence. One thing I chant internally all the time that I learned from a child psychology podcast (as you do) was “competance = confidance”. Remember that one – I didn’t coin it but of course that makes sense. It’s the same as us – as grown-ups. Achieving makes you empowered to try to achieve more and thus you feel proud of yourself = confidence. I can see it with all the more complicated chores that we do around the house. It’s a battle, truly, but they feel so good after they wash, dry, fold and put away all their laundry and I’ve even heard them tell their friends on the portal about their laundry – so proud of themselves. Listen, we have lots of problems, and we don’t push our kids academically (um … they are still being “homeschooled”) and often I worry that we don’t know how to discipline because we are both so soft, but yes I do ask them to perform life tasks beyond their years including cooking, cleaning and now babysitting themselves. We all have our strengths and weaknesses. I’m still learning my totally weird parenting triggers, patterns and quirks and some are NOT GOOD (like since I was raised/ingrained to never yell I end up getting so frustrated that I’ll start crying and throw a stuffed animal SO HARD in a way that I think disturbs us all, including the animal and then I have to apologize and we all cry and its SO DUMB). We ware a product of our parenting and environment. Everything we do and learn beyond that or against that is really, really hard work. Anyway, it was a Sunday night and they finished their chores and bath so they are allowed a big old sundae after dinner while we watch a movie. We told them that we’d be back in 2 hours. If they needed anything they can call us obviously. They thought we were going to this lake viewing area that is walking distance from our house, with a glass (or two ) of wine. BUT the truth is that it was kinda cold and Brian and I just wanted to watch a grownup movie in bed together (not like that, I think we watched two episodes of Lupin . So we said goodbye, then snuck around the side of the house, took the back stairs up to our bedroom, took off our coats and laid down. Then we heard screaming … 
… LIKE A FRAT PARTY. They blasted the music. They were dancing while making sundaes. They were squealing in delight or more likely the primitive sounds of the first feeling of independance. I still remember my first car ride to the beach with 16 year old friends – I could still describe the way the wind smelled. They took like 50 photos with my phone of their sundaes (I get that) until they settled in to watch Onward. We heard them let the dogs out over the next two hours and heard their dishes clank in the sink when they were done. Brian and I kept looking at each other with that knowing glance that only parents do when reflecting on the collective joy and relief that is parenting. We didn’t mess it up and IT WAS SO CUTE. After 2 hours we put our coats and shoes back on, walked around the house and came through the front door. Their movie was over. The dishes were in the sink, not the dishwasher but pretty close! We praised them a ton for how responsible they were, how much we now know we can trust them again, etc, etc. It was honestly such a WIN WIN. While we weren’t at a restaurant there was something really seedy and special about us just watching a movie in bed at 6pm on a sunday without them knowing. Perhaps we needed to feel a little independent and autonomous, too. Funny how that works. They are begging to do it again and while I don’t think I’m ready to actually leave them while we go to dinner (especially without a home phone) we might try a trip to the market, or both of us take the dogs for a long walk. Baby steps – for them and for us. All in all I’m excited to get a home phone, teach them more about strangers and answering the door (or NOT!) and going on an actual date. But for now, the walk, the drive, the fake bedroom movie session did something for all of us that I think we needed during quarantine and we will absolutely be doing again. Now I know a lot of you are going to say that you left your kids at a young age in the 80’s (we were left all the time), but with the rise of helicopter parenting (due to the media and societal pressures) it’s not so common practice now (don’t let me get started on this). I know that it absolutely depends on your kids maturity and frankly where you live (up here we feel super super safe where we might not in a big city). So I’m curious about current parents and how old your kids were when you started leaving them alone? But from that positive experience we are pretty into giving the kids more freedom when they show us they can handle it…. Opener Image Credit: Photo by Sara Ligorria Tramp | From: Keeping The Good Of Last Year: New Family (And Kid-Only) Activities – Plus The Value Of “Me” Time The post Brian And I Went On A “Date” And Left The Kids Alone For The First Time. Here’s How It Went… appeared first on Emily Henderson. Originally from Emily Henderson https://ift.tt/34GXTcp 
HI, HEY, HELLO. I don’t know about y’all, but I’ve been on a little bit of a spending spree lately – it’s all just a never-ending series of haircuts (so I can finally see past my bangs) and visits to my eyebrow lady (so I can see past my eyebrows that basically grew into bangs) and WOOPS, none of my shorts fit so like…I’ve gotta replace them too, right? And maybe I should grab some dresses while I’m out since I’m finally going on dates again, you know? And while I’m out, why not…you get it. MY CREDIT CARD IS WORKING OVERTIME. Ahh. But it also kind of feels like we may all be navigating this weird simultaneous return-to-socialization together – you know, we’re all kind of trying to make a nice re-impression on the folks we haven’t been able to spend a ton of close/quality time with – so this year’s start-of-summer sales have come at the BEST TIME. So whether you’re looking to grab a new patio set so you can lounge with your friends, or you wanna scoop an some awesome serving tray to highlight your newfound cooking skills (LOL I wish this was me), or if you’d just like to grab a new easy breezy dress because there’s nothing easier than wearing a giant shirt and calling it an outfit…I have a link for you! HAPPY SAVINGS (and if you own a small business – or if you know and love a small business – please be your own hype person in the comments)! Home & Decor
AllModernDates: Through Monday, 5/31 Annie SelkeDates: Through Monday, 5/31 AnthropologieDates: Through Monday, 5/31 Apt2BDates: Through Monday, 5/31 
Artfully WallsDates: ArticleDates: Through Monday, 5/31 Barnaby LaneDates: Through Monday, 5/31 Bed Bath & BeyondDates: Through Monday, 5/31 
BloomistDates: Through Monday, 5/31 Boutique RugsDates: Build.comDates: Through Monday, 5/31 
CB2Dates: Through Monday, 5/31 Crate & BarrelDates: Through Monday, 5/31 Food52Dates: Through Monday, 5/31 FrontgateDates: Through Monday, 5/31 Home DepotDates: Through Wednesday, 6/9 
Industry WestDates: Through Monday, 5/31 The InsideDates: Through Monday, 5/31 Interior DefineDates: Through Tuesday, 6/1 Jonathan AdlerDates: Through Monday, 5/31 Joss & MainDates: Through Monday, 5/31 
Lulu and GeorgiaDates: Through Monday, 5/31 LumensDates: Through Monday, 5/31 Marie Burgos DesignDates: From Saturday, 5/29 through Monday, 5/31 McGee & Co.Dates: Through Monday, 5/31 
MintedDates: Through Tuesday, 6/1 One Kings LaneDates: Through Monday, 5/31 OverstockDates: Through Monday, 5/31 
RejuvenationDates: Through Monday, 5/31 Rugs.comDates: Through Monday, 5/31 Serena & LilyDates: Through Monday, 5/31 SixpennyDates: From Sunday, 5/30 through Saturday, 6/5 
St. FrankDates: Through Friday, 6/4 TargetDates: Through Monday, 5/31 TerrainDates: Through Monday, 5/31 
Tuft & NeedleDates: Through Monday, 5/31 WayfairDates: Through Monday, 5/31 Fashion & Beauty
& Other StoriesDates: Through Monday, 5/31 ABLEDates: Through Monday, 5/31 AnthropologieDates: Through Monday, 5/31 B. YellowtailDates: Through Monday, 5/31 
BloomingdalesDates: Through Monday, 5/31 COSDates: Through Monday, 5/31 ExpressDates: Through Monday, 5/31 
GapDates: Through Monday, 5/31 J. CrewDates: Through Monday, 5/31 J. Crew FactoryDates: Through Monday, 5/31 
Kate SpadeDates: Through Monday, 5/31 NordstromDates: Through Sunday, 6/6 SkinstoreDates: Through Monday, 5/31 
TargetDates: Through Monday, 5/31 Volition BeautyDates: Through Monday, 5/31 WildfangDates: Through Monday, 5/31 ZapposDates: Through Monday, 5/31 That’s it for me (for now), but I’ll be around and updating this post all weekend. Hope everyone gets a chance to enjoy some nice and safe outdoor time with their loved ones! I’m reuniting with my lifelong best friend in upstate NY – we rented a pontoon boat before realizing it was going to be between 28 and 48 degrees, AHH – but I know it’ll be a fun time. See you back here tomorrow for a VERY fun post from Em Opening Image Credit: Design by Malcolm Simmons | Photo by Keyanna Bowen | From: Malcolm’s Bedroom Reveal Is Here… How He Found Healing Through Design + The Incredible DIYs That Transformed The Space The post Memorial Day Weekend Is Here And So Are All The BEST Sales (+ Our Picks) appeared first on Emily Henderson. Originally from Emily Henderson https://ift.tt/3yUI8MO 
I think the design gods are looking out for me (or trying to tell me to stop being so out of my mind). Why? Well, in my pretty ridiculous crisis over potentially having “too much” pink in my new apartment’s living room, this house was pitched to me by, you might have guessed, A 1000 X Better. The pink (as well as all of the colors designer, Elspeth Benoit used) are not only unbelievably happy but SO BEAUTIFUL. It’s an explosion of color but also not. I am in no way overwhelmed and yet happy to be so surrounded by color (ok, I’m technically am not in the space but doing my best to mentally transport or “shift” there. Have any of you heard of this thing the young kids are doing??? A topic for another time). So let’s dive into this absolute master class of designing a home where colors are not simply the decor but all over the walls and floors. 
Wall and Bookcase Color | Bookcase Millwork | Rug | Sofa | Chairs | French Doors | Door Color If you read this blog you likely have a love for charm-drenched homes that don’t need a ton of renovations… but wait, are there people that don’t love those?? Well, when Elspeth and her family moved into this home that’s what they got for the most part. All of that paneling was THERE ALREADY. I know. So to her, this was a blank slate. But to really make it a blank slate she painted the floors white and let it evolve. Here is the before photo: 
Is this a beautiful room? Of course. But with the truest power of paint and some upgrades (bifold doors and bookcase built-in), this space looks completely transformed. 
I actually think that the white floors and ceiling are what help keep the colors visually less overwhelming… and all the sunlight. Never underestimate natural lighting. That’s why Emily is so obsessed with knowing how the light moves around the farmhouse. She wants to maximize it as much as possible without living in an actual glass house:) 
Wall Color | Floor Colors: Dark Green, Light Green | Stained Glass Windows But then when you head into the dining room, Elspeth totally changes to the color story but still keeps it playful! Again, she uses “lighter” colors on the floor and ceiling but goes moody with the wall color. If you notice, aside from the bathrooms, all of the ceilings are white to help with continuity. That really helps to give the freedom to play with colors while still knowing you are in the same house. Plus it makes the ceilings feel taller. Ideal? Uh… ya. Now before we move on we NEED to talk about these particular floors and stained glass windows. These modern patterns feel totally fresh and yet classic. I love the understated boldness and life they bring to this room. 
Sunrooms are meant to be light and bright and that is exactly what this one is. And with that view… not sure you need much more. 
Here’s one more shot before we head into a pretty unbelievable kitchen. Also, note how those VERY cool sconces not only bring in some curves in a room with a lot of straight lines but they also complement the wood tones of the table and chairs. They also just break up the dark walls. Talk about balance! Ok, now we are actually headed to the kitchen… 
Cabinets | Counters (Quartzite countertops: Alexandrita) | Windows | Trim Color | Wall Color | Skylights | Rug I mean it’s warm, textured, colorful, yet simple. I can’t decide what I love most but I do know that my eyeballs are very happy. The cabinets are ridiculously good and custom-made by Dakota Witzenburg of ToDoSomething with Querkas oak (vintage oak veneered panels). The movement/natural “imperfections” make them completely timeless and warm. They perfectly contrast the sleek, polished Quartzite countertops (Alexandrita), Carrera marble floors, and modern hardware. We also need to talk about that blue window trim. They remind me of the ones from Zosia Manet’s cabin (which was my favorite detail in her home). Painting your window trim a “fun color” is such a cool way to add an unexpected moment, some depth and it just looks awesome. A deep blue like this one, Portola Paints “Ghost Tree”, is both bold but still a color you won’t regret in a few years. It’s basically a neutral… but a really pretty one:) 
Range | Sink | Faucet | Dishwasher | Wall Color Well, seeing the stone in its full glory makes me wonder if I like the stone or the cabinets more… but why do I need to choose? I don’t. They are both awesome. And that roman clay wall texture gives even MORE movement. Side note, I really need taco-shaped sconces now. Moving onto the bedrooms. 
I had this idea of doing a “Timeless Wallpaper Patterns” post and if I do end doing it (is that something y’all you want??) this one would be in it. It’s SO special, bold, and is a nice balance of “feminine” and “masculine”. 
And as we’ve said before when you install a bold wallpaper pattern, the rest of the room doesn’t need much else. 
Wall Color | Scallop Sconce | Rug This might be my favorite shot in this tour because it so perfectly shows the power of intentional eclecticism. Between the wallpaper (traditional), the rug (boho), the countertop (modern), and the blend of colors, it’s a design lover’s dream. Why I think it works so well is because those three main features (wallpaper, rug, and countertop) are all different pattern scales. Large being the wallpaper, medium being the countertop, and finally the rug as the small. Plus the soft pink walls are 100%. 
Custom Vanity | Countertop Stone: Cipollino Ondulato | Pivot Mirror | Faucet Oh and don’t forget to drool over the custom vanity also by ToDoSomething. So many pretty details. 
The thing about designing a colorful yet not too COLORFUL of a home is to know when to pull back. This sweet little twin room still has splashes of color (hello, yellow!) but otherwise, it’s a nice neutral moment full of texture. Hot Tip: If you have tongue and groove paneling like in this house, you are in visual interest heaven. 
Rug (vintage) What a fun and unexpected rug! I love the contrast with the pink walls. 
So yes, bedrooms are a very good place to go more neutral (but cozy). It needs to be your sanctuary. And look, some people are completely unfazed by big bold decor moments in their bedrooms. I equate them to people who can drink coffee moments before bed and still quickly fall asleep. WILD CHILDS! But that’s not what these people were into:) 
The deep-toned textiles and accent furniture totally pop off the walls to gentle balance and lead you to THIS BATHROOM! 
Wall Color | Vanity | Countertop Stone: Calacatta | Niche Marble: Cipollino Francese | Mirror | Sconce | Windows Take a deep breath with me and let’s admire this room. Can you handle that marble counter (again by ToDoSomething)??? Or the fact that the drawers are also marble??? This may be the most beautiful saturated color I have seen. Like the kitchen walls, it’s a roman clay finish so it basically feels like you are looking at the ocean with how much movement it’s got going on (in the best way). Also, do you see what’s peeking through the mirror?? Our beloved Zellige tile which Em did a big post about last week. It just looks so good and I think that with the myriad of textures and colors in this home that this tile works beautifully in it. Especially with those skylights! I think it would be impossible to feel like you are on vacation in the bathroom. Ok, that’s the tour! Hope you feel more empowered to bring color into your home because if these before and afters don’t do it for you I don’t know what will:) 
Same bookcase but totally elevated (thicker shelves in a different configuration and new cabinet doors) by ToDoSomething. 
Again! The power of literally just paint! Ok and a little stained glass. 
A full-on reno that was totally worth it. 
A new coat of paint (and some expert styling) is sometimes all a room needs. 
I mean there’s no comparison. Pink for the absolute win. 
When done right, white walls can really make a room feel A LOT bigger. 
A little loft clean up and wallpaper is clearly all that you need:) So have any of you really “gone for it” in the color department? Do you have any tips of your own? Or are you wanting to try but scared? What is your favorite room in this house? Let’s chat! Love you, mean it. Oh and one more thing…It’s for sale! If you are interesting in it here’s the listing *Design by Elspeth Benoit and Arterberry Cooke The post A Master Class In Using Color In Your Home Without it Feeling Like A COLORFUL Home (It’s Not The Decor) appeared first on Emily Henderson. Originally from Emily Henderson https://ift.tt/2QWm2It 
There is a special vulnerability/susceptibility in our brains for kitchen gadgets that I’d like to explore together. The other day Brian announced that he ordered an air fryer at a friend’s suggestion. He did it before I could stop him and I would have stopped him because I can’t handle another unused appliance. Not to throw Brian under the bus here because we all do this – we think that we need the newest way to cook to make our lives easier. Around the same time, I was on Shavonda’s instastory and she was talking about the Instant Pot versus the Crockpot/slow cooker (and how the instant pot might be BS) and it got me thinking of how I wish someone would tell me exactly what small kitchen appliances are necessary and which ones are marketing gimmicks to help “make our life easier” which end up in a landfill. Because it’s my thesis that almost everything can be done in the kitchen with far less. This revelation came after I bought the much hyped about Instant Pot which proceeded to make every soup mushy and saved me only a full 10 minutes of cook time. I didn’t know at the time that it’s best for things that normally take 8 hours, to instead take 4, but is that really worth the savings? Two years in we realized that we only use the Instant Pot for boiled eggs. That’s it. A whole appliance for the once-a-month boiled snack that we could easily do in a normal pot!!! But, Brian promised that the air fryer would be different and it was already ordered. So we tried it, making my potato mojos that I usually bake in the oven and they turned out 10 minutes faster and 5% better with slightly less olive oil. They also had a weird chemical smell/taste. To me, that is not good enough to have to drag it out of the closet, clean it, and put it away each time. Now maybe if you are on a strict diet and want to reduce as much oil as possible in your life it would be good, but we barely ever fry anything and usually bake with not too much olive oil. The point is, I don’t understand the full need for it if you can do everything in an oven with just a bit more time and a bit more oil. Don’t get me started on the fancy juicer I bought 2 years ago when I was doing that celery thing which had 14 parts that needed to be cleaned every time we used it… or the chopping “system” that I was gifted that had more plastic parts than I could possibly ever store (I think 18 different chopping options in total). 
While I’m on the subject, for chopping vegetables unless you are running a commercial kitchen, isn’t just a good knife and a cutting board enough? Do companies need to keep making the newest version of the slap chop or am I the only person who enjoys chopping and washing/storing less stuff? Listen, I also know that I’m in a privileged position where I work 7-4 pm so around 4 pm I start prepping out dinner and legitimately enjoy that hour of prepping/chopping/stirring while I listen to a podcast or music. I know that so many parents out there don’t have the luxury of that time. The nighttime scramble (especially when you add that commute back in) is real and if an Instapot makes your life easier then please use it. So I was thinking about the extra things that I do have that I use daily that are worth the extra cleaning. They are not the same as “kitchen essentials” but rather extra tools and gadgets that I use often and love: 
1. Cuisinart Salad Spinner | 2. Dual Citrus Squeezer | 3. Ninja Blender | 4. Stainless Steel Steamer with Extendable Handle | 5. 5 Quart Tilt Head Stand Mixer 1. Cuisinart Salad Spinner: I know that I can just use paper towels to wipe off my lettuce, but I HATE wet lettuce and wasting paper towels. This big gadget is annoying to store, but I use it very often and there really isn’t a good substitute. 2. Dual Citrus Squeezer: While you can absolutely just squeeze a lemon, this gets far more juice out of it. Again, almost daily I reach for this. 3. Ninja Blender: Ok I’m sure there are blenders that make more sense, but this is so easy to clean and small to store! Sometimes I have to liquify things in batches which is annoying, but a big blender sounds even more annoying. I suppose at the farm we’ll have a bigger pantry so storing a normal-sized blender will be fine, but we’ve also got along for 3 years with just this, so why would I add to it? 4. Stainless Steel Steamer with Extendable Handle: My friends make fun of me for still steaming vegetables, but I like it! I don’t really know how I would do it without this. It’s not genius or anything, but it works and is easy to store. 5. 5 Quart Tilt Head Stand Mixer: To be fair I’ve never used this but Brian does. He loves making cookies with the kids so at the beginning of quarantine we bought this and he has used it a lot. I also wonder if we need it just for cookies – we don’t really make cakes, but I suppose having one stand mixer is requisite for having a home. What I really want to know from you all is do you really use your panini presses, air fryers, pancake makers, slap chops, juicers, waffle makers, egg poachers, etc? Or are there actually any genius tools out there that I’m missing? Appliances and gadgets that truly do make your life easier and not just give you more to clean and store? I personally can’t wait for the Crockpot vs. Instant pot showdown in the comments Opener Image Credit: Design by Jamie Haller and Craig Ekedahl | Styled by A 1000 X Better | Photos by Lauren Moore The post What Kitchen Appliances, Gadgets, And Tools Do You Actually Use And Need?? appeared first on Emily Henderson. Originally from Emily Henderson https://ift.tt/3yHWvE4 

I’ve never actually placed furniture in a floorplan in the renovation stage before. Usually, it’s either pretty intuitive where things would go, there is a lot of flexibility, or there weren’t really a million options. But this time, with walls moving and a lot of square footage to play with I wanted to make sure that we used every inch of this house with the least amount of compromises possible, later. The living room was the biggest question mark as it is large, faces west (or will), is a pass-through space with a ton of traffic from the entrance, up the stairs, into the sunroom, out to the backyard, into the family room and open to the kitchen. It has multiple focal points – a big fireplace as well as the soon-to-be new scenic doors. So in order to really feel like we were making the best decisions we had to be in the space to feel it, and then even that wasn’t good enough… But first, here was the first floor when we bought it: The Living Room – Before

And as a refresher, here’s the layout of the entire first floor when we bought it: 
They had the living room shared with the dining room, which worked great. But we were changing the plans. As you might remember here was our “first final” floorplan. 
And here it is in a cool, 3D version which is a bit easier to follow: 
And then on your prompt, we decided to put the kitchen in the corner where the mudroom and breakfast nook are, to capture the best natural light of the house, which left the great room to have more flexibility. But we lost our cute little breakfast nook and that made us very sad. While we have a large dining room in the new sunroom (which will double as a work table for me, room for meetings, etc) we needed somewhere for the four of us to each on a daily basis – and no, we don’t want to eat at the island – we like to face each other. So without a real solution, we left the dining table kinda floating almost where it was originally, but it wasn’t ideal. I wanted my nook! This was where we landed before we went up there last time. 
The floating table just didn’t feel right but we needed to be in the space to see it. And then once we were in the space I was like, “well, I still can’t tell unless we get some furniture in here”. So much to Brian’s utter delight, we brought in some “stand-in piece” to “play furniture layout”. It’s Brian’s favorite game! If you are wondering if this is normal, I’m happy to report that there is no “normal” in a creative process and where I used to think I was nuts, I’ve realized over the years all creatives must push things to the point of what looks to be a little crazy to get a truly unique home that meets your needs. If you can do it by staring at a rendering then good for you! But I love to be in a space and yes I actually “lay down” on the “bed” (plywood floor) to make sure that this is where I want to sleep, and you bet I’ve been known to tape up the height of the sconces on the exposed framing. There is a massive difference between what works on paper and how you want to actually exist when you are in your home. A lot of it has to do with the views in every direction, natural light, and how you walk through and live in a space – a practice you just can’t predict on paper. So here are some of the furniture layout options we tried out… The Straight-On Sectional + Floating Dining Table
Sure this “works” but it allows for very little extra seating as the path in front of the fireplace would be a thoroughfare so putting a large chair there would be hard. Besides, we aren’t going to have a TV there and putting your back to the scenic doors, with the huge view to the yard full of trees felt wrong. You WANT to look out, not crane your head to look behind you. And it was just a ton of wasted space. 
Where my brother is, is where the big scenic doors to the backyard will be. Where the big window is, is close to where the entrance into the new added sunroom. Again, this CAN work and looks TOTALLY FINE, but when we were there all of us wanted to look outside, not at the fireplace. The (Pretend) Two-Sofas Facing Each Other
Pretend there is another one facing that sofa. I think it should be noted that the sectional is HUGE – like 10′, which shows you the scale of the room. So two facing sofas could work IF the dining table weren’t floating, because it’s weird to have the back of a sofa so close to the table. It’s like we aren’t in a loft. Surely there had to be a better solution? The Sofa + Chaise + 2 Chairs
Now, this configuration actually worked with the table floating there. A pretty backed sofa (like 8′ – 9′) with an open-backed chaise facing the fireplace and with 1-2 accent/club chairs. When we all sat in this configuration there was enough pass-through space to create great flow and it was open to the future view to the backyard (which is on the right – that will be totally opened up). All of us liked sitting in all those seats – the view from all of them is pretty and makes us feel part of the rest of the house, open to the view but still provided a t on of seating. But I still wasn’t psyched about the floating table and it just seemed like there HAD to be a solution to make that table more intentional. It felt like it was in between two doorways, like floating in a nebulous zone. So then I had the thought that we could put a nook in the corner IF we could move the entrance into the family/media room. 
So as you can see above that corner could be a perfect area to be built-in, but we have that darn double door to the family room (which were vintage and AWESOME). But what if we just had one door? could we fit a nook in that corner then? Of course, when we were there all the construction supplies were in that corner so we couldn’t move the table to test it out, but it felt pretty darn great. Brian couldn’t picture it at first but I knew it could work. Then I remember that we actually did just this at the Griffith Park house. 
See? Corner nook, right next to a doorway, under a window – it’s exactly our layout. Once Anne confirmed that we could fit it all in I was SO EXCITED. This means we have even more flexibility for the living room furniture – and next time we go up we’ll be able to finalize our furniture needs, see what we already have or what we need to source. 

I’m so excited about that corner. Not only will it be where we eat breakfast and dinner, but homework, games, and general hanging out with friends (FRIENDS!). Everyone loves a booth. The one we have here at the mountain house is – ahem – HUGE – so the four of us all end up just sitting in one corner. This nook will sit a roomy four but can go as big as 6 if needed. It’s also a great “kids” table when we have friends and family over, so the grownups can be in the sunroom (which could seat 10) while the kids eat here. Anyway, things are trucking along – permits are in, floorplan is DONE, windows, plumbing and lighting are being finalized right now and we just found our vintage island that I had totally given up on. More to come. xx The post The Farmhouse Living Room Layout Challenge – Playing With Real Furniture In A Demo-d Space Because The Creative Process Can Be Weird appeared first on Emily Henderson. Originally from Emily Henderson https://ift.tt/2SqmPBS 
Earlier this year Emily wrote this post and posed the question, “what do you wish someone had told you before you renovated or designed your home?”. Not surprisingly you guys delivered some juicy tips and cautionary tales (seriously, there were over 400 comments!) and there is no way we couldn’t share. In fact, y’all gave so much great advice and “buyer beware” tips that there were far too many to include in one post. Don’t worry, that just means that we will keep this series going (if you guys are into it) and we decided they would be best digested according to room. So today we have compiled every kitchen-related design mistake that have been lived and learned by you, our lovely EHD readers. These tips are guaranteed to save you time, money, sanity, or all of the above so you renovators and DIYers definitely don’t want to skip this one. Here we go. On Cabinetry
From Teresa: Stained wood cabinets are much easier to keep clean and maintain than white painted cabinets. I have painted cabinets with both the expensive pro classic enamel paint and a gloss wall paint – both types chip easily and have to be touched up. I would choose stained wood any day over maintaining a paint finish on cabinets (my cabinets were already painted by a previous owner both times so repainting was cheaper and faster than stripping the cabinets and staining the wood). From Leslie: I wish I had known to seal (front, back, edges) the scribed MDF apron cabinet-front surrounding my farmhouse kitchen sink. Water inevitably drips down the front of the sink when a certain someone (to whom I’m married) washes/cleans up. Over time, water drops damaged the MDF, which made the paint bubble. Eventually, I will have to replace…and the paint will not match the rest of the cabinets. So I will have to have all cabinets re-painted. Caulk could have helped delay this process too. When I replace it, I will order an extra cabinet front, have them both scribed-to-fit, and painted (at the same time) as a backup replacement for the future. It’s cheaper than a new husband. From Julie: Make sure to leave about an inch below the ceiling and the top cabinet in case the ceiling isn’t level from front to back. I put mine snug to the ceiling with flip top cabinet doors on top. They won’t open all the way because of the pulls and the cabinets won’t stay open bc I can’t get them to 90 degrees. From Sarah: When planning drawers/shelves/cupboards, really take inventory of your stuff and think about where it’ll all go. From Bee: We renovated/gutted our old New England carriage house in 2004-ish. I wish someone had told me we didn’t need upper kitchen cabinets. We have plenty of storage, and they distract from the other features. Huge regret. From Rebecca: Highly recommend outlets in cabinets, and on the side of kitchen counters/islands. So handy in the kitchen and bath (in cabinet allows you to keep your hair tools plugged in, which is amazing). From Kim: Tell your cabinet maker what kind of sink you are putting in your bathrooms. We had a cabinet replaced in our powder room/half bath and didn’t tell him it was a vessel sink. It’s way too high for kids even with a pull-out step built into the toe kick of the cabinet. From Missy: One of the best things you can do for your kitchen is add under-cabinet lighting. Using smart plugs and making them Alexa-enabled is a game-changer when you have messy hands from cooking. On Flooring
From Leila: Start with the walls and the floor. If the previous owners had wallpaper, get rid of it, as it will take one more coat of paint while you’re renovating and look lovely for five minutes but then start bubbling in the steam of cooking – at which point you’d have to hope and pray your new kitchen survives workmen trying to remove paper and plastering around your new units. Same goes for floors – always do them first and then install your new cupboards, unless you’re only planning to put some lino down. Also, painting existing cupboards is only a good plan if they are wood – never mind the tricks of getting a special primer to paint over laminate – just cut your losses. Any kind of stick-on thing does not work – tile paint/tile stickers/worktop “wraps” – and will end up falling apart and looking terrible and being a complete nightmare to remove. Also From Leila: Sanding the floors is always worth it and looks beautiful, no matter how awful the boards looked to begin with! Plus oil is much easier and more forgiving than varnish to apply, can be patched easily, and has a lovely natural finish that brings out the wood’s character. From KJ: Always run all of your flooring under every cabinet and into every closet. It allows you (or future owners) the option of moving things around without having to redo all the flooring (so wasteful). Having the same flooring in closets allows a “secret stash” of matching flooring if needed in the future to fix/patch anything. Always buy an extra box or two of your flooring (or extra carpet). It’s a pain to store but might come in handy for future repairs. From Michelle: Choose how you want your floors to transition (ie: tile to hardwood, hardwood to carpet, etc) before laying ANY FLOORING over your subfloor. From KD: Dark wood floors look beautiful right after they are finished and then are a complete nightmare to keep clean and dust-free. Also, be sure to think about the softness of the wood you use – my parents found out the hard way that the wood they selected didn’t hold up well to high heel shoes and occasionally clumsy people in the kitchen dropping things. From Miriam: Dark hardwood shows every dust mite and crumb. We have dark hardwood floors, we love the colour but we also have 3 kids under 8 so…there is a lot of mopping and vacuuming required to keep the floors looking clean. We should have gone with medium brown or something lighter definitely. From Diane: Think twice about installing heated floors. We have heated floors in the main bathroom and kitchen, under ceramic tile. They only work in certain areas on the floor, which means that to repair/replace them, we’d have to tear up the entire floor. It’s just not worth the expense of having the little luxury of walking on heated floors for the few minutes you’re in the room. Slippers are cheaper. On Lighting
From Brigitte: In an older home when installing new ceiling lighting that uses LED lighting, know that you will need to replace the old dimmer switch. I did not know you need a special dimmer switch that works with LED lights or the LED light flickers or does not turn up to its full force until a new dimmer switch is installed. So if you are installing new tech in an old house make sure the new tech is replaced from beginning to end. From KD: Upgrading the lighting can change an entire room (and be prepared to find out that previous owners cut corners on electrical work). From Heather: Recessed lighting can be really harsh and not give great light, particularly if you have low ceilings. LED light fixtures are often too dim and it’s hard to figure out the right temperature (3000k? 4000k?) for your house. I prefer lighting with bulbs so I can change brightness and temperature. Plan for overhead light, task lighting, and ambient light. Under-cabinet lights are awesome. From Brandi: Test your lightbulbs before installing canned lights. I installed 8 canned lights last year and put in white but now I wish they were a softer white or yellow. I wish I would have bought different ones and tested them and then I could have returned the ones I don’t want. I now don’t want to spend money for a second time for 8 different lightbulbs. From HKW: Think about where you might want your electrical. I was very focused on choosing light fixtures but realized very late in the process that we needed an outlet in the pantry and had to get that added into the scope of work. I wish we’d also added an outlet inside the bathroom vanity to plug in ugly toothbrush chargers and that a couple of our outlets were just a wee bit higher or lower to accommodate furniture. On Choosing Materials
From Allison: Pick out all your materials. I mean everything, from the water barrier on the outside, to the windows, cabinets, etc. Many contractors will use the cheapest and pocket the difference. From Kathryn: Beware of doing a small refresh if the options you are choosing will not match your eventual vision for the space. I picked countertops for a kitchen refresh that worked with my cabinet color, but hated the cabinet color and changed it a few years later. Now I’m stuck with countertops I no longer like! Better to save up and do it all at once, or be cognizant of what your eventual plan is so that you make choices that will work with your long term vision. From Kate: Don’t use expensive items like custom window treatments as your chance to add color/pattern. When you hate them a year or two later you’ll be stuck with them unless you have no budget/don’t mind the waste. From Lynn: Black granite (or dark wood floors) show every speck of dirt and dust. Don’t do it! From Kristine: I wish someone had told me that tearing out our nearly all-white kitchen and moving to stainless steel appliances and dark granite countertops would suck all the natural light out of our kitchen. For someone who likes a light-filled room, this really threw me. Thankfully we went with a medium-light tone cabinet which kept the kitchen from becoming a cave. From Amy: Pay extra for durable kitchen countertops. We cook, spill red wine, have kids that color on bar, etc. Porous surfaces are too stressful for the type of living we want to do in our home. Marble is gorgeous but I need to be able to squeeze a lemon when cooking and not have a panic attack! From Heather: If you want to keep a surface clean (like kitchen counters), then make sure it’s a surface that actually shows that it is dirty. If you don’t care if it’s clean or not, then pick a surface that hides dirt/stains/etc. On Designing For Your Needs
From HerselfInDublin: A pull-out bin in a lower cabinet in your kitchen is the single best thing you will ever do for yourself in your home. And the smaller the kitchen, the better an idea it is. Also from HerselfInDublin: Also, you do NOT need a draining board. No draining board in the history of kitchens has been aesthetically pleasing, empty or full. They eat up usable countertop and as their sole function is to have stuff sitting on it draining, that’s what you do with them so you constantly have unsightly dishes ruining the look of your oh-so-thoughtfully designed kitchen. I didn’t put one in and as a result, I never leave stuff to drain – I actually dry it up (twelve years in and I’m still astonished by this, but it’s true). You can get portable drying racks that you put up and take own, but honestly I just use a tea towel which I then hang up to dry because who would leave a wet tea towel permanently on their countertop? Not one visitor has ever noticed I don’t have one, either, even when they’re helping clear up. Do yourself a favour, leave it out. From Karen: Those spinning racks in corner cupboards are useless! Just do a shelf! Also if (like my kitchen) you have 2 of them then put the access on the other side so it’s not a corner! P.S. From EHD: A few people do like their corner spinning racks so it’s really just preference and something to think about. From KD: If you entertain a lot or have a large family – two dishwashers. They get way more use than a double oven. From Sarah: Plan around dishwasher loading/unloading. What will the flow be in putting away your most commonly used items? (Love that I barely have to move when unloading the dishwasher, despite a big kitchen.) From Bry: Beware the too wide drawer! The trendy ones that are half the length of your countertop or whatever. Super annoying to work in the kitchen when you have to keep telling people to move so you can open a drawer even several feet away!! More width standard drawers but deeper to fit stacked pans or boxed pantry items are easier to work around. From Riki: If you use a garbage slide-out, make sure it can be open at the same time as the dishwasher. For example, not either or due to a 90-degree angle. I was shocked at how often I want to access the garbage/compost/recycling while cleaning up the kitchen. From Caitlin: The best advice our architect gave us was to make the house we want and need based on how we live, versus trying to keep up with the Jones’ (neighbors). This helped us stay within our budget and while we didn’t add lots of square footage, we were able to splurge on a beautiful kitchen with Heath tile, a Wolf range, etc. From Eva: If you cook often, you need a full-size range hood. Most range hoods only cover half of the range (in terms of depth – they will cover the back burners), whereas most of the cooking happens on the front burners, which won’t be covered. We recently changed to a full-sized hood, and it made all the difference with regards to minimizing cooking smells and grease. Time and time again, I see kitchen designs even on EHD that don’t have hoods, and I always presume these designs must be for people who do not cook. Hoods are essential, in my opinion. Also from Eva: Open shelves next to the stove will require constant cleaning if you cook. Same goes with art or mirrors (???) behind the stove. From Sheila: Consider accessibility options, even if you don’t need them now. There may be a time when you’d like to host an elderly family member or when you or a family member faces mobility options during an extended recuperation. Having a bathroom, including a walk-in shower with space for a bench and a hand-held shower head that can be reached and controlled by someone seated on that bench, on the main living floor is highly desirable as is a means of entry from the car parking area into the house with a minimum of stairs. Depending on the area, light switch/doorknob heights may be set by code to be at wheelchair-accessible heights. If not, it should be considered anyway. From Lisa: Avoid a kitchen with only one entrance/exit so more than one person can be in the kitchen without bumping into each other. Have specific plans for locations for trash, recycling, composting, and dog bowls. Also from Lisa: Plan a “drop zone” for backpacks and purses and groceries. Imagine the trip from car to kitchen with armloads of groceries and adjust accordingly. From Ellen: The 2 BEST things we did in our kitchen remodel were adding a small prep sink in the island and having a pull-out sprayer faucet at the main sink. My SIL does (did until Covid?) so much entertaining and it has always been a struggle to get to the single sink (which is often piled with big platters and such). We have a small prep sink directly across from the fridge and our big sink under a window next to the dishwasher. I am thankful every day for that pull-out sprayer and prep sink! On Hiring Help
From HKW: Choose your GC first. We had to have some structural work done and had already contracted with an engineering firm (the same one we had evaluate the house during the buying process) before we landed on a contractor. We thought that would move things along, but it actually caused some communications issues about who was going to do demo and the order of operations and ultimately resulted in delays. If we’d had the contractor in place first, they would have managed the engineer and been able to bid the job more holistically as well. From Tara: We did a full renovation of our home (north Texas) in 2019. We utilized an interior designer (who is also a dear friend) and I think that was the #1 tip I would share. If you don’t think you can afford it, you’re wrong. The time and frustration she saved us along with her relationship with our GC are priceless. Not to mention the intuition they had about things as we went along that they just took care of and we didn’t have to stress about was SO valuable. From KD: You WILL regret working with any contractor who presented you with a plan that was much cheaper than competitors. There is a reason they are cheaper and it’s usually because they cut corners on things like permitting, qualified labor, cleanup, etc. Quality work costs money. If you are looking to save or really can’t afford to contract out with a quality contractor, either wait or DIY. From Greta: If using a general contractor or a design build firm, ask about the subs! We did a beautiful renovation on our home using a design build firm that we loved – except the HVAC! Not sure why they chose the subs and equipment they did, but in the years since when we’ve brought in our preferred heating and cooling maintenance company, they are left scratching their heads on the HVAC choices that were made. From Justin: Don’t expect the plumber to know how far the tub should be from the wall, or how high the slide bar should go. Do your research and be ready for everything so that you’re not making 8 am decisions on the fly. Also from Justin: Tile guys and contractors play it safe. Playing it safe = big grout lines. If you want thin modern lines, have that conversation up front. They may prefer a certain tile to achieve your vision. From Katie: I wish I would have really understood how construction loans work – but from talking to our title company manager (the title company disperses the funds for the draws), there is a lot of variety in bank rules. Our bank is a more difficult bank to work with for construction loans. Because we kind of shared the responsibilities of the general contractor with our builder, we had to pay for almost all of the downpayment out of pocket and wait to get reimbursed when it was complete. So we were paying out of pocket for 50% of flooring, cabinets, countertops, tile, and 100% of anything purchased by ourselves like light fixtures, and didn’t get reimbursed for several months. That all adds up to a lot!! It would have been better to be prepared for that. Also From Katie: Again, this is specific to our lender – but it was something I didn’t even realize that we should have asked our lender about – how they determine completion and if they will pay draw requests. Some lenders are easier about paying draw requests than others. Our lender uses an old school percentage-based completion percentage worksheet – old school like the pdf looks like it’s been copied/scanned a bunch of times – and we had trouble getting one of our draws approved because our initial down payment for the plumbing/HVAC (they would pay those down payments) were throwing the entire percentage completion worksheet off. So we needed to be drawing say 40% of the total loan amount, but they were saying only 30% was complete, so they didn’t want to approve it. It was a huge headache. After I got that draw through, I made them send me the completion worksheet (the old school scanned PDF) and made sure that all future draws were right in line with it….although the completion % worksheet definitely had problems – like it didn’t account for major utility expenses at all, even though they were 7% of the total construction cost. I understand all of this a lot better NOW and in the future will never use a bank that uses this type of construction completion % worksheet for a construction loan. From Rusty: Treat your tradies (contractors) well. They like you = they go the extra mile. From Cici: Never, ever let someone else (i.e. your contractor, designer, project manager) sign off on the final order of kitchen cabinets without you seeing and agreeing. Despite having detailed mockups, a list of cabinet dimensions and details, our contractor seriously messed up our kitchen cabinets and we had to pivot or delay the project another month. From Viktoria: Keep a very close eye on the budget!! and have regular meetings with your main contractor about money and where you are compared to what has been budgeted. They will not like it, but at least you know what is happening. The biggest anxiety about a renovation is when you feel like you are getting ripped off. Also from Viktoria: Put everything in a contract, never agree to anything based on a handshake and have a construction attorney lined up just in case!!!! You might not need it, but when you do it is very important to have someone protecting your rights. If you disagree with your contractor on how to handle an issue, have a home inspector come and give a third-party opinion. They will only charge a couple hundred dollars, but it will be the best money you have ever spent. From Mary: Be the annoying (but not too annoying!) client to a contractor. Walk down the work regularly that it’s all matching up to your vision and what you discussed. Ask questions (with pictures if communicating via text or email!). It is their responsibility to correct things they have done incorrectly, but it’s much better for the overall schedule if they are caught and corrected early. My mom gained a foot in her laundry room by catching a recess that was framed out that wasn’t needed for her house’s HVAC design (townhouse construction but each unit was slightly different). I caught several small things that they were able to correct throughout the process rather than waiting until the end and adding time to when they were out of my hair and I could enjoy my space! Also From Mary: Communicate your expectations for working hours if you are still living in the space but also be realistic. They probably can’t work around naptimes, but they can work around weekend events at your house (like my daughter’s 3rd birthday party), finishing each day by your dinner/bed time, etc. More Good To Know Tips
From Rusty: Plan in environmentally friendly and passive solar changes. You’ll save $$$ and the planet. Gotta say it… THERE IS NO PLANET B. That means no garbage disposal, outdoor clothes drying space, a place for a composting system, LED lighting, solar panels, an inverter system (battery storage if you can afford it), windows facing the right directions and exclusion of windows for the same reasons, no inappropriate roof colours (light for LA to reflect the heat), and plan on choosing and installing energy-efficient appliances like heaters, cooling, washing machines, etc, insulation everywhere you can squash it, soooo many more things….basically…. THINK FIRST AND CHOOSE FOR THE PLANET because it saves your hip pocket too! From Emily: Take some time to learn some DIY skills, but know your personal strengths and weaknesses and bring in the pros when needed. Ask your handy family and friends to guide you while you’re learning, watch some YouTube videos, there’s a lot you can and should learn how to do. From Rebecca: Do not start until everything is ordered!!! Product delays held up A LOT in several projects, and many custom items require lead time. Didn’t think about that when I was starting out. Also from Rebecca: Combining projects saves so much money too (for example, having the tile guy come once for multiple bathrooms or kitchen/bathrooms saves $$$). From Jill: 1. If you can afford it, move out of your home during construction. I had a meltdown in the depths of winter while we were living in our home, our ONLY toilet backed up and, yes, I had to use the construction porta potty. From Heather: Never use flat paint if you live with kids. We loved the matte finish but could not clean it. If I wiped it down with anything – water, Magic eraser, etc, it would leave a spot and touch up paint never worked either despite being from the original paint can (I read it might have to do with different temps while drying?). Anyway, now I paint all walls satin or eggshell. Most people know this, but we thought we could get away with flat paint. We couldn’t. From Elizabeth: If possible, I think it is very helpful to live in a house before you do any major work to it. What is important to you and how you flow in your house may play out differently than you think. Also From Elizabeth: Make as many design decisions as you can before demo even starts! I am not good at making decisions on the fly (as may be obvious from my previous comments), and it is very stressful when a contractor is demanding you make a decision on the spot about where the light switches are going to be because the electrician is there now and it is going to cost him and you more if he has to come back. You can’t plan for everything, but you will save yourself time, money, and agony the more you can do ahead of time. Alright my friends, I don’t know about you but I feel MUCH more prepared for a kitchen renovation project than I ever have. I am sure we have only scratched the surface, so if you have more to add please do so down below and let us know what room we should tackle next. xx Opener Image Credit: Home of Allison Pierce | Styling by Velinda Hellen & Erik Staalberg | Photography by Sara Ligorria-Tramp for EHD | From: Working With What You’ve Got – An $8k Budget Kitchen Makeover With A Lot Of Vintage Charm The post Renovating Your Kitchen? Here Are All The Reno Mistakes To Avoid – Crowdsourced From Our Readers Who Have Been There & Done That appeared first on Emily Henderson. Originally from Emily Henderson https://ift.tt/2QNcorw The 2021 #ShowEmYourDIY: 22 DIY Ideas to Transform Your Sad Backyard Into Your Favorite Place5/24/2021 
Weeeeee’re back! It’s our annual update to one of our most popular posts….DIY outdoor projects. There really is something so special and inspiring seeing people take charge of their own homes and let their creativity flow. And since last year really showed us the importance of not only our homes but our outdoor spaces, a lot of people really made a concerted effort to maximize those spaces (even my own dad which you are about to see:)) So here are 22 spaces and projects to help inspire you to maybe get those hands a little dirty and create an outdoor space you can really enjoy this summer…and I promise you WILL be inspired. Let’s start with a project that anyone with a paintbrush and a dream could do… Two Joyful And Modern Deck MuralsOk, now Liz Kamarul is an incredible artist/designer. If you want more proof take a look at her Instagram. She also has a deep love for checkered patterns (we are the same in that way:)) #foreverchecked 
So in true Liz fashion, she decided to paint a mural last year on her wooden deck. She started with using two coats of paint and primer and then just let her mural evolve naturally (I’m extremely impressed as I would have absolutely needed a plan. But that’s clearly the difference between artist and non-artist). So if you love the design from last year that’s how she did it. But this year Liz wanted to give her deck a fresh look and did this very cool checkered pattern in even cooler colors. 
The lighter peachy color is Sunset Drive by Behr and the darker color is True Copper also by Behr. This pattern seems pretty user-friendly. So if you are wanting to do something cool/modern to your outside patio this may just be it! Here is a highlight on her Instagram that takes you through the journey with more tips. Now let’s take it up 5000 DIY notches and talk about Ursula’s Greenhouse… The DIY Greenhouse We All Need NowI also am in awe and cannot believe this project. 
This is not a beginner DIY but if you are handy (or someone in your life is) you too could have a greenhouse like this one. Ursula has a detailed materials list here but for the cliff notes version, she painted her already great shed and then added this wonderful little greenhouse to it using recycled windows to keep the budget manageable. So for about $1000 Ursula was able to make this little slice of heaven! How great is this before and after?! 
If you aren’t quite at DIY greenhouse level, she has A TON of smaller projects that are much more beginner-friendly like this DIY Copper Obelisk Trellis or this Garbage Can Privacy Screen. The Cutest Vintage Salt BathAs I was writing this post, I remembered that my dad literally just finished a VERY cool DIY project and really wanted to share. He didn’t say it but I could tell he was excited that he was going to be featured:) So here is his new, totally DIY’ed Salt Bath and Shower: 
Shower Fixture | Solar Pendant Light “So my neighbor was getting rid of her clawfoot tub. I thought it might make a nice outdoor bath at my place so I bought it from her ($200 a steal). I figured a good spot was across from my guest quarters in the backyard (which I just finished) because I had access to hot and cold water. My girlfriend likes to take salt baths so I figured it would be used plenty. I thought I could just drain it with a garden hose but as fate would have it I was very close to my sewer line. After a little digging, there she was. What luck. I have never tapped into a sewer line before. When I did I was promptly made aware of the definition of the term “fecal gravity”, yikes! I would suggest hiring a plumber for that particular chore if you want to connect to your sewer line. It was not pleasant and once you cut into it you are at the point of no return. I will save you (and me) the graphic details of that day. (I am forever scarred). Anyway, as you can see all is well that ends well. I raised it off the ground on a huge piece of lumber I’ve been lugging around forever. It gives it character. The teak floor mat warms it up a little. I also made a floating shelf out of a piece of alder wood I had laying around. I am quite pleased with the outcome. It took me about three days to complete. The most expensive part was the cedar enclosure. The price of lumber has skyrocketed. I was shocked. What would have cost $500 last year was $1000. Yikes, again. That’s life I guess but painful. Now for a hot outdoor bath. Woo hoo!” 
To get a little more technical, the sides were made like boxes to be both pretty and hide the plumbing on the shower side (he made sure to make a little trap door so he could get to the plumbing. Then for the roof, he used clear corrugated plastic that’s being supported by his cool wooden geometric design. Also, the rest of the decorative pieces were all picked out by his girlfriend. I think it turned out so great and I’m so proud of him! (P.S. I never knew about his sewage issue… YIKES is right and major palm to face, dad) 

Ok, now get ready for some real DIY magic… A Totally Classic “Marble” Patio FloorNope, that is NOT real marble on Fariha Nasir’s patio! 
This very talented DIYer handpainted this faux marbled flooring and I think it looks so awesome. Large scale diamond floors are never “out” as they are completely classic, but they sure are “IN” this year and it’s all about them being painted. If you go to this highlight on her Instagram, she walks you through the main steps:
I asked Fahira if she could give us all tips on how she got her awesome marbled look and she delivered: 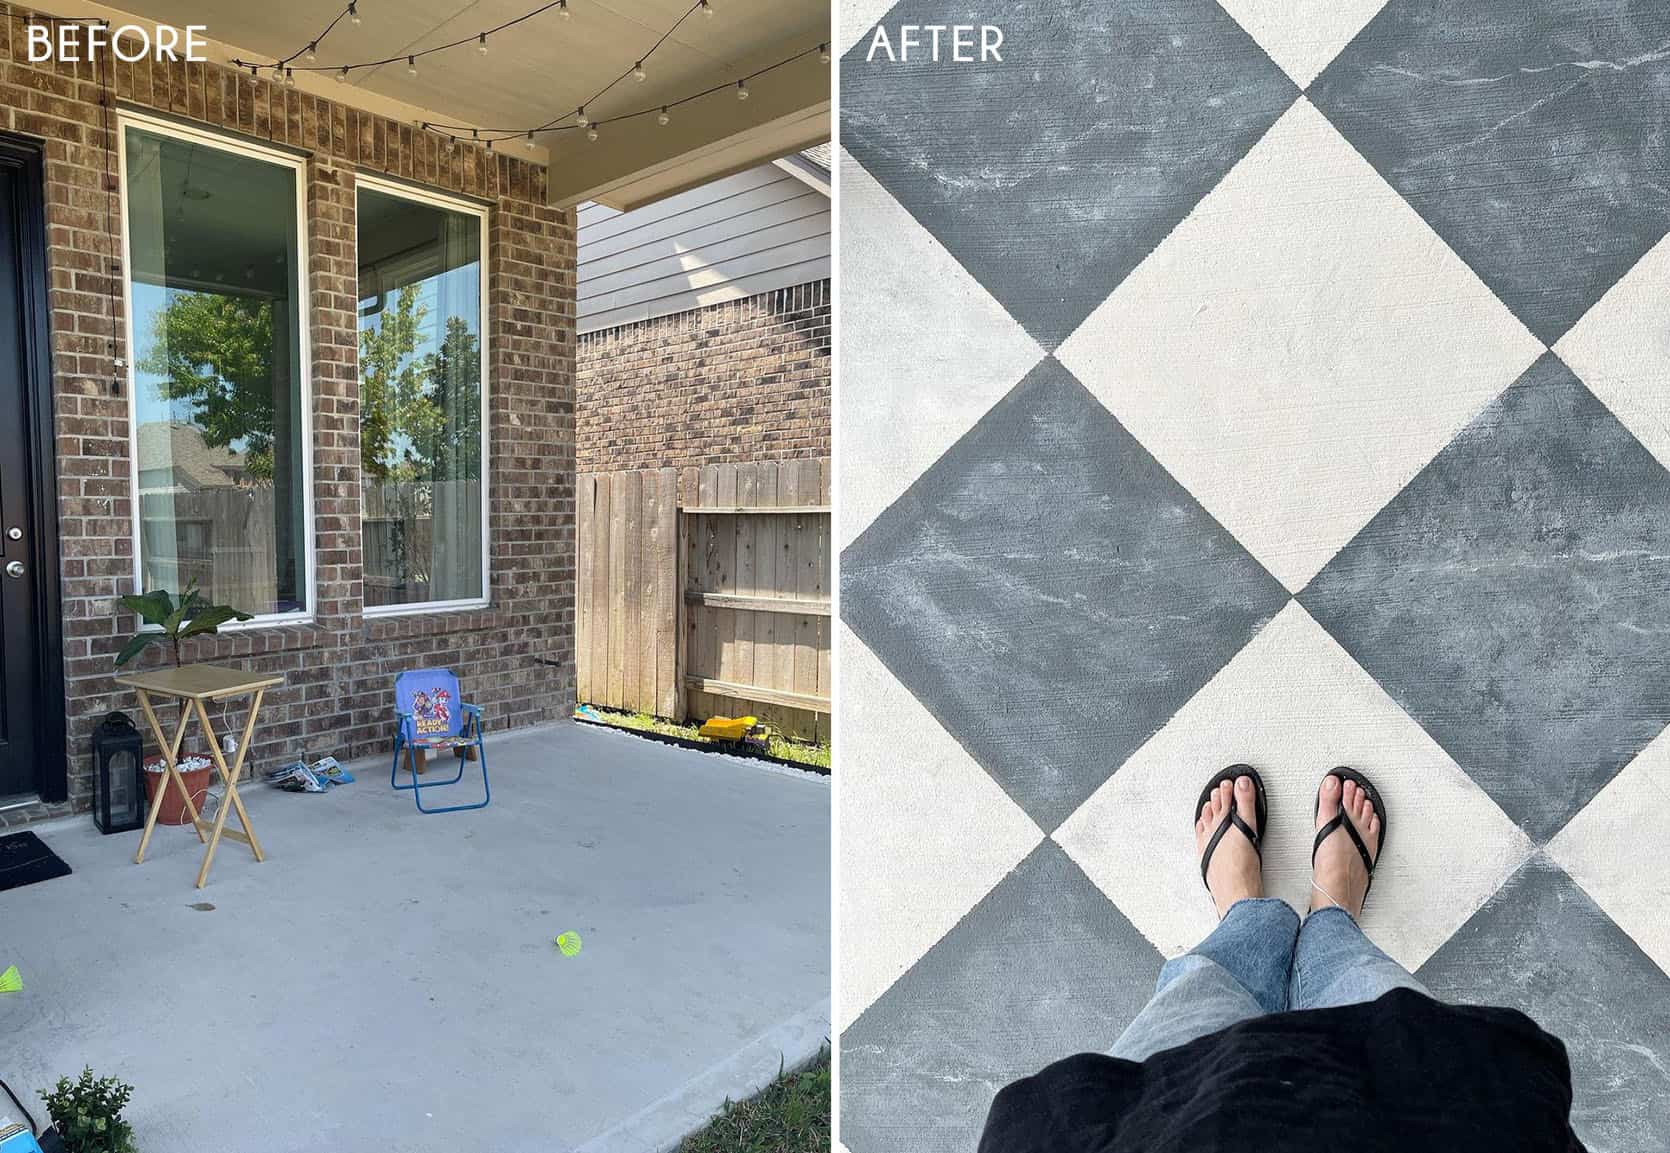
1. To get the marbling effect you will need to mix a few different shades of the paint colors you’re working with. The first two shades will be the paint straight out of the can (the base colors of the checkered tiles). For your third shade (dark 2), mix 1 part of the light color with 2 parts of the dark. For your fourth shade (light 2), mix 1 part of the dark with 2 parts of the light color. Now you have four different shades to work with. Thank you, Fahira! She also has a marbling highlight too if you are a visual learner:) O and check out the rest of her backyard here! A Stunning (User-Friendly) PergolaNow…this incredible pergola! 
Last summer, Tiffany of Pretty Real, decided it was time to tackle her backyard and create a dream lounge/entertaining area. She started with extending her concrete slab (the more budget-friendly option to a floating deck at $2,500) to fit her soon to be DIY’d awesome pergola. The idea of building a pergola has always been intimidating to me. I mean what if it came crashing down because I didn’t support it correctly?! Luckily Tiffany found Toja Grid. It’s a company that sells those black brackets you see above. This way you can confidently DIY a pergola without any fear of it “unexpectedly falling down.” Tiffany wrote a whole post on it here but the dollar breakdown was around $800 for the Toja Grid hardware and about $300 for the lumber. So for $1,100, her whole family can enjoy endless summer nights in their backyard under that pretty epic pergola. 
Two updates in one post? Yep! Tiffany said that staining the pergola black was always the plan but you know… life happened so they waited a year to finish their project. Both versions look great but I LOVE the black stained version. If you are thinking about staining your current pergola for a needed facelift or plan on DIYing one after seeing this, here is the stain she used. However, if you want some more info check out her post about the whole process here. Also yesterday Tiffany wrote a post about her DIY outdoor movie theatre (What can’t this pergola do?) The Perfect SunroomNow let’s head inside, we’re just dipping our toes into “outdoor” but it’s actually a sunroom because that’s kinda outside, right? 
Fun fact, we actually have already showcased Avery’s handwork in the DIY kitchen post where she transformed her kitchen for $250. But when she heard about our DIY outdoor space callout, she emailed us this room and it was too good to pass up. We play by our own rules and definitions here. This awesome transformation took six weeks and cost $650 (minus the rug and curtain dye). She first painted the space with Sherwin Williams’ Extra White, the accent wall with Aubusson Blue from Annie Sloan and the floors with gray epoxy paint. She then, with the help of her brother-in-law, built a bed swing, transformed free tree stumps into coffee tables, and then made custom olive drapes by dying basic white IKEA curtains. For the rest of the pieces, she either owned them or thrifted. My biggest question to her was how did she feel secure about the swing and her advice was to just make sure that “you screw your eye hooks into ceiling joists.” Noted for the future. It looks awesome and if you want more info go here and for the swing DIY go here. Shall we officially head outside again? Stenciled Concrete (YES it’s painted)
I mean this entire transformation is insane but likely the most impressive part of Kristin’s outdoor space is her DIY concrete stencil. Ya’ll (I’m stealing “ya’ll” from Caitlin:)) the total cost was $90. Yes, your eyes don’t deceive you! So for under $100 you too could make your bland gray concrete into something so fun and special. Kristin has a whole highlight on her Instagram for you to look at and learn all of her tips and tricks. The Gravel Marvel
When Melissa and her husband bought their 90+-year-old home they knew a lot of love was needed for their backyard. So over 2.5 years, their yard went from falling apart to looking brand new. The first thing they did was tear down the old fence. Instead of rebuilding it, they repurposed some of the pavers from the ground and created a small retaining wall (needed due to the sloping of their yard). They then dug out all of the grass and built those great garden beds and added pea-sized stone all over. The last DIY was that awesome cedar walkway. Since the rest of the yard had gotten a facelift, they decided to say goodbye to the cement walkway because it looked out of place. It was definitely the right call and the whole space looks fantastic. Like I said before, this project took them about 2.5 years and a rough total of $2,700. Well worth the wait! Let’s talk more about gravel, shall we?? Stairway to Backyard Heaven
Cathy and her husband needed stairs in their backyard and boy did they turn out great. Here’s how they did it and some general advice for all of you: “We made nine based on the steepness of our slope. Each project would be different based on the slope. So the diy-er would need to calculate the rise and run of the steps. To determine the number of steps, measure the total height in inches from ground level to upper level divided by 6 (the height of each step). This will give you the number of steps you need. Then measure the full length of the stairs (in inches) by the number of steps. This will give you the run of each step (tread width). For our project, we made nine steps and the tread width was 15.5” (if tread width is longer, then make side pieces longer than 18”). Each step is basically a U-shape. To make a step, we used a circular saw to cut the 8’ long pressure treated lumber into 18” and 24” pieces. Our steps were 24” wide and we used 18” pieces for the sides. 
We pre-drilled holes for the 8″ lag screws that would attach the front board to the sides. We drilled the holes 2.25” in from the edges. And since we wanted the bolts flush with the wood (wouldn’t want to kick a bolt with a bare toe in flip flop), we used a countersink bit after predrilling. Use a ratchet wrench to tighten the 8” lag bolts. (This part can be a little tricky because you need to secure the wood pieces when drilling and tightening the bolts. We eventually propped up each step and I sat on it like a sawhorse while my husband tightened the bolts, haha.) Because the first step is secured to the ground with rebar, you’ll also have to drill two holes at the back of the first step. After drilling the two holes, spray any freshly cut sides with wood preservative and let dry (takes a few minutes). Place the first step where you want it and check to see if it’s level. Then you’re going to hammer the rebar through the first step into the ground for stability. Once the rebar is flush with the board, double-check the step is level and fill the step with dirt about halfway. Then proceed with making the second step. Before securing steps on top of one another, spray any freshly cut sides with wood preservative. Once dry, place the second assembled step onto the first step, making sure that the steps are level. Use a measuring tape to place it at the appropriate tread width. Again, ours was 15.5”. Mark two holes at the top 1.5” from sides. Predrill the holes going through both the second and first step. Use a countersink bit again and then use a ratcheting socket wrench to tighten the 10” lag bolts. Fill the step with dirt half-way and repeat for the rest of the steps. After all the steps have been built, fill with pea gravel. 
Materials List: Tool List: Basic Instructions: The Modern Wall DisguiseNow I’m pretty excited to show you this next DIY because I feel that A LOT of people deal with similar less-than-ideal backyard plaster walls. This is how Anita made her’s nearly disappear. 
Anita decided she was tired of looking at her old plaster walls so she and her husband DIYed these very cool modern wall panels to help disguise them. They started by digging holes for the posts followed by pouring a bit of cement into the holes to create a foundation. Next, they sanded the posts down, set them into the holes and finished by securing them with filling the holes with gravel. Once the posts were all set, Anita and her husband painstakingly sanded the rest of the slats with an electric sander and then decided to leave them natural instead of painting which was the original plan. Once the slats were up, she added the flower boxes to add some more visual interest. They also wanted to give their cement pad a fresh look so they painted it with a soft grey. In addition to that, Anita learned how to limewash brick so the previous 90s red bricks that would have been in front of the wall now look brand new! Now for the grand total…the fence (all materials included) was $244 and the plants/planters came out to $481. Anita said that weather prolonged the process but that someone could easily do this over two weekends or even a long one (weather permitted). This is really such a clever and budget-friendly DIY. Want another killer wall idea but for a patio?? The (Faux) Green Wall of Privacy
Bev is one of the lucky few in New York (Brooklyn specifically) to have outdoor space (especially now). But as expected in a big city, it lacked privacy. In a stroke of genius, she decided to figure out a way to create a green wall and I think it’s safe to say she nailed it. With a bamboo fence, a faux trellis, and zip ties, her patio looks like a slice of serene outdoor heaven. She calls it “The Easiest DIY Green Wall Ever” but it’s also the smartest. Since NY experiences all of the seasons, her bamboo and faux greenery should hold up beautifully. This is incredibly renter-friendly (no tools needed), small space friendly and for a rough total of $500, you can make one yourself. She wanted to point out that the $500 is for two panels so if you need only one panel then slash that price in half. Let’s head into a very real garden now… The Sweetest Vegetable Garden
This doesn’t look real with how stunning this photo is but it is and you can build it too! Erin took these purchasable plans and really made a beautiful vegetable garden. I love how that arch and makes it look super special. 
Erin has two blog posts where she lays out all of the planning and installation so it’s as user-friendly as possible. So if you’ve been dreaming about a vegetable garden, this is such a good one. 
The Cutest Budget PoolDid you even summer if you didn’t dip into a pool? Bri thought, no… 
After being inspired by other DIYers on Instagram, Bri decided she wanted to put in a stock tank pool in her backyard. While she and her husband are already very handy, she still did a lot of research, read blogs and watched YouTube tutorials. After all that, she and her husband were confident they could make it happen. To add more style and avoid the pool looking “like a giant cake pan” as her young daughter so lovingly described it as, they decided to build a little deck. Bri said, “from there it was calculating our plans on how to build the deck, level the pool with sand, purchase the wood for not only the structural base but also the top decking that I wanted to have a more modern feel. And then we sealed it.” You now may be thinking, “but how does it stay clean?” Well, they put in a pump system and use chlorine tablets. The pump is hidden underneath the deck and is hooked up to the nearest outdoor electrical outlet. Wanna know the craziest part? It only cost roughly $650 all up. To be able to have a very chic pool for just over $500 is mindboggling to me. They did such an incredible job and I now really wish I had a backyard. Now the next year Bri added to her already awesome yard with DIY BBQ Station. A Modern BBQ Station
It looks so great and solved their grilling storage problems. Plus for a total of only about $300, Bri was able to customize it to exactly what she wanted. She even made the concrete toppers herself! She has a whole blog post of how she did it so if you too are a grill master head over asap. The Dreamiest Stucco Sofa
For the last #ShowEmYourDIY post, we shared two of Sarah’s incredible DIY bathroom transformations and today she is back with a total genius and chic outdoor DIY…the succo sofa. Again with her handy husband Emmett, they were able to build this custom stunner in three days for about $1,000. By using cinderblocks, cement, and a few other materials they made such a special accent to their already beautiful yard. She has a whole blog post on the exact how-tos of the project. While I love my little place, seeing this sofa makes me SO sad I don’t have a yard that I could replicate it in. Someday, right? You Bet We’ve Got One More Stenciled Patio DreamWhen it’s this good we have to show you! 
This was actually a DIY that Em sent me by Jesi Haack and told me we should include. Clearly, I agreed because look at it! For this DIY, Jesi first used this cement cleaner to prep, then washed it away with a hose, and then primed it with this KILZ primer (an EHD favorite:)). If you love that pattern as much as we do then you are in luck because it’s a stencil from Etsy! For the gray, she used this KILZ concrete coating in Slate Gray. She also has a highlight on her Instagram with an awesome timelapse for you to get more info and enjoy. Is it dinner time? Well, it is on Erin’s patio. Build Your Own Dining Table
Erin and her husband built this awesome large table for about $200 (instead of the $1,000 it would have cost to buy brand new). They used this tutorial as their guide and once it was all built and beautiful, they finished it off with Superpaint (an exterior grade primer + paint) from Sherwin-Williams in Extra White. PSA: If you can eat outside then you should absolutely eat outside. Head here for more info on her process. Let’s now talk pergola AND firepit…that is next to a waterfall?! (dreams) Pergola + Firepit = Summer Heaven
Audrey, her husband, and two boys tackled these two awesome DIYs. They started by ripping out the grass (which was mostly moss). Even though it was very pretty, they wanted to make the space more drought-friendly, sustainable and drain better during their Seattle winters. So they hauled in 24 yards of pea gravel to cover the area. For the firepit, they stacked paver stones around an iron ring, laid iron mountain flagstone on the ground and set granite boulders to help create a fire pit zone. To make the area soft and inviting, they landscaped with ferns, hosta, moss, and flowering groundcover. Now for the pergola, they wanted it to be the main statement in their backyard so they chose to use 8×8 posts. For how they installed the posts, she said her husband “raised the posts by himself and I would steady the posts while he mounted them to hidden brackets attached to cement pillar bases he had dug three feet down into the ground.” Easy right? Ha. Once they finished putting up the rest of the structure, the whole family painted the posts Sherwin-Williams Caviar but kept the cedar slats a natural tone. To keep everything looking consistent they also used the iron mountain flagstone underneath the pergola. In total, the two projects took them three months and they spent about $6,500 for materials. A last-minute project Audrey emailed about was the outdoor dining table. Kevin used 4×6 cedar pieces for the base with leftover stain from the pergola. They then spray painted an old tabletop and chairs to give it a fresh look. It looks brand new! All that hard laborious obviously paid off. The Wood Plank Coffee Table Firepit
This is such a chic and easy way to make the most functional firepit ever. Designer Kisha Gianni made this awesome yet simple wood plank insert for her firepit. This way when those flames are taking a break, she can use it as a normal coffee table. Note the two holes on top to make it easy to take on and off. The only tricky measurement you really want to get right is the depth of the pit. You want to make sure that the braces are the right height so when it sits in the hole, the piece is flush with the rest of the coffee table. So if you have a measuring tape, a power drill, and some screws (maybe an electric saw if you can’t get the pieces pre-cut) you are good to go! Also if you are in the market for a firepit head here Turf Oasis
I have questioned the use of turf before. I mean I know it’s low maintenance and saves on water but does it look better? Well if there was ever a case in favor it’s designer Lauren’s poolside oasis. “When we bought our house a little over 5 years ago, the wood deck around the pool had been painted white. The concrete around the pool was a beige/almost peachy color with lots of cracks. I tried several methods for sanding the deck, but the most effective option was an angle grinder with a DimaBrush attachment. I then used a multi-tool with a detail sander attachment to sand in between the cracks of the deck. To say it was tedious is a massive understatement! After everything was sanded, I filled all of the cracks in the concrete and used H&C Cool Feel acrylic deck & walkway coating from Sherwin Williams to paint it. For the most part, I rolled it on, but I had to brush it on along the inside edge of the pool and in between the plastic expansion joints. Next, I replaced the broken and warped deck boards and stained the whole deck with Cabot Australian Timber Oil in Jarrah Brown. The angled part of the fence that really bothered me broke during a storm this spring (how convenient!), so we hired out that job and got that replaced. In order to help the old & new fences blend in a little better, I pressure washed the existing fence and stained everything with Wood Defender stain in Harvest Brown. While you can clearly tell that part of the fence is newer (the color isn’t exactly the same and it is horizontal as opposed to vertical), it is much better than if I had left the old part untouched. Eventually, we’ll replace the other two sides, but that just wasn’t in the budget for the time being. This was clearly a big project but man what an incredible reward. Here’s the budget breakdown: Again a very big project with a lot of DIY labor but for something that will last them years and hours of enjoyment, it was a great investment. In need of garden/patio inspiration on a budget? Well, Cathy is here to fix that. The Perfect Paver Patio
This DIY is seriously impressive, not only for how beautiful it turned out but it only cost $2,000 (not including the furniture). Cathy and her husband kept the deer fence, grapes, and fruit trees but cleared out the debris, added gravel, made garden beds, created the stone patio added a gate and styled the whole thing. Plus, get this…it only took four weeks to complete. This just goes to show that while this yard had beautiful bones, it’s completely possible to fully makeover a space on a reasonable budget and timeline. Head to her blog if you want the total breakdown of the costs and process. Lastly, we have another familiar face, Leigh. Poolside Retreat Makeover
You might remember Leigh from our DIY bathrooms post and her awesome mint green vintage tub. Well, that was just one of MANY projects because she and her husband are renovating their entire home (backyard included). Again, there were a couple of things they hired professional help for like resurfacing the pool and installing an outdoor shower. But the rest was her, her husband and some very kind friends. While her husband resurfaced the pool deck, she DIYed that flower pot wall by painting inexpensive terracotta pots and gave some much-needed love to her vintage patio furniture. For the furniture, she painted the glider navy blue but wanted to keep the circle chairs lighter for visual contrast. To do that she painted the bases white then replaced the old broken vinyl herself (after watching YouTube videos). “It was actually very fun and easy to do. You measure, subtract about 10%, then boil the vinyl strips and they get stretchy.” Very cool and everything looks great. I don’t know about you but I want to be outside and preferably in a pool of some kind RIGHT NOW. A frozen drink sounds pretty nice, too. However, in all design seriousness I, as always, hope you feel inspired to DIY your outdoor space if it needs a little makeover. Also, let us know what you want to see next in the DIY world and we will do our best to deliver. Love you, mean it. REMINDER! If you are looking for more even renovation and budget-friendly goodness including posts and shopping options head to the All Things Renovation and Budget Ideas sections of the site. Opening Photo Credit: Design by Bri Moysa The post The 2021 #ShowEmYourDIY: 22 DIY Ideas to Transform Your Sad Backyard Into Your Favorite Place appeared first on Emily Henderson. Originally from Emily Henderson https://ift.tt/3eCBmQx 

Hello friends and welcome back. We’re so happy you stopped by and we can’t wait to get into this week’s link up. As you may have seen via Instagram, we had a couple photoshoots this week so we’re excited to say we’ve got some reveals coming at you very soon! Stay tuned for that, but for now please enjoy these EHD recs: This week’s home tour is the one that everyone on our team cannot stop talking about…Mila Kunis and Ashton Kutcher’s entertainment barn. While we’re not 100% sure what “entertainment barn” means, this space is super unique and special and gave us a lot of feelings (and led to some debates – do we like grey wood?). We all collectively ooooed and aaahhhhed over the dining room (that plant styling?!) and the kitchen. What are your thoughts??? From Emily: My friend Joy Cho is Domino’s cover star! We’ve been friends for a LOOONG time (I designed her last living room, her studio and nursery/office like 10 years ago), and it’s so fun to see her dream home come to life – and then featured so heavily in a magazine! Check out her office tour here From Mallory: I’m a HUGE Nespresso fan (I drink their coffee every day if not multiple times a day). They come out with fun limited edition flavors on occasion and this month’s flavor is so good that I could not NOT put it here and tell you all about it. What is it you say??? ICED COCONUT COFFEE. I’m drinking it as I type this and I am thoroughly enjoying every single luxuriously silky smooth sip so I had to share. Get these coffees and at $1 per coffee (depending on the sleeve/flavor) they’re SO much cheaper than drinking Starbucks every morning –– and you can recycle the pods. That is all From Ryann: TW: This link is related to drug addiction and drug rehabilitation. I grew up in a small suburb called Simi Valley, Ca which was hit especially hard with the opioid and heroin epidemic around 2008. Ever since it became a massive problem in my hometown. It has never really gone away and I know so many families who have lost children and family members to heroin addiction and it has affected my own family in more ways than one. Just last week someone who I was very close to lost their life to this disease and his family is asking in lieu of flowers that people donate to a charity called Not One More. It’s a charity that started in Simi Valley by a family whose daughter tragically lost her life to overdose and they work to educate the community and give support to those affected. If you can donate that is amazing, but I felt compelled to write this because there is so much stigma around addiction and I hope the more people are informed the more we can help those who are in need of help and support. If you want to learn more about the history of drug addiction and the war on drugs, Chasing The Scream by Johann Hari is incredible and so eye opening. From Albie: It should come as no surprise that as soon as it dropped, I shipped the Hilton Carter for Target collection. The faux plants did not disappoint, but the items I’ve been most impressed with — my new aprons! I snagged both the half & full apron for my husband and I respectively, and I’ll be getting a similar style elsewhere for the mini. The canvas and heather quality is so good — like “I’m surprised it didn’t cost more” good! I can’t wait to get into the garden with my apron, while the hubs is excited to finally have a workshop apron. From Jess: If you are a millennial or just enjoy hilarious people then let me introduce you to Rod, an anxious millennial. I can’t even being to tell you how much fun it was to deep dive into his content. It’s funny, nostalgic, so relatable (well not the corporate job stuff:)), and light hearted. Plus the songs he uses are the best “blasts from the past”. I think it’s easier to binge his content on TikTok but his Instagram is great too. Enjoy! Also From Jess: This fully vaccinated life has made me feel like a new woman and a part of that is wanting to dress up, be bold, give waaaay less Fs about how “loud” I’m dressing. So I bought this incredible dress/gown (that I didn’t think would fit as well as it did) from the Target x Christopher John Rogers collab and I actually wore it to a pretty casual dinner Friday night with High Top Chucks and a leather jacket. 2019 Jess would have NEVER. She would have been too scared of being overdressed and possibly standing out too much. Are we all feeling this way?? I hope so:) O and if it helps I’m wearing an 8. From Caitlin: I just ordered my first pair of summer shorts! Arlyn actually introduced me to them when we shot this try-on post almost two years ago and I’ve been meaning to grab some ever since, but they sell out SO FAST every summer. They’re just under $40, so easy to wear, and the pull-on style means that you won’t be like “oh my GOD I only ate ONE THING why are the buttons on my pants so uncomfortable???” Big fan, highly recommended, and I can’t wait to look as cute as Arlyn did in that shoot Also From Caitlin: Just want to flag that self-tanning sunscreen exists. You know, in case you’re like me, a person who is pale enough to have recently been described by a date as “bioluminescent,” and you’d like to enjoy some time outdoors next weekend without blinding anyone. (PS. If you’re just looking for regular sunscreen, I swear by this oil which locks in my moisturizer while making my whole body nice and dewy looking!) That’s all for this week! Thanks for reading and have a very very lovely Sunday. Opening Image Credits: Design by Joy Cho and Project M Plus | Photo by Bethany Nauert | via Domino The post The Link Up: Jess’s Bold Summer Dress, Caitlin’s Self-Tanning Sunscreen (Yup, That’s A Thing), and Our Go-To Summer Shorts appeared first on Emily Henderson. Originally from Emily Henderson https://ift.tt/3ubzbLl 
I’m unimpressed with my landscape design skills, but that shouldn’t be too surprising as A. I’m not a landscape designer and B. Technically Brian was supposed to be in charge of this outdoor project because “you’ll take too long and make it too expensive”. He’s not wrong, but mostly that’s because unless we want to DIY it ourselves good design takes time and landscape/hardscape design and materials aren’t cheap. DUH. This is a GREAT example of “doing it ourselves” not really panning out. I didn’t have time to really dedicate to it properly, so we rushed things a bit. Before winter came (when landscape work stops) we found a small window of time where we could snag the turf, snag a firepit, and we found the last hot tub on the mountain that wasn’t a three-month lead time. So we threw them together and VOILA! I love the turf, “stream”, and hammock, but the firepit was put in too big the day before the turf arrived, the plants have died because they need “water”, and the hot tub area is surrounded by a dirt patch full of literal dog shit. It’s actually hilarious and we’ve gotten used to it, but when people come over and see the pile of dog shit next to the hot tub, it reminds me that we aren’t quite done with this yard. 
But we did get a new table and while this is a terrible shot of it (It’s Friday morning with an iPhone), we are one step closer to making the lower deck much better. 
It pains me to show you this, but it’s all a process. The old table was an indoor table from Ikea that we happened to have so we shoved it out here and y’all it did not fare well. It was totally disintegrating and falling apart (and became kinda disgusting to eat on). The new table is AWESOME because our needs were very specific – we needed an insanely durable dark metal table and no it couldn’t be outdoor quality wood because the weather is extreme up here and that might last a few years but not 10. Of course, you can put “outdoor covers” on it but up here it will dump 2 feet of snow one day (which comes through from the deck above and piles on the table) and then 4 days later you can sit outside for lunch it’s so warm. So putting covers on and off is annoying, PLUS it’s right outside our scenic doors which means that we would be staring at a big covered table all winter while we hang out in our family room. Finding a black rust-proof metal table that is long enough to seat 8 comfortably and is not ugly is virtually impossible. I found this last summer on Williams-Sonoma (and it’s commercial quality – YES) but it was out of stock before I could snag it. So this year I DID. I know it doesn’t look that exciting, but the proportions are at least modern and I love how seamless it is with the deck. It’s tonal, monochrome, and modern – so now I need to make the whole space look, well, better. I would love the chairs to have a warmer element to them (like wood or wicker) but I also don’t want to just buy new chairs when these are perfectly good and comfortable. New lights, a few plants, style it out with people, food, and fun, and call it a day. 
But honestly, we use the heck out of this yard (upper deck reveal coming soon – I LOVE IT and will NOT be embarrassed to show you how it turned out). We still love the faux grass (real grass is not permitted up here and the bark was driving us NUTS with these two muddy pups). We’ve made some good changes (we upgraded our BBQ, ordered this outdoor kitchen counter instead of customizing anything, and got that dining table). But the hot tub is still surrounded by dirt (on a cement pad) and the chain link fence is not exactly pleasuring my eye. THE DEAD BUSHES
But so many projects left undone. I know I’m slammed designing the farmhouse, so I need to not be so hard on myself but we did kinda have a year to do this… Now I must defend ourselves – where we live (Lake Arrowhead) has had a population EXPLOSION. Being only an hour and a half from LA and historically pretty inexpensive (comparatively), all of LA basically migrated up here during covid which skyrocketed the real estate but also made it virtually impossible to find subcontractors to do small jobs. No one wants to prioritize some lady to build a deck around a hot tub – it’s just too small of a job. Besides, before we were vaccinated and knew that being outside was safe, we weren’t psyched about having people working at our house. That’s all to say that we are moving in two months to Portland and not only do I want to enjoy this backyard a lot this summer, but also we’ll likely start renting it out and as a source of pride, I want it to look BETTER. 
Two summers ago for the reader event (woah time flies), I hired a gardener to plant these laurels along the fenceline to disguise the chain link fence and provide privacy. Normally they thrive up here in both freezing winter and hot summer with minimal care, but they were too new and they didn’t fair well without enough water in the summer/fall to make them strong enough to last through the winter. The ones near them (same plant) had deep enough root systems to live with zero maintenance. So now that we are leaving I don’t trust that anyone will water them, we don’t want to invest in irrigation and yet just digging them out and having a line of turf does NOT sound beautiful. But I feel a bit like my hands are tied. I don’t mind DIY’ing something with someone else, but Brian doesn’t love handy work in actuality (oh… he does in theory!), and we don’t have the right equipment. Besides the days go so fast, the weekends fly, and “building a new fence” shockingly doesn’t get done. I’ve also learned that no matter how much I try to manipulate him (It will be fun! You can have a sundae afterward! We’ll do it together!), forcing your husband to do a big house project that he doesn’t deem necessary is an absolute lose/ lose for your weekend and your marriage. He doesn’t care about the fence – he thinks it “goes away” and maybe he’s right. He normally is. He doesn’t see the point in investing in making it better. So without a handy person, a gardener, or an enthusiastic husband I’ve left to actually do this myself. And my fencing skills go as far as playing Peter Pan with sticks with the kids. Oh and then worse/final of all I found out that we aren’t allowed by the HOA to build a solid fence – it can’t be enclosed. And let’s face it chain link fences do the job just fine. They keep the dogs in, coyotes out, and they are zero maintenance. Besides, we already have it, and spending $7-10k putting up a nice-looking wood fence that we might have to pull down seems crazy when we are frankly not that interested in investing more into this property as we have bigger fish/farms to fry. 
You can barely see the chain-link fence in the photos, which I suppose makes them seem like less of a big deal. But I know it’s there, and green which definitely gets more disguised than any other color up here. 
But then the other day the creepy Instagram Gods tempted me with this: 
It’s an expandable privacy green edge, that you place in front of what you want to disguise. Let me be VERY CLEAR – this product is likely a garbage landfill and I don’t think anyone should buy it. It’s $39.95 and based on the website it reminds me of the time when I bought the Baby Shark that moves like it’s a real baby (so cute!) that was really just a fake CGI video ad. When I got it (for Christmas for the family!) it was just a foam shark. Like a $40 pool toy, shipped from the other side of the world that the dogs quickly ate. We now call this “baby shark shame” in my house (likely on the blog, too), when you make an idiotic impulse purchase that goes in a landfill. No more baby shark shame here!!! 
But it’s just so TEMPTING. In the video online it’s so satisfying. They just open it, extend it, and voila! Bu Bye chain link, hello beautiful boxwood hedge! Now AGAIN, I’m not condoning this product. In fact, I really don’t think it should exist unless it’s for your wedding and you need to disguise something disgusting. But it got me thinking that if this product exists for this cheap, surely someone has created some sort of product that doesn’t involve rebuilding a wood fence inside the chain link fence for people like me. This existence of this product proves there is a hole in the market, and surely there has to be a better way to fill it than this??? But we all know that “cheap, fast and good” solutions aren’t a thing. So maybe I’m SOL. HELP. So maybe what bugs me the most is the gate and behind the hot tub. Maybe I should replant in the areas where the new-ish laurels died and set up a drip system just for this for the summers until they get established. Leave the perimeter of the fence as -is, but maybe upgrade the gate and make the hot tub area better, but accept the perfectly good, functional fence. Heck, we are lucky to have a fence at all. So with a quick search I found this chain link fence upgrade idea – 
We could paint it out the dark green of the house and maybe where you see the fence the most it would just be a nice painted wood? 
Then for the hot tub do a similar version in green that makes it feel like a “room”? I know in LA I would easily be able to hire some people to execute this in a weekend, but up here I don’t know how to get it done. 
I know that that isn’t terribly inspirational but that seems doable with a handyman? Something like this, but even simpler? 
I just want to not step from hot tub to dirt – OH AND I FORGOT TO TELL YOU THAT IS WHERE THE DOGS POOP. Not IN the hot tub (picture that if you want to LOL a lot) but currently right to the right of it, in the dirt patch. So it’s like a poop patch. Right outside the romantic hot tub. Now you fully understand the lack of appeal of our hot tub. Now I’m not complaining about the hot tub just would love to not have it surrounded by dog poop and chain link fence.
Looking at this the hot tub area seems WAY more of a priority than the chain link fence (poop removed for your Pinterest pleasure :)) I might even reach out to Yardzen (which I should have in the first place) and see if they can come up with a plan for the deck, hot tub privacy surround and any sort of fencing solutions. We are going to be living here for 2 months before we move to Oregon (sob) and then we’ll be down every winter and summer (and literally every 3 day weekend until someone in the family starts complaining that they want to “experience the world” or even “go somewhere new”). I know it seems crazy to invest more into a house that you are not going to be fully living in, but leaving it in this state feels sad/wrong when the inside of the house is so pretty. But yeah, I just don’t know how to do it and it’s not my skill set. Also, Brian is officially fired as the in-house landscape designer. Don’t worry, he’ll bounce back! So here are my questions:
The post How Do You (WE) Disguise A Chain Link Fence??? A Quick Backyard Update (And Rant) About Dead Plants, Chain Link Fences And Our Not Quite Romantic Hot Tub Area appeared first on Emily Henderson. Originally from Emily Henderson https://ift.tt/3ufl5bH |


