
Hey all, Julie here and I’m back already! We told ya, it wouldn’t be too long till you heard from me again. Before we get into it, I wanted to tell you all how helpful your feedback was in my Ask The Audience post. I took so many of your suggestions and kind of ended up blending the two mood boards which when looking back on it made the most sense all along. So here’s a big THANK YOU to all of you! I hope you’ve had your cup of coffee (or tea) cause be prepared. I took some rental-friendly risks which are definitely bold and full of color. 
Told ya. This was a no holds barred kind of design approach. I mainly tested out a few tricks to steer your eye away from all of the beige square tiles. Trick #1: The painted “stripe wallpaper” – that’s right I decided to spend hours upon hours during the LA heatwave last month painting all those stripes instead of using temporary wallpaper. The main reason was that I wanted the trim and wallpaper to match so I used Carmine by Portola Paint & Glazes on both. It’s the perfect shade of purple with a touch of lavender/pink without going too dark into the royal purple territory. There were a few failed attempts to get the lines super crisp until I came upon the paint mural queen, Racheal Jackson’s (aka @banyanbridges on Instagram), story highlight that literally says, “clean lines”. All you have to do is once your painters tape is up on the wall, take some of the background paint color. For me this was white, and paint a layer where the edge of the tape meets the wall. Then wait for it to completely dry and paint on your stripe color. I typically like to peel off the tape as soon as I’ve completed the second coat of my stripe color in a section. This is because in the past I’ve had it where the older layered on paint will peel off with it if I wait til it’s fully dry… rentals am I right? It’s the best “work smarter, not harder” trick out there and if you ever need some painting inspiration you should definitely give Racheal a follow. 
Trick #2: Swap out your seat! Let’s just say it, my toilet seat was gross. It had started to yellow and every time you sat down it shifted just a little until one day it actually broke on one side. It was time for a replacement and despite some of the comments, I went ahead and got this wood one from Build, it’s by Signature Hardware and that sucker is sealed so no gross stuff will ever get in the wood grain. And I had NO CLUE how easy it was to install, you literally just screw it on. Still learning new design things every day. Hire me? haha. But really… hire me (+ Velinda and Grace) shameless plug here. I wanted to add in a few vintage pieces but since I started the design back in late March going to the flea markets wasn’t an option. So all of the items were sourced from Etsy and paid in full by yours truly. It was also great knowing that I was supporting small businesses all over the world in a time of uncertainty. I was certain however on making that wood cigar mold into a tank tray, it was large enough for all the important necessities (*sarcasm*) like a tiny bicycle from my grandmother, Mimi, that was part of a dollhouse she made. She is very talented and I believe I get most of my dry humor and creative side from her. Love you, Mimi. It also holds that anatomical heart drawing which came from Ryann’s link up recommendation a while back, the shop is full of amazing vintage-inspired prints. I was tempted to buy more than two but restrained myself at least for now. I am actually reading that book which is kind of a bit “too on the nose” for what’s happening in the world today but the colors also looks too good with that oil diffuser. 
There were some hilarious and accurate comments regarding the original shower curtain I had planned for the space. I was so sold on it that I actually had it in my possession when the ask the audience post went live. Then I started painting the stripes and it was just too much of the same scale pattern. Like most of you, I too was in love with the other bold flower print shower curtain. It ties in all the colors of the space making it feel cohesive and more thought out rather than a bunch of random colored objects, I meant to do that. 
When designing a space you not only should balance out said colors and materials throughout the room but also consider your shapes. To help counteract all the linear lines of the literal lines, I added some curves in the mirror, light fixture and the detail on the hanging planter. It makes the space feel a bit softer and adding a dedicated spot for a plant always livens up a room. 
That marigold light fixture from Schoolhouse is so fun and a classic shape from the 1950’s era so it already has a vintage flair. Since both the fixture & stripes draw your eye up towards the ceiling I wanted there to be a “moment”. Rather than just having the stripes end at the ceiling I decided to go for a faux crown moulding. I did have some grandiose idea of this cool painted check ceiling treatment which I actually did and then when I started adding in all the rest it was a little too much in an already jam-packed life room. I woke up early the day of the shoot and decided to fill it in to be solid, ain’t nothing like a little last-minute painting. 
That vintage mirror was the piece that started it all. I debated for a while if I should even invest any money into my bathroom since I don’t know how long I’ll be living here, was it really worth it? Then that all changed when I came across this beauty on Etsy and it was a snowball effect after that. It’s the perfect size and was actually a great price too. I had been searching for a vintage mirror for over a year and they are not cheap so once I saw it, I bought it right away. I love the beveled edge and wood detail on the bottom without it being too ornate. She’s a rarity and something that I will keep for years to come. Hanging it was less of a love story and more of, The Comedy of Errors. I drilled 2 holes above where it hangs now, thankfully I had lots of spackle on hand. Turns out I didn’t need to use the anchor I thought I did and just screwed the heavy-duty hook straight into the wall. That explains why I wrapped the chain around the hook to get it back to the right height. At the moment it wasn’t so funny but a good reminder that there’s always a solution to be found. Since I didn’t swap out anything on the vanity, not even the hardware because I couldn’t access the screws (there’s a wood piece over them on the inside). I intentionally kept the styling to a minimum which redirects your eye elsewhere, at least I hope it did before I called attention to it.
There are so many rental bathrooms that come equipped with the standard metal-framed medicine cabinet and mine was no exception. To remedy this builder grade situation, I bought some cheap hobby board from the hardware store and promptly took it to my mom’s boyfriend who owns all the power tools. A few 45-degree cuts, some staples, and a bit of stain later and I had a frame to fit over the metal. I did adhere it to the mirror using mounting tape which is so strong and rental friendly but up close you can see the backside of the frame, including the stickers we didn’t take off. Whoops. It doesn’t really bother me but if you are to try it yourself then I’d recommend removing them and staining the backside as well. 
Added in some tiered window treatments using a tension curtain rod, another renter-friendly item. They not only hide the dirty louvered glass but it also creates diffused natural light which is great for applying makeup in the mirror on the aforementioned medicine cabinet. I know that some of you warned me that the purple hue of the paint on the window trim might make my skin tone look a bit off but luckily I haven’t noticed a difference. I picked up another great life hack from, Emily Bowser, who really should just be my life coach. Have a stack of washcloths handy for washing your face at night and then use it to wipe down your countertop after for a double clean. The woven basket next to the cart is because I am honestly too lazy sometimes to walk the extra 5 steps to my laundry basket so I toss them in here instead. 
That is the other piece of art from the recommended Etsy shop by our Ryann. If you don’t already know it’s the Plague Doctor which is a bit morbid but also very topical. I tend to gravitate towards out of the norm art which isn’t always for everyone but that’s what personal style is all about, what you like, remember that. I bought the vintage wood frame off of, that’s right, Etsy. It actually didn’t have a back or glass so I cut out a piece of foam core that I had leftover from another project for the back and bought a cheap frame from Ikea and used the plexiglass which fit perfectly. Ever since Emily B. and I lived in Atlanta for 10 days searching for scores in vintage shops I have wanted a french coat hook. There were TONS of them in the stores and I always regretted not buying one so once I purchased that vintage mirror I knew it was the next item on the list for my bathroom and bought this one 10 minutes later. It’s especially wonderful since my boyfriend is crowned the worst towel hanger-upper when it comes to a towel bar so the hook is our compromise. Sara got this great paint detail shot, which really shows how varying in size all the stripes are. It ends up adding so much more depth than if they were all exactly the same. I know. Because I did a whole section of the wall like that and the results felt too flat and graphic. Even with the amount of storage I have in this bathroom somehow I always need more so I picked up this utility cart on one of many Ikea trips last year. There are a few items that I always use daily and having them easily accessible makes getting ready in the morning a bit easier than digging through a drawer full of stuff. If there was a piece that caught your eye, then check out all of the resources below. 
1. Shower Curtain | 2. Carmine Paint from Portola Paints & Glazes | 3. Alabax Large in Marigold from Schoolhouse | 4. Vintage Mirror (similar) | 5. Shower Curtain Rings | 6. Shower Curtain Rod | 7. Hanging Planter | 8. Oil Diffuser | 9. Anatomical Heart Print | 10. Wood Frame | 11. Vintage Cigar Mold (similar) | 12. Bath Rug | 13. Ceramic Vase | 14. Wood Toilet Seat | 15. Tooth Brush | 16. Tooth Brush Holder | 17. Soap Pump | 18. Toilet Brush | 19. Seagrass Tray | 20. Medium Canister | 21. Small Canister | 22. Dry Brush | 23. Bath Salts | 24. Hobby Board | 25. Hand Towel | 26. Washcloth | 27. Wicker Basket | 28. Window Curtains | 29. Moisturizer | 30. Brass Tray | 31. White Utility Cart |32. Plague Doctor Print | 33. Vintage French Hook | 34. Bath Towel | 35. Seagrass Tall Basket | 36. Hair Brush | 37. Beau Fragrance Before I leave you let’s look at some before and afters! 


Thanks for stopping by my vintage-inspired (wife of the old man library bedroom) rental bathroom refresh. I am excited and a bit nervous to hear what you all think about this “I went for it” design in the comments below. See you there! xx **Design by Julie Rose | Photos by Sara Liggoria-Tramp The post MOTO REVEAL: Julie’s Anything But Beige, Amazing DIY Bathroom Refresh appeared first on Emily Henderson. Originally from Emily Henderson https://ift.tt/2HJr860
0 Comments


If you haven’t noticed from the multitude of pumpkin items at the grocery store… fall is in the air. That means with each passing day the undeniable urge to “cozify” our homes is getting stronger and stronger (and I’m not mad about it). Have you given in yet?? There’s one easy way to start leaning in and that’s (you guessed it) THROW BLANKETS PEOPLE! I’ve personally always been enamored by the art of the throw blanket. How to throw it, where to throw it, which throws to buy… the questions go on and on so… Welcome to the official EHD throw blanket guide. I felt the best plan of attack for this post was to break it down by furniture item. Meaning, I’m breaking down all the pieces of furniture you can throw throws on…including some you may not have thought to throw throws on before. We’re starting with the most obvious: the sofa. SOFA THROWSI started asking my throw questions to Emily a while back, who created this IGTV to teach me how to throw a throw (if you haven’t seen it –– give it a watch it). If you’re anti-Instagram or if you just want this video clearly laid out…here’re your throw placement options for your sofa: The Corner ThrowQuite possibly the most widely used option…here is the corner throw drape. It can be casually thrown to look more “organic” or you can go with a folded, more clean-cut look. Here are some examples: So you’ve made the choice to either be organic (right) or folded (left), now you have one more stylistic choice you need to make…all the way up and over the back of the sofa, or the seat-cushion-only throw. The options above are the up and over option…here are some SCC (seat-cushion-only) examples: As you can see here, you also have the option to go clean-cut or organic. The choice is yours my friends The Arm ThrowThe over the arm throw is an EHD favorite –– especially if the arm of your sofa is the first thing you see when you enter your living room. It visually catches your eye and can add color, texture, and layer to a room upon entrance. Now the same rule applies if you enter your room to find the back of your sofa. Behold… Back of the SofaThis lil trick can give the back of your sofa the glow up it deserves. Look how much more visually interesting the backs of these sofas look? Not to mention it’s a VERY budget-friendly and easy option. 10/10. The Chaise ThrowIf you have a chaise on your sofa –– this one’s for you. This is a technique Em’s used in her own house for years. Specifically, with this very comfy, modern couch that just never goes out of style. Here’s how she used it in 2 different houses with 2 different throws… As you can see, this is a great option for sectionals (especially if you wanna double up on throw blankets as seen above). If you’re more of a casual minimalist, you can do what Em did in her best friend Suzanne’s living room, where they went for a more “effortlessly casual” throw over the chaise. To achieve this look, don’t fold the throw –– just throw it and see what happens (This is Emily’s actual method). Here’s an example below: 
So those are our go-to sofa throw options, let’s get steamy and move right along into the bedroom… BED THROWS
A throw for your bed is NOT to be confused with a bed blanket (there’s a post about this coming soon). A bed blanket is MUCH bigger than an average throw because, well, it covers your bed. If you think a throw is the only blanket that goes across the bottom of your bed, you’ll be sad to know that you’re wrong (that was a classic design mistake I made before working here). A traditionally sized throw is too small to cover the entire bottom of your bed (unless you have a twin…then maybe…). This should be used purely for decoration purposes & to add texture. That’s why it’s generally draped on one corner of the bed & not perfectly straight (otherwise it will look like it’s trying to be it’s older sister, the bed blanket). We typically layer a throw on top of a quilt, blanket, or bedspread so it feels more anchored, but can add that extra pop of color beds sometimes need (plus we love a layered look). Here’s how you throw it on your bed… 
I’m so glad we’re not confused about the difference between bed blankets and throws anymore. It personally took me a long time to figure out, but ain’t it better on the other side? Let’s jet right into the last place you can throw your throws… ACCENT CHAIR OR BENCH THROWSIf you couldn’t tell from the above photo, we LOVE a throw on a chair moment. It makes a chair look so much more inviting –– like you could snuggle up w a book and some cocoa (sounds dreamy, right?). Here are some examples of what a throw can be on a chair: As you can see, it can either go on the seat cushion, arm, or both (if the arm is really low). Just like in the couch throw examples, you can either do a more organic looking throw, or you can fold it (it’s completely up to you). If you wanna go for the clean-cut fold, you can drape it over the arm OR go for the next option… Over the topWe love the over the top, folded look. It gives the chair some texture and is just like “over the back of the couch” throw option, this is a great choice if you can see the chair from the backside to add texture and interest. Now we love throws on chairs, but let’s talk about one last place you can put your throws. It’ starts with a B and rhymes with henches… 
Benches! You got it. A bench throw adds so much texture and really makes it look like a cozy seating area that stands on its own. And just like always, don’t forget you can either fold or go more organic. The choice is yours (make it count). Hopefully, you feel like a throw blanket expert by now & are feeling inspired to add some throws around your house (especially now that fall is imminent). Don’t worry the fun isn’t over because I have some GREAT shoppable options for you. 
1. Stargazer Plus Throw | 2. Geometric Sherpa Throw | 3. Winston Porter Textured Throw | 4. Double Sided Faux Fur Throw | 5. Ribbed Plus Throw Blanket | 6. Chunky Oversized Throw | 7. Anti-Allergic Chunky Blanket | 8. Paige Sherpa Throw | 9. Chenille Throw Blanket | 10. Chunky Knit Throw | 11. Heathered Fleece Blue Throw | 12. Black and Beige Woven Throw 
1. Elulia Throw | 2. Everyday Cotton Throw | 3. Tapestry Throw Blanket | 4. Picasso Throw | 5. Border Stripe Throw | 6. Three Posts Throw | 7. Happy Habitat Recycled Cotton | 8. Arcadian Throw | 9. Dots Black and Ivory Throw | 10. Ivory Diamond Cotton Throw | 11. Gabi Ethiopian Cotton Throw | 12. Abstract Embroidered Cotton Throw Where are you throwing your throw??? Bed? Chair? Sofa? All of the above? Let’s chat about it below. HAPPY THROWSDAY! Opening Image Credit: From Elevated Prairie: Target’s Fall Collection 2019 | Photo by Sara Ligorria-Tramp The post Design 101: Let’s Talk About Throw Blankets And How To Style Them + Shop Our Favorites appeared first on Emily Henderson. Originally from Emily Henderson https://ift.tt/30iuJhQ 
Hi, Albie here! Wife, mom, interior designer, and all-around idea machine. This combination is likely why I’m an interior designer. As a teenager, I remember constantly shuffling the furniture around my tiny bedroom — usually at 3 am — tinkering and ideating ways to the room to feel less tiny…because it was definitely tiny. When I moved into my NYC studio — my first apartment on my own — I was determined to transform it into my bachelorette pad in the sky. What both scenarios had in common? No, not that they were small spaces, but that they were mine… all mine. The only person’s needs I had to consider were my own. Then I met my now husband. Then we had a baby. Poof… my bachelorette pad became a home for three, forcing me to really flex my small-space design muscle. How does a family of three comfortably live in a studio apartment in Hell’s Kitchen? Lots and lots of space-saving design decisions & shopping solutions. Yes, I did some “baby-proofing” — bumpers on the corners and all that — but never did it ever enter my mind that I needed to make my home “kid-friendly” — I’m not a kid…my husband’s not a kid… and my kid won’t be a kid forever. Now five years and two apartments later, I still refuse to subscribe to “kid-friendly” design and here’s why you probably shouldn’t either. 
What Exactly is “Kid-Friendly” Design?If you do a quick google search of the phrase “kid-friendly design” you’ll be hit with all kinds of “ideas” but no clear definition… at least not anything specific. Instead, you’ll find suggestions to accommodate your home to work for your children, everything from the best performance fabrics to use to tips on incorporating your children’s artwork tastefully — all pointing towards “adultifying” things that are deemed “for kids”, so why isn’t it just considered good design? Or, if we must put a label on it, why not call it “parent-friendly” design — design for parents who still want to feel like their home is made for grown-ups? When you look at most of the “expert” tips on how to make a design kid-friendly, it’s suggestions that would also be perfect for a space that has no kids — performance fabric is a great idea because of its durability, stylish storage solutions is perfect in a small home short on actual storage space, finding ways to display sentimental artwork would make any traveler’s heart smile — yet somehow these tips, and more, have dubbed “kid-friendly” as though the alternative would be to just live in squalor. 
Spoiler: Having kids at home doesn’t void the house of good design.I would get asked so often how I decorate with a toddler — “how do you have nice things?” would actually, often, be the exact question — and my reply? “Why wouldn’t I have nice things?!” That’s when I often tell people about my own childhood, growing up around glass coffee tables and priceless vases and so many other things that probably wouldn’t be deemed “kid-friendly” nowadays. I grew up in the household with plastic on the cream velvet sofas — plastic that my mother now regrets removing by the way — but not because my parents didn’t trust me; the plastic was because my parents didn’t trust anyone and they wanted their upholstery to last forever. My parents’ idea of designing around me was simply explaining to me why we don’t stand on tables, jump on sofas, or write on walls. The end. We had rules. I didn’t break em. Unless you count my using the back of the sofa as a balance beam because I thought I was the next Dominique Dawes, which I’m clearly not. 
Taking my cues from my parents, it never occurred to me to design our entire home around our kid — I want a storage coffee table because where else am I going to put my collection of throws and pillow covers. The switch to a washable rug? Duh, because my husband is super clumsy with his beverages yet insists on putting them on the floor. Do my design decisions take my daughter into account? Of course they do… just as much as I consider my husband’s needs. It’s about what works for all of us — every occupant of the home — and yet, the idea of kid-friendly design has been glamourized as some sort of groundbreaking design development, when truth is, it’s basically just utilitarian design masquerading as being kid-friendly. With or without a child in the home, it would likely still meet the design needs of the grownups in the house; and if not, then it’s up to them to discern if they’ve actually made choices they can live with or if they’ve sacrificed their home happiness for their child who won’t be a child for very long. As parents, my husband and I always try to remember that unhappy people don’t raise happy kids. This isn’t to say that designing exclusively around our daughter would make us unhappy — definitely not what I’m saying — but what message are we sending when we’re sacrificing our velvet sofa and wool sofa for fear of what she might do…one day…maybe? Are we expecting her to be destructive? Are we assuming we won’t make just as much of a mess? Are we saying we don’t trust her to value things in our home? Just like I did, our daughter has grown up with a pretty awesome understanding of taking care of things — not because they’re valuable or so she won’t get in trouble, but because this is her home too and *gasp* she likes nice things just like mommy. Will there be some design choices that you make exclusively because you’re a parent? Sure! For example, in our pantry, the snacks are deliberately on the lower shelf so that baby girl can self serve. Without her, I most likely should’ve had our snacks in a totally different spot. But on the other side of that, when she was a baby in our studio apartment, we opted for changing pads we could use on our bed, versus an entire changing table and went with a mini crib because spatially it made good design sense. So this isn’t to say design that suits children’s unique needs doesn’t exist; but let’s be honest — “kid-friendly” is relative. 
So I repeat… What exactly is “kid-friendly” design? It’s parent-friendly design. It’s utilitarian design. It’s good design. Plain & simple. As with anything, the way I have lived has shaped my opinion on this, so I’m curious — do you think there is a place for “kid-friendly” design when we’re creating our spaces or are you with me on this one? What does kid-friendly design even mean to you? I’d love to know where you land on this! Opening Photo Credit: Photo by Tessa Neustadt | From: My House Tour From Good Housekeeping The post Why You Should Take “Kid-Friendly” Out Of Your Vocabulary – Also Meet Albie! appeared first on Emily Henderson. Originally from Emily Henderson https://ift.tt/30d2cu1 
Hey everybody & welcome back to the Link Up. I think we should just hop right on in since September is basically over and time is of the essence. With that, let’s get right into the house tour for the week. This home tour is a London flat we found via Remodelista & it has an insanely good kitchen. We’re gonna shock you with this one… because speaking of the kitchen, those steel cabinets are from IKEA (go look at it you probably won’t believe me). We also love that paint job in the bedroom. Excellent work Red Deer & Studio Thorne. Snaps to you! From Emily: This is SUCH a good bed especially for the price. Looks so high-end. Also From Emily: Amber Lewis’ line just launched at Anthropologie and it’s pretty great! I’m a BIG fan of this coffee table (and not just because I like the name obviously) Also, Also From Emily: Too soon? The best matching holiday PJs ALWAYS sell out in one of our sizes, thus negating the whole “matching” thing, so while I had no intention of going the holiday route so early (Birdie just needs a new nightgown so I was shopping) I found this black and white buffalo check with a hint of holiday that has MATCHING SETS FOR THE DOGS and snagged them early. If you think I’ve gone too far too early, trust me that I’m not alone. This year, due to COVID, we are home and looking forward to any holiday moments and even Brian said (with no sarcasm, I swear), “see if they have any matching Halloween PJs for us”. I scrambled to type those words down before he realized what he said. I WILL, BRIAN, OH I WILL. From Mallory: If there’s one thing I’m ready for, it’s fall. So I’ve been denim shopping (at Madewell, of course) and just found these straight leg jeans. I LOVE THEM. They’re 40% off for Madewell insiders btw. Since we’re talking about Madewell, I also found this cardigan in the sale section and the ruffle on the sleeve is too cute for me to handle. I just ordered it and can’t wait for it to come so I can wear it with these shoes that I stole from my mom’s closet (which are also on sale for 55% off…so yeah, they’re $20 mules…) all of these items together will be my fall uniform if you care to partake in this outfit & match with me From Caitlin: I’m coming up on 7 years with my cat so I bought her this bed as an adoptaversary present (this is normal, right??) and IT’S A MIRACLE because she LOVES IT. She has eschewed every. single. bed. I have bought for her for years, so this feels like a huge win for me. When I go to bed every night, she typically pokes around and walks on top of me till she can find a cranny to sink into, so I was hoping this bed would create a similar feeling and IT WORKED. It’s 20% off right now and as a bonus, there’s also a photo of the cutest golden retriever I HAVE EVER SEEN modeling the XL size in silver. From Jess: One of the gifts that we got Julie for her last day was this bath soak. I am sure Julie has spoken about her love of baths, so when she said how much she loved the smell, it meant A LOT. I’m now thinking I might need to grab one myself:) I mean who doesn’t want soft, hydrated, and really good smelling skin??? From Ryann: My dog is notorious for absolutely destroying dog toys. Whenever I buy him one it lasts about 10 minutes before he has completely ripped it to shreds and I am out $10 to $15 bucks. BUT HE HAS FINALLY MET HIS MATCH. This toy is indestructible and he loves it. It’s already lasted over a week which is a record. Also from Ryann: P.S. if anyone’s wondering about the stick on nails I talked about last week – I absolutely love them! They are easy to apply and they look SO good. Sales are going strong this weekend, and we’d like to call attention to a few… Calling all healthcare workers! World Market is offering 20% off plus free shipping on orders over $49 as a small token of gratitude. THANK YOU for your service. Apt2B (where our sweet Arlyn works now!!) is having a sale also…15% Off Storewide and Up to 65% Off the Entire Outlet PLUS Free Shipping at Apt2B. Valid 9/22-9/28. Enjoy That’ll be all. Have a wonderful rest of your weekend and we’ll see you next week! Opening Image Credits: Photo by courtesy of Red Deer | Design by Red Deer and Studio Thorn | via Remodelista The post The Link Up: Emily’s New Matching Pajama Set, Mallory’s $20 Mules & An (Actually) Indestructible Dog Toy appeared first on Emily Henderson. Originally from Emily Henderson https://ift.tt/2S0FUqH 

Few debates have run so all-consuming and lengthy as the “should we have bark, sod, or turf in the backyard” at the mountain house. It’s right up there with other compelling debates, like “The 2019 almost marriage altering wood ceiling argument” and “Where the heck do we put the TV and can I please have one in our bedroom?”. Ah … oldies but goodies. These debates usually run a year long and we get SO SICK of talking about them, changing our mind, weighing cost, function, practicality, and yes style, in hopes that there would be a clear winner. Wanna watch a little video about the whole backyard plan before we dig into the post?? Me too. (Just wait until the ad plays) The Debate Between Real Sod And Artificial Grass/Turf
Before we moved up here full time we were fine with the bark. We didn’t love it, but it was appropriate and easy and pre-dogs it didn’t bother us. But that’s changed. Besides the bark we had these two options: Real Sod:The Pros: Real grass – when healthy – is prettier than fake. It’s a lot cheaper upfront (we already had irrigation as the family that lived here a decade ago had real grass). It is soft and comfy for falls. The Cons: It’s illegal to put in real sod up here due to water usage (we would be criminals!), it freezes in the winter so we worried that we would be able to maintain it well and we had a lot of shade in the summer so we were worried about it thriving without enough sun. Artificial Turf:The Pros: Very little maintenance, year-round green, little mess/dirt for kids especially when it rains/snows. Practical AF. The Cons: It’s expensive up front (anywhere between $6 – $15 a square foot installed), it can look fake and bad if not done right. It can get hot in the sun. Neither was a clear choice… Enter The Dogs – The Ultimate Deciders
Enter the dogs – the final turf decision-makers. When the dogs arrived, we had bark out in the back – a typical and very affordable mountain landscape choice. They “enjoyed” this bark a lot and spent most of their unsupervised time jumping in the pond, then chasing each other back and forth only to end up digging up dirt around the perimeter, bathing in mud and bark. Meanwhile, all the dust from the bark floated its way into our home, permeating every room. We knew that we had to get rid of the bark within days of having these dirty little pups. But do we install real sod? Well like the grass gods answering our prayers (wouldn’t it be awesome it if were always this easy?), the next week we brought down the dogs to LA to stage the house and those little mothers started digging holes in the middle of the grass in our backyard. We couldn’t stop them. The second they were let outside they would dig up everything! We were going to replace the sod anyway there (and we did) but it made it clear that these two mud pups will abuse any future grass. DONE. TURF. IT. IS. So we did what any designer + husband team would do – we rushed the process because we were going mentally a little cuckoo dealing with muddy pups every day destroying our house. We knew that we wanted a fire pit area and a hot tub (this is a mountain house and both feel like long term investments for winter – and if we ever Airbnb it, it obviously adds a lot of value). But I was being a perfectionist and “cared about the design too much” so Brian took this project over to speed it up. I agreed that this wasn’t where we should spend a ton of money or be too precious. We are up here for at least a year but after that who knows? And if we didn’t do it quickly we wouldn’t get it done until after winter as a lot of the exterior construction stops late November – April. WE HAD TO HURRY. 
We Got Multiple QuotesSo our first quote from a landscape contractor included turf for most of the yard (around 1700 square feet), plus a stone path to a stone patio where the two boulders are, creating a natural gas fire pit area. This quote came in at $56k, which we thought was incredibly high and frankly shocked us. He thought maybe he could get it down to $45k and this did NOT include digging the trench for the gas, hooking up the gas (done by a plumber), or laying the slab for the hot tub. We knew that landscaping your house is almost as expensive as renovating the inside – mostly because of labor, but we had not predicted this. So we got another quote, slowing down the process (but still rushing too fast, don’t worry!). This time we called Save Pro Turf and we had an amazing experience (not gifted or given a press discount – just super impressed with the product and service). We decided to not spend the money on a stone patio and instead just put down pebbles and we nixed a path I wanted since we didn’t really NEED it after all. By doing this we got the quote for $16k. Now, this didn’t include bark removal, tree trunk removal, some grading, trenching the gas line, installing the gas line ($850), and lastly pouring the slab for the future hot tub. These things will add up to a few thousands of dollars, but they were still FAR under that $56k quote. Plus, the turf was in stock and they were available to do it 3 weeks later (many of the other companies we called were booked through November, and then depending on weather they might not have been able to do it til spring – NOOOOOOO!!!). We could NOT live with that bark. It was making our house DISGUSTING, the dust, the mud, the chewing of the bark all over the house, NOOO. The Scramble To Find Sub-ContractorsI don’t know how it is where you live but up here, all contractors and subs are SLAMMED with work. It’s great for them, but as a homeowner, it was almost impossible to book any subs for these jobs (and no one really cares about my Instagram following which I only reluctantly mention as a hail mary JUST IN CASE). I reached out to our GC Jeff Malcom (who did the mountain house) and asked for him to ask his subs for us, and while he tried to help he reminded me that “subs will always prioritize working for general contractors over homeowners because they’ll get consistent long term work from them, whereas with a homeowner it’s just a one-time thing”. Fine. So we were scrambling to find crews to de-bark, trench for gas pipe, grade the earth, and then get a plumber to install the pipe for the gas. It was also labor day weekend and no one wanted to work overtime, understandably… without a pretty penny at least. So we ended up paying far more to get crews to come on the weekend or after hours. The turf was coming on September 8th and if we didn’t have the yard ready by then they couldn’t do it for another month after that. But by rushing it we paid about 30% more for labor to get it all ready in time. FUN! We lived with the de-barked – full dirt backyard for over a week which wasn’t ideal (remember dogs and kids), but also fun for the kids as we had some great mud-ball fights that horrified Brian and admittedly took days to get out of my hair. 
INSTALL TIME
Here’s what I can’t recommend enough: hire a very experienced turf company that specializes in turf to install. There are many ways to mess this up and make it A. look terrible or B. not last as long as it should (pull up on the edges, not prepped properly underneath, etc). Save Pro Turf knew exactly what they were doing. They came out twice to do drawings and measurements and mapped it all out. 
The day of the install they arrived with close to 10 guys – all so pleasant and genuinely seemed like they loved their job. I mention that as a huge compliment to Jeff who runs the company – that he clearly takes care of his team (some have been with him for 10 years). They did some additional grading and started prepping the earth. This included spreading out a recycled concrete layer to compact and act as a weed barrier. 

Brian and I had to go to LA to shoot something so while we were gone his parents kept sending me photos and videos of the process and it was INTENSE. They arrived at 8 am on Wednesday and they were totally done by Thursday afternoon! I do think that this is unusual and they said they had double the crews to make sure they finished before a massive job the following week (so I wouldn’t typically expect it to take such a short time). Do We Love It???
OH, DO WE. It instantly changed our backyard and lives. The kids can actually use it, play on it, lay on it. The pups can run around and if they avoid the pond/dirt they remain clean! If they are unsupervised and they DO get in the pod and dirt then the faux grass almost acts as a big doormat and brushes it off of them if they stay out there long enough. Does It Look Real??
Artificial grass rarely fools you completely. But in my opinion, there are five factors that help it look more real:

Now I know that many of you will never be on board with faux, but admittedly the second that the decision was “forced upon us” and more importantly the night that it was installed I was SO RELIEVED and secretly SO happy that this is our future. It would be like a doctor telling you to only wear Uggs or to start eating more french fries. The lack of maintenance of this grass really checks a huge box for us permanently despite it not always being my first style choice. But We Still Rushed Some Things…
Jeff (our contractor) told us after we had booked everything that we were being hasty putting in artificial turf FIRST, that it’s like installing the carpet before you’ve painted the walls. Oh Jeff, don’t be so boring. I knew he was right but desperation for turf NOW was leading the hasty machine. So here is what we kinda rushed:
Part of me is disappointed in myself for not having a fully fleshed out design plan, executed properly, step by step in perfect chronological order with the appropriate elements where they make the most sense. In a perfect world, we would have a contractor manage, draw it out, grade it all, MAKE A PLAN, do all the dirty construction (deck, additional landscaping, lay slab, demo out the fence, install new fence) THEN do the grass. But we didn’t. And I’m not sad about it because that plan would have taken MONTHS that we just didn’t have. I just hate disappointing you guys (FINE AND ME) with a less than perfect design. But don’t worry, we aren’t done and I can work magic with some plants and styling… Which is why Brian is taking credit for this backyard design. When we were “debating” (cough cough) the rush, he was like “just tell them that I’m handling this project – that I’m the designer”. Once I let go of owning the design it was SO EASY and happened so fast. He employed the “done is better than perfect” philosophy, which is typically hard for me. But I’m so relieved that we don’t have to wait until spring to enjoy this backyard. Then in spring, it will look even better when I’m done with it… 
What Do We Have Left???HOT TUB. We are laying the slab next week and it comes after that. Surrounding it will have pea gravel, stepping stones, and some boulders. Again, this will likely never be too Pinterest worthy, but what I’ve heard from friends is that the kids will get in this hot tub every night so it will be worth it (and the reason we put it here (see above) instead of in the “dog run” area is because over there we would have had to remove the trees or make it really high, and also we liked the idea of it being further from the street and visible from the outdoor dining table. It feels more accessible here to where we’ll use it more. DOG RUN TURNED. What????? They are going to grade the former dog run (the area on the guest bedroom side of the house) and make it flat enough (but not super flat) that if we wanted to have a seating area or an above ground tramp (with safety net) we could. We also might put a shed there, dunno. Either way, we’ll have stepping stones to the door with the hopes that the kids will go straight from the hot tub to the shower in that bathroom. Speaking of shower… OUTDOOR SHOWER. Now Jeff and Brian (since when did Jeff get 30% say on this??) think an outdoor shower is stupid. I’ve spoken to Sherry (Young House Love) enough to know that it’s something that once you have you can never go back. You know when two cis males look at you like you are crazy so you give up on a dream? I know it seems silly and there isn’t the perfect place for it (nor is it easy to tap into the plumbing and we might have to rip open the exterior wall to do so) but I want one. For the record, I asked for the hot water hookup during the renovation and it got overlooked so… FENCE. I’m still on the fence (I’m genuinely sorry about that) about replacing it or not. The only fence we’ve ever put in was in LA with a fancy pedestrian gate and an electrified driveway gate and it was a lot. For something basic (horizontal wood, painted the same color as the house) how much would it actually cost? Time to get a quote. Brian is against this because he feels like this one “goes away”, but I feel like the backyard will be SO much prettier with a nice wood fence surrounding it. MORE PRIVACY THROUGH BETTER LANDSCAPING. I’m not very private, but near the fire pit and the hot tub we might just add a few taller shrubs on the perimeter for privacy from our lovely neighbors, and to shake it up so it’s not just laurels. It’s more so they don’t have to see/hear us if their windows are open, less about us not wanting them to hear our riveting s’mores conversations. FURNITURE. Now that the fire pit area is bigger than just 6 chairs (with the fire pit not being centered) I’m thinking let’s make that a full-on living room over there, not just the 6 Adirondack chairs I had planned. We even have room for a sectional and two club chairs. I’m not going to do this until spring (hoping to get the Standish sectional that Target has that isn’t unavailable till January). We also need a metal 10 person dining table that can withstand snow and a lot of water dripping from the upper deck when snow melts. And yes I know that I could get a pretty wood one and just cover it but I think that we all know we won’t, and besides it’s right outside our family room window and I don’t want to stare at a cover. VEGETABLE GARDEN. If you are wondering where that amazing vegetable Victory garden that I was going to plant, ME TOO! We ordered a ton of pots that just never arrived due to COVID. The 2×8 above-ground beds arrived in July, almost too late to plant. But that is when I realized that we have WAY less sun once the trees have leaves than I thought. So we are going to utilize the upper deck and pots way more than originally thought. (Fun Fact: Our neighbor has the most amazing veggie garden ever, with the most delicious produce I’ve ever eaten. So the kids and I are going to help him with his garden, put in a new big above-ground bed, and be able to harvest in addition to our pots and planters). PEBBLES… OVER EVERY SPEC OF DIRT. Now, this is Brian’s idea that I don’t think will work but thought you guys would know. The dogs are STILL digging. We are going to try using Cayenne pepper because they don’t like the smell of it so they won’t dig there. But if they do, we are thinking just spreading pea gravel around all the bushes. I think give them a month and this will be holes of dirt again, but if any of you have solutions to stop pups from digging in dirt, please… 
Back to the turf. Again, I can’t recommend Safe Pro Turf enough. They were awesome. We are SO DANG HAPPY. This is kinda like how I felt turning on my first indoor gas fireplace with a switch (as opposed to gathering and lighting wood). The ease that it brings our life is worth the sacrifice in style. Not everything that is fake is BAD if it adds so much more function and practicality to your life (engineered countertops, engineered wood flooring, faux candles at Christmas… I could go on and on). I think I need to recap my questions for you all: 1. Above ground tramp or no tramp at all? 2. Can you put pea gravel around the roots of plants without killing them and will that even prevent the dogs from digging them up? 3. Are you pro or anti fake grass????? I know that when we move to Oregon I’ll be pro real grass (what with the rain and all), but as right now I’m in LOVE. The post All The “Hows”, “Whys” And “How Much’s” Of The Turf At The Mountain House + Introducing My Landscape Designer – Brian Henderson appeared first on Emily Henderson. Originally from Emily Henderson https://ift.tt/2G6Lu8q 
Ok, so…the world’s on a BIG organizing kick right now. I think it’s probably 70% because of The Home Edit’s new Netflix show and 30% because it’s nice to have ONE. TINY. THING. that you can actually control in your life. Whatever the impetus, actually getting organized can be kind of annoying and overwhelming because there are about a billion bins and specialty products and like, how’s a person even supposed to know what’s good?!?!? And that’s where I come in. I was birthed and reared by the best lady in the universe, Brenda, who has been a lifelong advocate for the organizational bin and basket. For years, my mom would come to visit me in LA and by the end of her trip, I’d be a bit more organized — whether it was adjusting storage in my bathroom, figuring out under-sink bins, or sorting the miscellany in my closet, I learned THE WAYS OF HOME ORGANIZATION (should I trademark this???) from Brenda and from her mastery of The Container Store. To that end, I’ve learned that there’s a lotta stuff out there that you actually don’t need, so I pulled the all-time best picks for 5 key areas in your home. As I was linking this post, I realized that every. single. item. also had a 5-star rating, so it’s not just me being biased — this is the certified GOOD STUFF. (PS. This is not sponsored. All honest reviews from your org pal over here who has spent years trying pretty much everything!) So since the weekend is kicking off and a whole bunch of this is available for pickup at a store near you… let’s get started with the best, most affordable storage and organization tools out there. YOU COULD BE IN A TOTALLY ORGANIZED HOME BY SUNDAY. Imagine that!!! Kicking it off with the heart of the home, your kitchen… Kitchen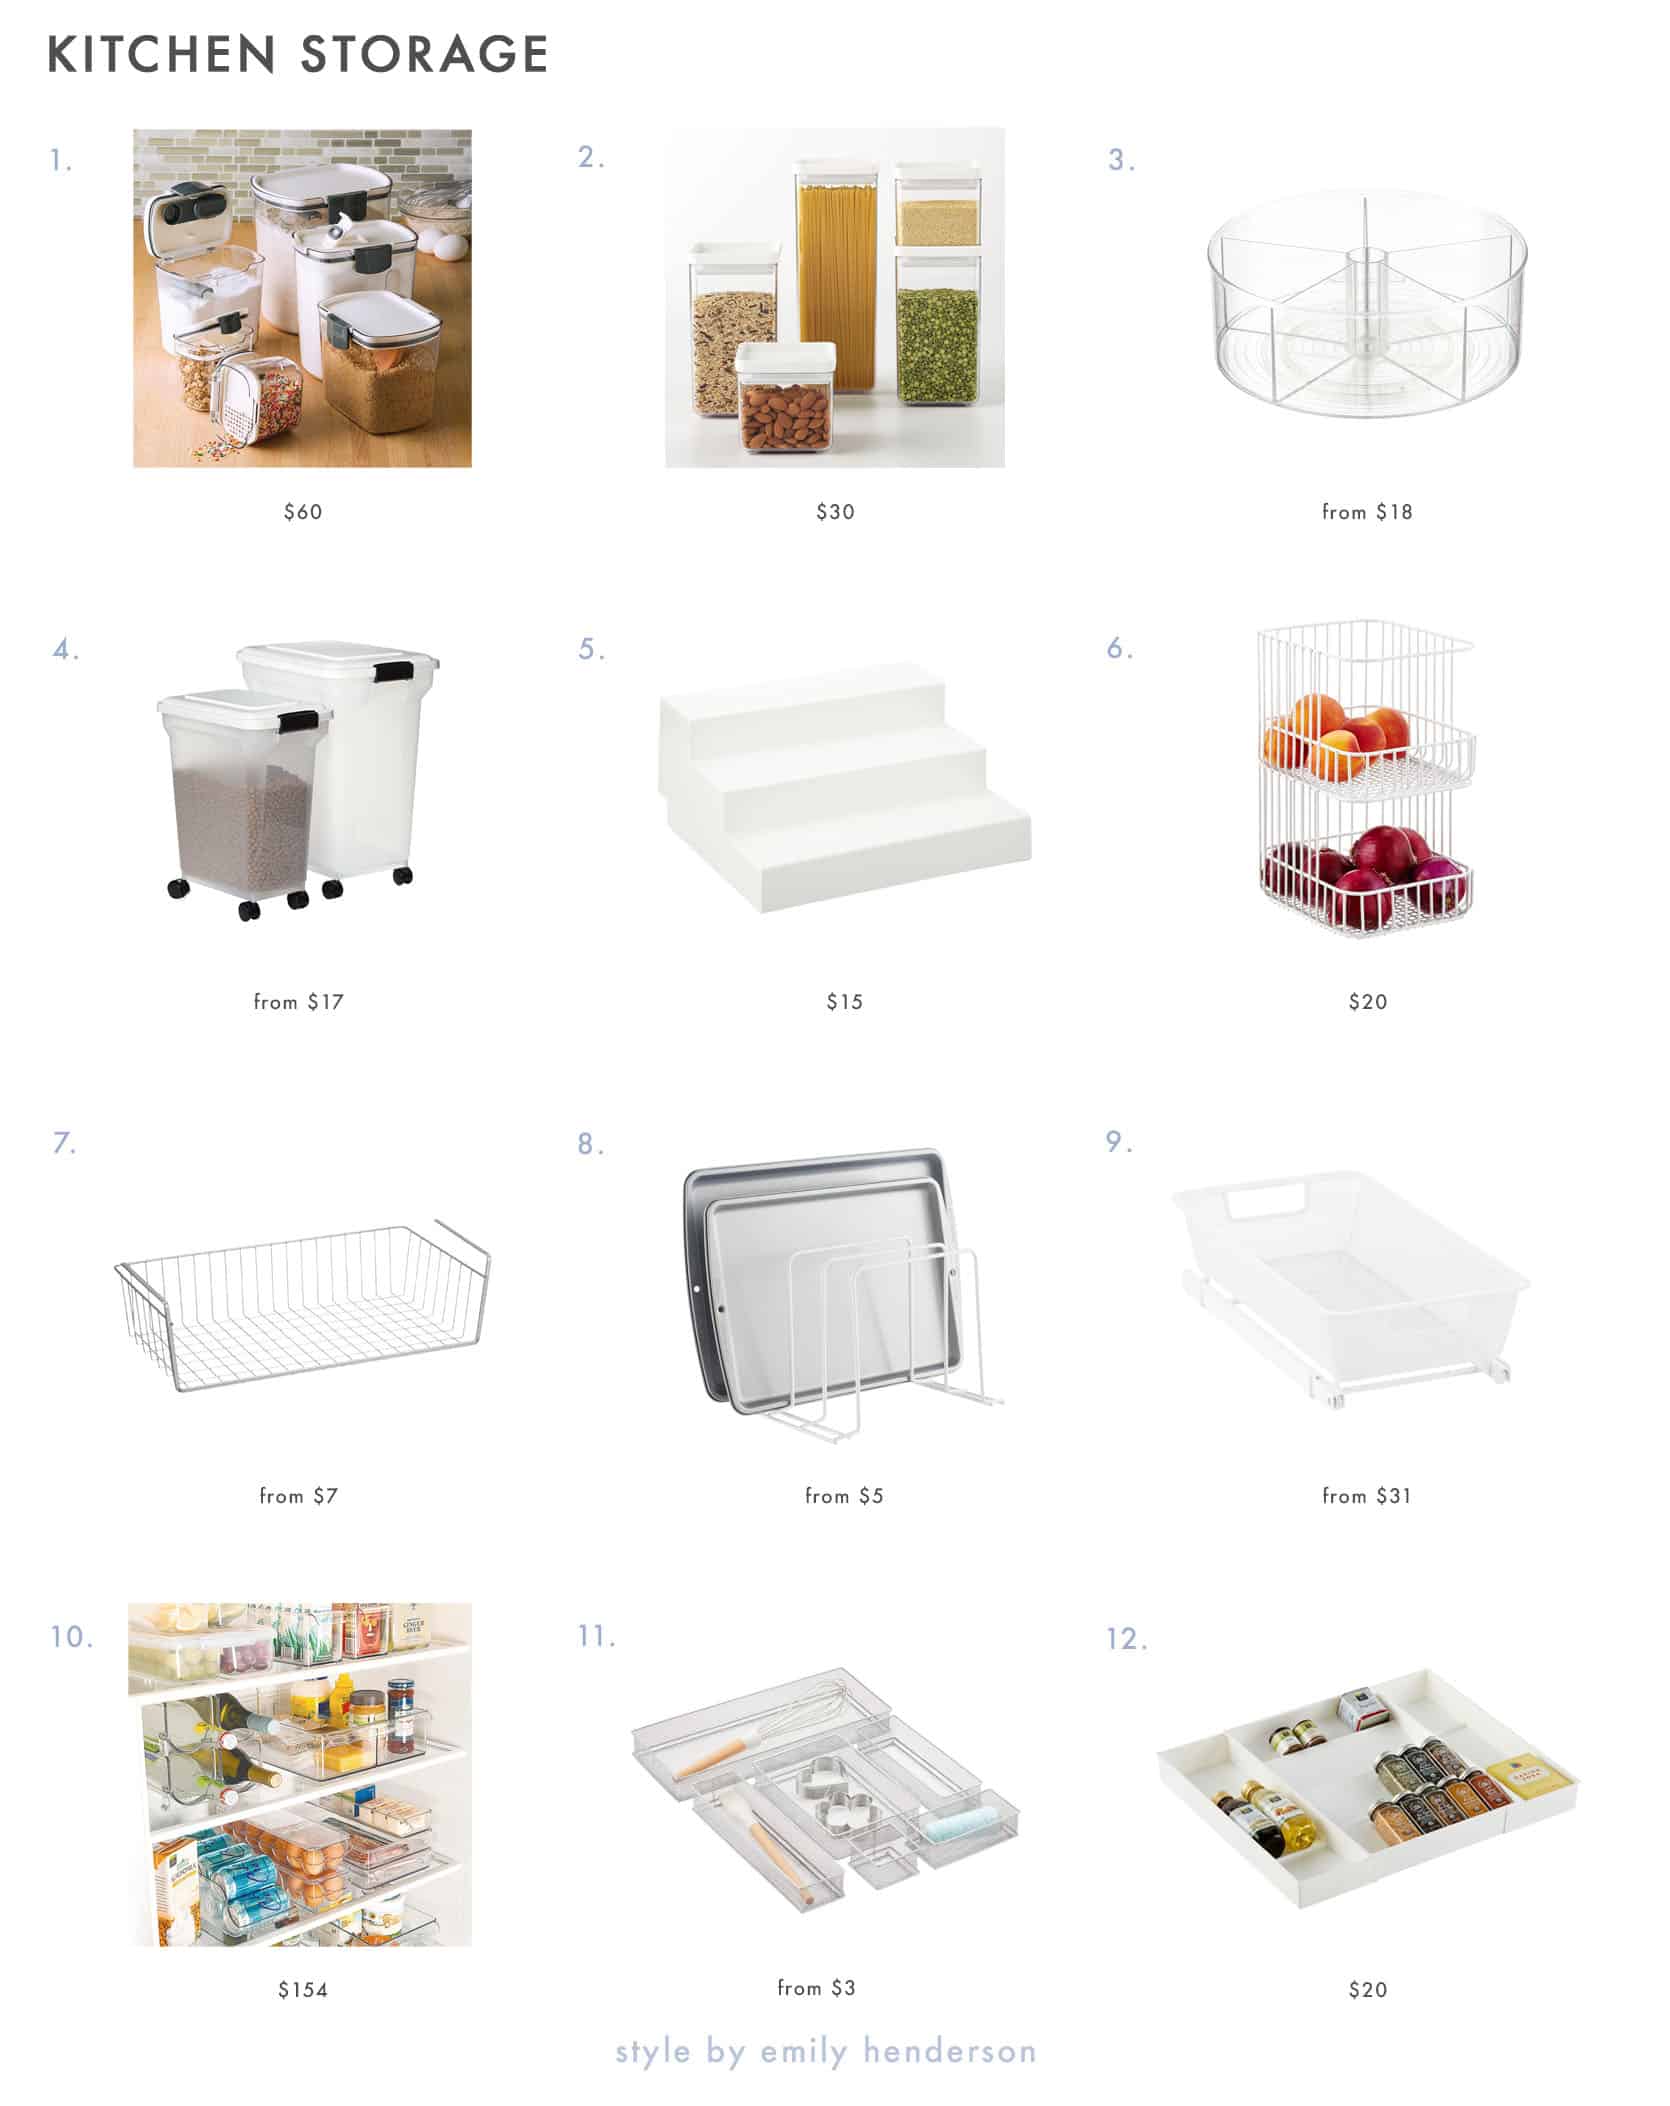
1. Baker’s Storage: There are SO MANY options out there for airtight baking containers, but this is the best choice for casual bakers. (I know, because I am a casual baker.) There are so many special details here — snap out levelers, flip-out spouts, dusting spoons, terra cotta inserts — and it’s a great price for six containers. (If you’re a more serious baker, they have a set of 10 for only $20 more.) 2. 5-Piece Modular Canister Set: Your search is over. After examining nearly every container option, this one came out as the winner. These don’t feel bulky or heavy, they’re easily stackable, and the size is perfect for actual consumption. (Sometimes I feel wary of food I decanted a while ago — this doesn’t happen here because they’re not jumbo and I can actually eat everything in a canister in a week or two.) They’re about half the price of the equivalent OXO product and while they lack that signature airtight button seal, I actually think the food tastes less plastic-y and I eat it fast enough that it’s never been an issue. 3. Lazy Susan: There are a lot of clear acrylic lazy Susans out there. This is the best one AND it’s nearly 20% cheaper than a similar one that’s branded with the name of a certain organizational company with a new Netflix show. (No shade! Just love a deal over here.) 4. Pet Food Containers: Did anyone else grow up with a big, round, plastic bin of dog food looming somewhere in the kitchen vicinity? This is an even better version of that — the wheels make it SO MUCH easier to manage and the locking clamp means that food will be safe from even the smartest of pups. This also could work for litter or garden soil or road salt or…you get it 5. Expand-a-Shelf: This can stretch from 13” to 25”, so it’s the most flexible tiered shelf on the market — you’ll be able to use this in nearly ANY cabinet you have in ANY kitchen for the rest of your life. After testing out a can rack like this and these shelves, I give these the edge as I like being able to see everything AND you can organize by tier (e.g. nut butters on top, cans in the middle, spices on the bottom, vitamins upfront on the actual pantry shelf). 6. Steel Wire Stackable Basket: These are a dream for organizing snacks or perishables that need a little breathing room (potatoes and onions, this one is for you!!!). They’re stackable, so you can customize the height to fit tiny cabinets or larger open spaces. 7. Undershelf Basket: If cabinet space are at a premium in your home, this opens up a whole new world for ya. These are sturdy (there are review photos of one of these baskets holding up 5 cartons of almond milk in a pantry) and they come in a few sizes, so they can fit anywhere you need a little extra storage. 8. Wire Dividers: These are a dream for lids and for things like muffin tins and casserole dishes, which I had previously just stacked on top of each other. If the sound of clanging glassware or pans grinds your gears, this is a GREAT option. 9. Pull Out Cabinet Drawers: OH MY GOSH y’all, don’t spend money on custom cabinets when you can grab these for UNDER THIRTY DOLLARS. If you have deep cabinets and trouble accessing everything OR if you have any mobility issues (where are my fellow pals with bad backs and knees????), these are a total game-changer. There are so many sizes available and installation is a breeze. WHAT ARE YOU WAITING FOR? 10. Fridge Starter Kit: If you want a custom fridge solution, start here. As pictured, these products are only 50% of the price of the previously mentioned branded equivalent and the quality is AWESOME. You can customize to fit your needs (like, I love wine and eggs — not together, though maybe I should try??? — so I could increase the number of those respective pieces) and there are some BEAUTIFUL fridge inspiration pics in the reviews. 11. Mesh Drawer Organizers: Eschew your standard cutlery tray for these bad boys! I live in a 1930s building with original, not-2020 standard sized cabinets, so these are a dream for wrangling all my forks and knives and openers and peelers and general kitchen miscellany. They maximize space and I’m not left with some weird larger leftover tray spots, like I am with most standard all-in-one options. (I know those spots are for like, serving spoons or different sized forks or something, but I don’t own any of those!!) ANYWAY, take a peek in your drawers, figure out what you ACTUALLY need, and make these work for you. (PS. I prefer silver mesh over acrylic here because you can avoid water spots if you’re also kiiiiinda lackadaisical on the “drying” portion of doing the dishes.) 12. Spice Organizer: There are obviously a ton of traditional options for spice storage (racks, caddies, lazy Susans, etc.) buuuuut I am very partial to this one, which can slide into a drawer. It takes away a layer of work required by some of the other options (like decanting or labeling) and I’m a big fan of seeing everything laid flat. Would recommend if you have a drawer to spare! Garage
1. Corner Double Tool Rack: This comes as two pieces so you can definitely rock a semi-circle like the photo (arches are very 2020 so this is actually an #ontrend storage option, which is fun) but you can also separate them and push each piece into a corner. It takes up virtually NO SPACE and holds SO MUCH STUFF. Brooms, rakes, shovels…give them a home here instead of leaning them against a wall! 2. Utility Bike Rack: Remember Em’s garage and Brian’s organizing plan? I have on good authority that once the moving dust settles, they’re eyeing a WHOLE garage makeover, including this bike rack. The Elfa line is awesome (it’s what Sara picked for her closet, so there are interior options too) and perfect for those of y’all who love a simple, clean, organized space. 3. Cargo Organizer: I am notorious for having a wreck of a car (both interior AND exterior, if you must know), so my godmother Shannon bought me this for Christmas. I had time during the beginning quarantine (didn’t we all??? Remember March?) to FINALLY clean everything out, and now I’m hardcore for this. Thanks Shannon! I keep it in my trunk to organize all the emergency stuff, but my favorite use is for flea market finds — when I get home, I can plop everything safely into a separate portion and carry it all upstairs at once by myself. There are smaller sizes too, but I loooove this 40” one. Bathroom
1. Sectioned Trays: There are a lot of bigger bathroom organizers, but I vouch for these sectioned trays instead. They’re the best-priced option, you can pick the sizes that best fit your drawers or your needs AND they’re extra perfect if you have a super thin drawer that can’t fit traditional organizers. Also great for kitchen junk drawers or craft areas! 2. Handled Bin: Once you get one of these in your bathroom, you will *never* be able to go back. I keep two on the vanity — one for my skincare bottles and one for my hair products. Having things corralled makes such a difference and makes cleaning a breeze, as I can just grab a bin and clean underneath instead of having to move a bunch of individual bottles. Definitely would recommend, especially for those of y’all with kids or partners who clean *just* up to where products start on the counter! (Formerly guilty.) 3. Dual Canister Set: If you’re looking to decant cotton balls and swabs, the price on this can’t be beat. Again, it’s connected, so it’s EXTRA EASY to pick up and move for cleaning purposes. Closet
1. Drawer Organizers: JUST TRY THESE. There are TONS of different sizes (there are also some VERY good inspo photos in the reviews) and they will make your dresser feel like a custom closet. I went from haphazardly dumping my underwear in a drawer to putting each pair in their little custom cubby. They make me feel like a person who really has my sh*t together, which is an IDEAL way to feel when you’re getting dressed every morning. 2. Hanging Clothes Organizer: Life-long convert over here. I have two VERY tiny closets in my bedroom so while I’m good on hanging space, I definitely needed more “bulkier folded clothes” space. I use one in my primary closet for jeans and one in my ~sportswear~ closet for sweats and pajamas. Love them. 3. Mesh 2-Drawer Unit: Gone are the days of the plastic dorm room storage!!! The product photo shows this being used as extra folded clothing storage, but I recommend this for corralling alllllll those little tiny purses/clutches/wallets or for folded scarves. 4. Tall Solid Shelf Dividers: OMG I LOVE THESE. If you also have a tiny closet and you find yourself stacking sweaters on a high shelf, you may be familiar with the tilt, where everything just leans and looks kinda sloppy. I’ve tried a couple solutions for dividers but this is the best one because it hooks onto your shelf and is super stable — your folding work will be preserved AND your top shelf will *finally* look tidy. 5. Belt & Tie Rack: You can wall-mount these and they are the BEST for belts. The spacing is perfect. 6. Bedside Caddy: Ok, is a bedside caddy the most beautiful thing in the world? Probably not. Will it be gracing the covers of a magazine anytime soon? Signs point to no. But OMG does it deserve more love? It sure does!!! The uses are endless: tiny room with only one nightstand? Caddy on the other side of the bed. Bunk bed in a dorm? Caddy on the top bunk. Cat knock everything off your bedside table in the middle of the night? WOULDN’T HAPPEN WITH A CADDY. Office
1. Letter Tray: Love a letter tray! I use the top for partnerships contracts that I’m currently workshopping and the bottom for contracts that are active. (Finished contracts go in a folder in a credenza…in case you were wondering.) 2. Portable File Box: If you don’t have one of these on hand already, they offer up a lot of peace of mind — it’s nice to know that you have all your family’s most important documents (birth certificates, passports, medical records, etc.) in one place where they’re ready to grab in case of an emergency. 3. Erasable Labels: The person who designed these deserves an award. These are just the labels (so you can grab your own cute folders!), but you can actually use them ANYWHERE and they’re also perfect for canisters, bins, or shelf labeling. 80 of these will last you FOR. EV. ER. AND THAT’S IT FOR ME. This is the good, good stuff and an actual jumping-off point if you’re feeling overwhelmed by the sheer number of options available out there. I would like to once again extend my gratitude to Brenda, my mom, for instilling in me a near-encyclopedic knowledge of every item at The Container Store. (Again, not sponsored, but I wish it was!!! What kind of partnerships gal am I, writing posts like this for free??? One who’s dedicated to acrylic bins and who wants to spread the word about pull-out cabinet storage, I guess.) And because I can’t leave you without tipping you off to a final really good deal: The Container Store is currently offering 25% off custom closets, which is 100% worth exploring if you’re in the market for upgrading your own place. 25% off here can equate to like, hundreds or THOUSANDS of dollars, and you know I love a discount!!!! Sara picked the Elfa, their most affordable option, for her own closet (reveal coming soon to the blog!), so I can vouch for quality AND aesthetics. I sound like a spokesperson (and yes, I would happily accept the position), but just wanted to make sure it was on your radar in the event that you had been budgeting for a little closet makeover. ANYWAY. What org products do you love??? Anything I should try next?? The post The Organizational Products That Have Been EHD-Vetted (Room By Room) appeared first on Emily Henderson. Originally from Emily Henderson https://ift.tt/3mOOBCO From Design Assistant To Lead Designer Our Wonderful Julie Is Off To Start Her Next Exciting Chapter9/29/2020 
Julie Rose started with EHD a little over 3 years ago. I remember her first day vividly, as does she I’m sure, because I had to leave her in my office, mid introduction to puke in the bathroom because I had overdosed on vitamins. What is worse is that I had to go back into my office and tell my new employee that I had just puked because I had overdosed on vitamins. It was pretty cool. We later laughed about it, but that must have been SO awkward for her. I hired her straight out of design school, with an impressive portfolio but no on-the-job design experience (or very little that I remember). She played it cool like she didn’t follow the blog or had seen the show (this is a normal trend with new employees but then I find out the TRUTH later :)). But she had good calm energy, like I said impressive interior architectural skills, and most importantly to me she hiked (by herself) the Pacific Crest Trail for weeks from Socal all the way North to… I don’t know where it goes but it’s LONG. I know that not every employer is like me and cares about “extracurriculars” but someone who can hike by themselves physically and mentally for weeks without seeing their friends and family (or sometimes a single human) is IMPRESSIVE. It told me about her perseverance, her willingness to put her head down and work and not to mention her love of nature and spirituality (which I think is a nice touch to a well rounded human being.) 
But she started in the middle of a real EHD design panic (not to mention the physical vitamin OD). I was underwater on the Portland and mountain house projects and needed help like ASAP. She was not the first nor the last person who I have interviewed on a Monday and asked them to start on a Tuesday (it’s not my best move as a boss, I know). So needless to say she was thrown into a company that doesn’t just design and we are not traditional in our work process. We had two projects going – one in another state that was supposed to be a “cute remodel” that ended up being a 5k square foot new build, and one where I had given the audience all design decision making ability (remember I Design, You Decide) thus us needing to design each room TWICE!! That’s all to say, she was THROWN into the EHD world and while I’m sure at home she told a different story, at work she was so on top of it and cared so much almost immediately about the projects. She was very often the first one in and the last one to leave (and trust me, people – your boss notices this). She even came in on a Sunday and worked all day with me because the bathroom sketches were due the week before and I couldn’t do it on my own. And on our many trips to Portland and the mountain house, I loved hanging out with her, working with her, and drinking whisky with her. She was very responsible for catching so many of my mistakes and we got to make so many more together! Over the last year and a half, after those two projects ended, she became the lead in-house designer taking over so many room makeovers and sponsored design projects that at first I helped oversee, and then I didn’t even have to. She has such creative talent AND SKILLS. See for yourself. She and Emily B. led the Velux Project in Utah:
The Atlanta Project (with Emily Bowser):
Then Violet’s Bedroom:
Chandlers Bachelor Pad:
And Of Course, Suzanne’s Bedroom:
AND Grace’s bedroom and her bathroom refresh – both coming soon! Training an employee to not need you on projects, to lead confidently is truly a win-win and made it so we could both grow in different ways. So what’s going on now? Well, with the potential move to Portland, our permanent move from LA AND the pandemic, our day to day “designing” had drastically shifted. Knowing that within the year (we think) we’ll be up in Portland made taking on any major new design projects in LA difficult, or I would be doing it just for her because I didn’t want to lose her. So after a lot of open conversations, we realized that it’s time for her to move on, to seek out other opportunities to grow on her own or with another designer. AND GUESS WHAT??? She is going to be working with Velinda on design projects! And guess what else? Grace (remember Grace?) is ALSO working with them. Guess who shoots their work? Sara. Guess who styles it? Emily Bowser. And guess where it’s published after they’re shot? STYLEBYEMILYHENDERSON.COM. So not only is she still finishing up a couple of makeovers that we have (our next Velux Feel Good Makeover), and going to be a contributor on design posts, but she is going to be working with former EHD on design projects, published here. It makes me so happy I can’t even tell you. And while I want her to fulfill her dreams of designing a boutique hotel (and she will someday) this year probably isn’t the year for it. So in case you are looking for a fantastic design team in LA (they do e-design too!) you now not only get Velinda, but Julie, Grace, and Bowser. Spread the word, guys. 
Now I wish I could go back in time and write tribute posts for each person. I feel like Velinda and Emily B., since they went freelance at the same time, didn’t get a full post on their own, nor did Grace (and I’m sure others). But know that I love you, Velinda (great designer, hire her), Bowser (great stylist – hire her), and Grace (great designer – hire her) so much. Anyway, after Sara went freelance I’m sure you have a lot of questions about the size of the team reducing. Is everything ok? What’s going on?? The truth is – I’ve loved so many of my team members over the years, deeply, but I like running a small team. I was on the precipice of making the choice between going bigger or going smaller (medium size of 10 – 20 employees is strangely difficult to manage) and I realized that I don’t want a 100 person empire. At least not right now 
But back to Julie. Yes, today is her last official day as full-time EHD staff. Writing this made me cry. You, Julie, have seen me cry SO MANY TIMES that I’m sure you can picture it. Thank you for 3 amazing years and I can’t WAIT to see what you do next, in every way. You’ll always be Team EHD to me The post From Design Assistant To Lead Designer, Our Wonderful Julie Is Off To Start Her Next Exciting Chapter appeared first on Emily Henderson. Originally from Emily Henderson https://ift.tt/2FYjAM9 
We are not in the “breaking news” business of journalism, yet publishing our scheduled “guide to throws 101” is not what we want to read ourselves. We’ve tried blog escapism and NEWS FLASH: IT DOESN’T WORK. Yesterday’s announcement, after 6 months of protesting not to mention 400 years of racial injustice oppression was shocking and yet for many not surprising. I had more hope for us (and her) and thought that at some point there would be arrests and charges, but I also suffer from an almost toxic positivity of which I’m learning to shake quickly in 2020. Instead of me trying to say something poignant so immediately and quickly (I have so much to say about this that can’t be written overnight), we have collected thoughts from those who we follow who said it quickly and better than we ever could and we will add to them throughout the day. 


To help continue the fight against systemic racism EHD will match every donation from readers up to $5k towards Louisville Community Bail Fund. Email us your receipt to [email protected] and we’ll collate them together and match the donation. Update: thank you to all those that donated. WE want it to be very clear that myself and the EHD team supports peaceful protests and our hope for supporting bail funds to help those arrested who can’t afford to make bail, make bail. Let us know any other ways to help in the comments so we can help promote and get the word out. Racism – systemic racism – is not the Black and brown community’s problem to solve and it’s even more clear many leaders in our government aren’t interested in solving this either. Use your voice even if you say it wrong or in a wrong way – lord knows I have and it’s OK, we are all learning. Just speak up LOUDLY, VOTE, and remember, always say Black Lives Matter. Opening Illustration Credit: Design by Arlyn García The post Today We Mourn The Death Of Breonna Taylor appeared first on Emily Henderson. Originally from Emily Henderson https://ift.tt/3ct7Ugf 
This year I found myself tuning into the Emmys for the first time in years — less because I had a vested interest (though I will say that Matthew Macfadyen was ROBBED) and more because I’m just at a loss with what to do with my Sunday nights at this point. But OOOOH, it was FUN. I was pleasantly surprised! Did y’all watch it? It felt so voyeuristic, which I loved, but it also felt surreal. Like, I’ve been sitting alone in my apartment for 6 months…and y’all are Zooming in from a party? In a room TOGETHER???? Sitting on the same sofa when there are known infections in the celeb crowd AS WE SPEAK? (In case you missed it, two of the preshow hosts had to drop out because they tested positive for COVID.) Barring my confusing and visceral reactions to seeing groups of people being happy together — and barring the surprise that the Emmys production team was able to coordinate hundreds of people on Zoom, while I recently had to enlist Julie to help me turn off my computer camera because I thought I was being spied on (spoiler: obviously, I wasn’t) — I HAD A GOOD TIME WATCHING. I don’t even know what was said in any acceptance speeches because I was transfixed by some of these real-life houses — that, when away from good angles and professional photographers and photoshop, just seemed normal and achievable — so now, we obviously have to talk about it. Kicking it off with the controversial pick that I had to share during Monday’s meeting… Jesse Armstrong’s (The Succession Guy’s) Heriz
THERE IS SO MUCH TO TALK ABOUT HERE. When Em asked us in our Monday morning meeting about we did this weekend, this was my only contribution: DID YOU SEE THAT FREAKIN’ RUG? She’s gorgeous!!! At first I wasn’t totally sold on the room — it was a lot (even for me, a self-proclaimed maximalist!) — but I was pretty transfixed by the end of the night. Look at the legs on those sofas! The walls of optical illusion drapery! The…wolf??? paper mache behind Jesse’s left shoulder! I feel like I *need* to see the professional shots of this place and I *know* someone out there has them. Zendaya’s Neutrals + Olive Trees
Can someone please fill me in on the awards show wizardry? Like, I know the whole thing was ~live~, but it definitely wasn’t, right? How did Zendaya go from the stage to…home??? in a new outfit??? in a matter of minutes? Is this backstage at the Staples Center? HOW DID IT WORK? (These are the conversations that I really miss now that we work from home). In any case, this room was a masterclass in textured neutrals. Those white linen chairs are SUCH a classic and that chunky solid round pedestal table behind Zendaya was GORGEOUS (when you could see it). Also was a huge fan of those enormous pots and olive trees — though technically I think they may be olive bushes? — as decor. Billy Porter’s Everything (+ The Post-It)
I wish Billy Porter had won because I NEEDED TO SEE MORE OF THIS SPACE. First: I wish I had footage of the person who had the job of draping this cape/wrap situation. And even though this whole place is so glamorous — from the casual award placement to the $1,300 floral arrangement (there’s a fun rabbit hole for ya this afternoon!) to the baby grand piano — there is still a blue Post-It note over the door handle with what I can only assume are instructions for locking the door. It’s SO HUMAN and normal. Loved it. The Shelf StylingNot that it’s a competition (although technically, I guess the Emmys are a competition), but who won the built-in shelf styling for you?? I loooooved Linda Cardellini’s floral arrangements and think they’re super inspiring. Can you imagine a huge built-in with just plants like these? It’d be so luxe! But I was taken by Uzo Adubo’s shelves. They look like my shelves! She had books and figurines and candles and boxes and it just seemed so personal to her. I think the Friends’ shelving was maybe technically the most ~magazine ready~, and the backlighting with the dark paint was STUNNING, but it also didn’t say a ton about the person who lived there. (To that end, who actually lived there? Whose house is this? Aniston’s? Kudrow’s? Cox’s? Jason Bateman’s? Is this even a house, or is it just a set? Can someone with a production background chime in?) Anyway, WHOSE WAS YOUR FAVORITE? Maria Schrader’s (Unorthodox Director’s) Wall Paneling
OH MY GOSH. This room was an architectural knockout! Look at the paneling and the checkered color variation. Look at the carvings above the door. Look at the moulding heading up into the wall! I’m so used to seeing painted trim and walls that seeing all this untarnished wood makes my heart so happy. I think this was my favorite space of the night. (Also, when I googled to confirm that I was spelling Maria’s last name correctly, I learned that she is 54! I know this isn’t a post about skincare…but she needs to drop her skincare secrets! I had assumed she was only a few years older than me!) Octavia Spencer’s Leaded Glass Windows
LOVED. Can you imagine lounging here, wearing a similar silk jacket, and sipping wine with your new pal Octavia? The gray is a dream in here — not too warm and not too cool! It reminds me of the Chalk Gray that Julie used in Chandler’s apartment — and the cream pleated lampshade, throw, and grain sack pillows do a perfect job of warming it all up a little bit. (PS. This is the best vendor for similar pillow covers on Etsy!). But more than anything, I’m obsessed with those leaded window details. How beautiful!!! I stalked a little bit and found this article from 2013 about Octavia purchasing a home that *seems* like this place based on the windows, but now I am in desperate need of a full house tour. (I need to know how she styled around that fireplace!). Rachel Brosnahan’s Leopard Spot Pillows
Obviously I’ll be an eternal fan of storied brick walls, a timeless leather couch, and bold modern art, but the real winner for me here were the pillows. I don’t know enough about animal prints to know what this really is — my googling has also suggested that this may be a cheetah spot or a Dalmatian spot — but I *do* know that I have been increasingly bullish on graphic animal prints lately and these absolutely scratched that itch. (Also gotta love the masterful brand placement and martini styling!) Don Cheadle’s Textile Mixing & Matching
SO. MANY. GORGEOUS. TEXTILES. And not only on the pillows and blankets, but also on the upholstered dining chairs! I had a feeling that this was pulled together by a pro and it turns out that Bridgid Coulter, the woman up there and Don’s wife, is an incredible interior designer based right here in LA! Her portfolio is a real treat for those who love bold, worldly, and collected spaces. AND THAT BRINGS US TO THE END OF MY FAVORITES. What were yours? Did you also enjoy this year’s show? Does anyone else want to talk about how Matthew Macfadyen was robbed? Or about that Schitt’s Creek SWEEP?! I no longer have the luxury of watercooler chats with my coworkers, I live alone, and I can’t really justify holding meetings to check in with the team about celebrity’s Zoom backgrounds, so y’all are really the only ones I have. LET’S CHAT?? The post The Real Winners Of The Emmys… The Celebrity Interiors That Deserve The Spotlight appeared first on Emily Henderson. Originally from Emily Henderson https://ift.tt/2G0GDWf How to Lean Into Eclectic Granny The Minimalist Way (Via A Vintage Lovers Dream Home Tour)9/29/2020 

Thanks to my never-ending search for home inspiration, my style feels as if it is constantly evolving. This can be disorienting and design paralysis inducing, but it is never boring. Now, as I’ve painstakingly discussed over the past few months on this blog, I am leaning towards an old-world-eclectic-Italian-grandma style in my home. To solidify this path, all I needed was one home tour to hang my hat on, to ensure that this style is not just a phase, that it is in fact where my heart lies. Enter today’s home tour that confirmed my destiny with just one photo. Today, we have the distinct pleasure of featuring 1925 Tudor located in Los Angeles, California that’s currently on the market waiting patiently for the right buyer. It was staged by our friends at A 1000 X Better so when they reached out asking if we’d like to feature it, I nearly fell off my chair. Little did they know they just sent me my personal dream home, so I was eager for a chance to talk about the exquisite design. When I spoke with their team, they let me know this was a partial staging, and A 1000 X Better used most of the seller’s own furniture and supplemented with pieces that would integrate into their style seamlessly. What’s really striking is how lived-in and soulful this home is because the staging involved amplifying the already eclectic pieces from the previous owners. While staged homes are just that — staged — this one is particularly dripping with charm making it feel like paying a visit to eccentric yet very stylish grandmother’s house (again, my dream!). Now, I realize the eclectic granny style is not for everyone. In fact, the comments from this post prove just that. However, if you are slowly acquiring a fondness towards this style, I want you to feel confident that it can be achieved in a minimalist way. So without further ado, let me introduce you to the six steps to doing just that: Pick Your Big Wall Moments
Obviously, if your home has a floor to ceiling built-in bookcase wall á la Beauty And The Beast, picking your big wall moment is a no-brainer. But I want to dissect why this wall moment works in bringing together the eclectic granny style while still maintaining a minimalist feel. First, the extensive collection of books makes the space feel eccentric and cozy, but not too busy. The walls surrounding the shelves are kept simple and for the most part bare, so your attention is not pulled in many directions. With the bookcase wall being the focal point the rest of the decor can be kept simple and minimal. Note that it is minimal, but not at all boring. This same effect can be achieved with a gallery wall, a large multicolored tapestry, or a wall to wall bookcase styled with books or unique collections. However, if you want to veer away from entering full maximalism territory, just make sure to focus on a single wall, then keep the rest of the walls and decor minimal (while maintaining a simple color palette). 
Aside from the loaded bookcase, they’ve styled out the home with a plethora of vintage wood furniture which leads me to my next tip… Mix Wood Tones And A LOT Of Texture
A big component in achieving an eclectic granny style is incorporating many vintage or vintage-inspired things. Varying wood tones can help achieve this aesthetic and it especially helps if those pieces are worn in and well-loved like this excellent rustic farm table. To include more depth and warmth consider mixing patterned linens and pottery to layer tons of texture. It is important to vary textures but keep a solid color palette to maintain a relaxed and minimal style. Keep Your Color Palette Neutral (With Small Pops Of Color)
While this room is clearly warm and neutral it is far from boring. The bedding is crisp and simple but the choice of the rug and pillows adds character and depth. 
It’s worth noting how calm and inviting this room is while still achieving a very eccentric and cool style. The aspects that are working to calm the space (the white walls, white accent chairs, and neutral bedding) are paired with vintage silhouettes, patterns, and photographs making the space much more dynamic. 
Additionally, the gallery wall of framed photographs are reminiscent of family portraits, emphasizing the room’s cozy and welcoming feel. 
Similarly, this bedroom maintains a calm, neutral color palette but is not lacking in color or pattern. To create this look, opting for a colored accent chair or piece of furniture in an interesting shape allows the rest of the space to stay quite minimal. While the bedding is very simple, the curtains add some visual interest with the small pattern that matches the overall color palette. And finally, the rug pulls in even more color that can be accented throughout with art and decor. 
As previously discussed here, we love pairing a boldly patterned lampshade with a solid lamp base. The green floral lampshade here brings in just a touch of color and whimsy to the minimal desk set up, making it a perfect little vignette to emphasize the eclectic granny-style they are going for. Also, look how fun and interesting using a “too big” lampshade on that small base looks?? Another classic way to add color in a neutral space is through art. A landscape painting works two-fold by adding color, and when paired with an antique frame, can give off that granny effect. We at EHD are very fond of the vintage landscape paintings and vintage portrait oil paintings to bring more personality into a room. 
Ok, this wonderfully odd sculptural piece isn’t adding a pop of color BUT that has EHD written all over it. Excuse me while I search for something just like it… Layer In More Color And Character With Patterned Vintage Rugs
When a room is lacking character a simple rug swap can do wonders. While we love a neutral or solid rug, there is something special about a rug that adds brightness and dynamic to a room. As you’ve probably noticed, this home is dripping with vintage rugs which adds in a ton of color to the home without being too loud. 
If you want to ease your way into eclectic granny, a vintage rug is the most simple and effective baby step you can take. They surprisingly work well with a myriad of styles and always bring life and color to a space. When incorporating lots of vintage rugs as they did here, you can keep your home simple and moderately decorated because the rugs will add that needed pop of color. Create Zones For Eclectic Vignettes (Show Off Your SPECIAL Collections)
Any wall cutout or built-in is the perfect vessel for displaying collected items, but this can be carried out in any home with a bookcase, shelf, or cabinet. I am a huge fan of decking out bookcases with books as the design gods intended, but any type of unique collection is great for styling shelves. For example, a simple and affordable hack is to fill a vessel or catchall with matchbooks, as they did here. This creates a curated yet personal feel that is essential to styling any home. Consider Dark Trim To Ground The Space
If I imagine the space without the dark trim, it is still fiercely breathtaking, but sans dark trim, it is at risk of coming off less dynamic. Creating contrast with trim is going to give the home an eclectic feel right off the bat. Again minimal doesn’t mean boring. 
Especially with light-colored walls, opting for dark trim creates contrast but still keeps the space feeling light and bright. If this were a dark room, it would feel very heavy, so keeping the walls light and bare is essential. 
Anddd, there she is. Thank you for joining me on this tour through such an inspiring and eclectic home and huge thanks to A 1000 X Better for letting us feature what happens to be my personal dream home. RESOURCES: Vintage Rugs: Blue Parakeet Vintage Kantha pillows: Etsy shop in India Hemp and Kilim pillows via Etsy shop in Turkey Turkish textiles: Oddbird Flowers and Branches: Mayesh Art: Alison Lowe For more information on this 1925 Tudor home, check out the listing here. xx ** Staging by A 1000 X Better | Photography by Scarlett Macdonald | Creative Direction by Gillian Lawlee | Real Estate Agent: Jacqueline Tager, Sotheby’s International Realty Los Feliz Brokerage. The post How to Lean Into Eclectic Granny The Minimalist Way (Via A Vintage Lover’s Dream Home Tour) appeared first on Emily Henderson. Originally from Emily Henderson https://ift.tt/3mHHsUJ |
 I am so ready to share with you my “teeny tiny rental bathroom refresh” reveal. It’s been almost 3 months to the day since four of us on the EHD team – Jess, Ryann, Caitlin & myself – shared our


