
Hey hey, party people welcome to FRIYAY! I have been assigned to tackle (yet another) post about alcohol (the last was my easy cocktail making formula for beginners, don’t forget to read it if you haven’t already). Today’s post, however, isn’t about mixing drinks, it’s about creating and styling out the station that houses all the goods to do so. That’s right, we’re talking about…anyone? Anyone? Bueller? THE BAR CART. I know that suspense was killing you, so I won’t make you wait a second more. Let’s get down and dirty on the rocks. I purchased a bar cart beauty from the one and only Sara so I’m excited to say that it’s being passed down from EHD generation to generation. It’s kind of like your Grandma’s family heirlooms getting passed down except for your Grandma has impeccable style and is only 29. Anyway, Sara was selling this beauty and I pounced on the deal very quickly. Here’s my new bar cart in action (from Sara’s perfectly styled house reveal): 
Ain’t she cute?? Now here she is in my empty pile o bricks apartment: 
A lil different without the cute styling, professional photography and good lighting…but I’d say this bar cart is still a looker. I saw its potential very early on (well at Sara’s shoot to be exact) and since then I wanted to make it look as good as possible, BUT HOW? I needed some inspiration, so I dug into the EHD archives and pulled some cute styled bar carts from back when Ginny and Brady did their MOTOs. Let’s take a peek: from brady’s living room reveal | styling by brady tolbert | photography by zeke ruelas There’s no denying these bar carts are swoon-worthy…so let’s dissect what makes them SO GREAT. I studied and I fought and I killed for a bar cart formula we now get to build…(is Hamilton suck in your heads too since it came out on Disney plus???). Also, I had some expert help from Julie too:) Anyway here’s the magical EHD no-fail bar cart styling formula: OUR FOOL-PROOF BAR CART STYLING FORMULATOP SHELF:On one Side: Something tall and sculptural (a vase with greenery is a great option) In the Middle: Bar tools to actually make your drink (shaker, mixing glass, cocktail spoon, jigger, muddler, etc), everyday glasses and citrus bowl On the Other Side (because we want to create levels): Most used liquor bottles (either decanted or not, YOU CHOOSE) BOTTOM SHELF:On one Side: Tall extra/specialty liquor bottles In the Middle: Tray (the rug of the bar cart) with extra glassware on top with something small like a candle On the Other Side: A fun, tall sculptural decor piece (again levels are your design eye’s friend) So that’s how it’s done. But clearly, I’ve talked the talk but now it’s time to walk the walk… so here it is you guys. My bar cart styling formula in action (with photography by me so please don’t judge): 
I told you my photography skills are not quite professional, but look how cute this lil cart looks! Compared to that first photo where it’s empty, I’d say I’m pretty proud of how she turned out. Also, yes I put a decent helping of Casamigos on it bc it’s my favorite and no this is #notsponsored. If you guys want to see me build it I made an IGTV so watch that bad boy here if you want to see how it came together. Now let’s be real. It wouldn’t be a bar cart post if I didn’t round up a bunch of awesome bar cart accessories (P.S. these might look similar if you shopped my how to make a cocktail for beginners post). If you didn’t read that post and still haven’t clicked on it even though I linked it twice then these will look very fresh cute and new to you (but still read the cocktail post and enjoy the best at-home drinks of your life). Please enjoy these goodies! 
1. Cocktail Kingdom Set | 2. Gold Cocktail Tool Set + Gold Cocktail Shaker | 3. 12 Piece Cocktail Set | 4. Gunmetal Cocktail Set | 5. Rose Gold Cocktail Set | 6. Black Marble Bar Tool Set + Champagne Gold Cocktail Shaker 
1. Walnut Wood Muddler | 2. West Elm Thatcher Jigger | 3. Hammered Metal Muddler | 4. Stainless Steel Jiggers (Various Measurements) | 5. Winco Netted Head Muddler | 6. Gold Jigger with Handle 
1. Nugget Ice Maker | 2. Peak Extra-Large Ice Cube Tray | 3. Silicone Round Ice Tray | 4. Short Tumbler (set of 4) | 5. Mexican Recycled Luster Highball Glasses (set of 4) | 6. Blush Pink Coupe Glass (set of 6) Thoughts? Comments? Questions? Concerns? Hope this was a fun post to round out your week –– happy bar cart styling everyone! The post The NO-FAIL, EHD Approved Bar Cart Styling Formula… Just In Time For The Weekend appeared first on Emily Henderson. Originally from Emily Henderson https://ift.tt/2BLZNxk
0 Comments

Hi all, and welcome back into my teeny tiny bathroom for one! A little over a month ago a few of us on the team walked you through our rental bathrooms and shared our hopes/dreams of how to spruce them up for the better. Unbeknown to us (Ryann, Caitlin, & myself), Jess decided to announce in the post that she wanted to challenge all of us to get them done in 2 months. I gladly accepted this deadline cause I personally work better under pressure. Let’s just say I perfected pulling an all-nighter in design school. So ladies, how are yours coming along? I know that Caitlin has wallpaper on the way and Jess shared a very beautiful custom piece with us on our Zoom call yesterday. All I can say is that it involves more of that beautiful wood incorporated in the rest of her apartment and it’s a real good hack that I think many of you have agonized over in your own rentals. I’ve had a few items arrive like a huge half-circle vintage mirror, a vintage french towel rack and a hanging planter but there are some last-minute but big design decisions to be made and I am soooo torn. Here is where you all come into the equation, today I am hoping you’ll weigh in and just tell this Libra which direction to move forward in. As a little reminder here is the beige box that I am working with… 
WOW. I apologize for all the many, many notes of the things I want to change and this is only a mini refresh, imagine if I was doing a full renovation. Yikes! Actually, it would probably have just a big ‘X’ over everything with the exception of the window and door trim since I am quite partial to those. Let’s talk about the initial ideas I had for the space. First off, I am not planning on swapping out any of the hard fixtures. This includes the faucet, toilet paper holder, mirror, and even the vanity hardware. That last one is mainly cause I can’t remove them without ripping apart the vanity since there is a piece of wood covering the screws. I am however wanting to replace my yellowing (ewwww) plus kind of broken toilet seat cover with a beautiful new wood one. When Jess shared this bathroom trend idea, I just knew I had to have one in my life. For the past 8 months, I was searching for a large vintage mirror to overlap that builder grade one to add some interest to it since it spans the entire wall. I finally found it and it arrived the other week but like the excellent procrastinator that I am, it currently lives under my bed. I like to tell myself, “Why should I hang it before I add temporary wallpaper or implement my paint design idea?” but in reality, it’s cause it weighs a ton and I am nervous to install it into my brittle stucco walls. Short Rant: They truly are the worst walls and make the littlest of tasks so difficult. I went to hang a piece of art with a small nail the other day and I kid you not, when I hit it softly with the hammer for the third time it sounded like half my wall crumbled behind it. Coooool. So, hanging the mirror is a bit terrifying but eventually I will gain the courage (probably after a drink or two) to see if it stays up on the wall. Rant over. The rest of the design refresh includes a mini medicine cabinet DIY, picking out a paint color (your choices are dark or light purple, yes purple), adding a new towel rack, some solution for storage, and styling it out. 
On the other side, we have this beautiful (kidding) shower surround courtesy of circa the 1970s I assume. It’s hard to tell from the photos, but in person it looks pastel peach with some streaks of coral, it could be worse but also it could be better. For instance, a classic simple subway tile like on the front of the tub. Why didn’t they put it all over?? But I get that it being a rental would make it very hard to clean or expensive to replace over the years. So, what has inspired the mood board you are about to weigh in on? Well, none of them are a bathroom that is for sure. 
Initially, I wanted my bathroom to carry over the “old man library” aesthetic of my bedroom and was so inspired by the three images above but then I saw this photo from Angela Wator’s Instagram… 
That purple and coral color combo stopped my scrolling thumb amongst the sea of neutral. I think I’ve mentioned it before but the right shades of purple and I have been friends since high school when I painted my 12′ x 20′ attic bedroom floor to ceiling in purple. Arlyn wrote about the purple comeback almost two years ago and the trend doesn’t seem to be slowing down yet. 
Two weeks ago I decided to give our members on EHD Insider Community a sneak peek at my two mood boards that I have been working on for the past month. My hope was that it would help me decide once and for all which direction to go but they too seemed pretty torn between the two design plans. One of the options had more items and therefore felt a little stronger so to make it fair (Libra) I’ve updated them to include all the same stuff. Without further adieu, let me introduce you to Option One: 
Option One was designed by drawing on the elements from the first round of inspiration photos. There is pattern, there is a lot of color (maybe too much), it’s a bit moodier and definitely has that “old man library” feel but like his wife came in and for sure put up that shower curtain. My design heart was set on this plan until I thought of two things. The first is that it might be a lot for a tiny bathroom where I try to relax as I get ready for my day in the mornings and take my baths to again relax at night. And two, the temporary wallpaper in yellow did not look great next to my shower surround. Here’s the proof… 
I was afraid that it would accentuate the shower surround and make it look more dated than it already did. What I needed was a contrasting color…purple, lilac to be exact. That brings us to Option Two which incorporates a lot of the same elements but is more tonal (read: relaxing) but my question to you is, is it too safe? 
In this option, I am deciding to forego the peel & stick floor tiles. It’s kind of a relief in a way since I am not sure how much longer I will be in this apartment and it seems very time consuming to put them down just to spend hours removing them in maybe less than a year. I do love the ones that I had found so I hope Ryann uses the black colorway in her own rental bathroom. Do it, Ryann! And, if you are wondering what that wood frame is for, that’s the mini medicine cabinet DIY. I am making a simple wood frame with cheap hobby board to cover up the chrome and calling it a day. Alright! Now is the time to cast your votes below. Opener Image Credit: Photo by Sara Ligorria-Tramp | From: Makeover Takeover: Julie’s HUGE (and DIY packed) Bedroom Upgrade The post Ask The Audience: Help Julie Design A Quick And Colorful Rental Bathroom Refresh appeared first on Emily Henderson. Originally from Emily Henderson https://ift.tt/30cO5W2 
I don’t talk about this much, but I have a great aunt named Katherine who lives in Amish Country right on the outskirts of Lancaster, PA. I see her once or twice a year tops — only for the holidays — and in true millennial fashion, I normally spend the entire trip complaining. My time at her house is usually spent up on a ladder, reattaching the gutters, cleaning the 9 basement litterboxes for the hordes of feral barn cats she’s welcomed into her home, or carrying around bails of hay. Y’all, there is a reason I moved to a big city 11 years ago and it’s because this LTE-less farm life is NOT my thing. But every time I’m at Katherine’s, right when it’s time to head back to my regular life, she hits me with a present. Sometimes they’re holiday-related, sometimes they’re a belated birthday gift, sometimes it’s an “I saw this and thought of you” pick. They’re almost always thoughtful and timely — snowmen at Christmas, fake flowers for an upcoming spring, pumpkins to celebrate the fall, an embroidered pillow — but they’re so not my style that I dread getting them every time. AHH. Does this happen to you, too? What do you do with decor gifts that are just not right for you, especially if there’s love behind the giving process? We ended up talking about this on a recent EHD Zoom and EVERYONE from the team had examples. There were bookends from a loving nana, depression-era goblets from a great grandmother, tiny figurines from a sentimental mom, quilts from a thoughtful sister…and collectively, we are stumped. If this is a universal struggle, how do you handle it in your home? Katherine can’t travel (and she doesn’t have the internet, which is why I feel a little better about airing my grievances so publicly), so all of my gifts from her currently sit in a closet in my living room. Y’all, it looks like a Magnolia outpost in there. I HAVE SO MANY THINGS MADE OUT OF WOOD. It’s truly like a secret Narnia farmhouse, which sits in stark contrast to my 80s black and white striped sofa and leopard print Jaymar chair. I know the etiquette is that I’d have to style these things like they always take up real estate in my home if she were ever to visit, but since that’s not an option, they just sit untouched until I will inevitably re-pack them up and schlep them to my next home. My favorite gift I’ve ever gotten from Katherine was a sponge holder, like this, which my mom forced her to get me for my 25th or 26th birthday. My mom says she protested — “this isn’t nice!!! It’s not good enough!!! It’s only $6!!!” — but it’s the only gift I’ve ever actually used (and loved! I highly recommend a sponge holder like that!). But it’s been a couple years, and we’re back on the painted barn wood gift train — even my mom’s nudging that maybe I’d prefer something a bit more practical didn’t sink in long-term. So if you can’t necessarily hint at the things you’d like (and you have enough social awareness to know that telling your 80-something year old great aunt that you dislike her taste would be AWFUL) and you have to accept these gifts, where do you go from here? Is donating ever an option? For the past couple years, it’s been cool to have less, but the world has shifted a bit. (LOL. A BIT.) Like, do my unnamed coworker’s (you know I wouldn’t put anyone on blast!) old goblets spark joy? No. Do they work with her decor? NO. Buuuut, would they be kind of nice to have now that she’s home all the time and dishwasher-less? Maybe! I think I struggle with my decor because it can’t serve this functional purpose — my hanging wooden Halloween ghost is off-brand (for me) and it’s just taking up space. But can I donate it without guilt? I’m not sure! (Right now, though, it’s a firm no! She’s old and spent her limited income on getting something for me, so I have to keep it forever, right? SOS! Someone, tell me if it’s weird or not to be having a moral crisis over this! I want a closet back!) And it just gets more complicated when you jump into the family heirloom space. What happens when you’re not dealing with just decor — what if it’s a bigger piece, like a vintage chaise or an antique hutch? How do you tell your family that you’re just not interested in bringing something with history and sentimental ties into your home, knowing that it’ll cause hurt feelings? Do you think you’ll ever regret not having your grandmother’s extremely ornate bedroom set? Is it worth it just to store it somewhere, or do you just cut your losses and send it to Goodwill? The whole thing is just DICEY, y’all. So please, I’m curious if you’re having the same dilemmas: do you also have a spot for that gifted decor that’s just not right for your house? Do you suck it up and present it anyway, because you love the history and gift-giver? Have you donated a gift? Do you lay things out when your relatives come over, only to return them to their more permanent home in your closet or basement? Have you donated something and then regretted it? Are you not sentimental at all and do you think I’m a goof for writing this whole post? LET’S CHAT ABOUT IT. Opening Photo Credits: Photo by Bethany Nauert | From: Lisa’s House: Living Room The post What Do You Do With Bad Decor Gifts?? appeared first on Emily Henderson. Originally from Emily Henderson https://ift.tt/39E7odY Its Back to School Well Back To Homeschool: 54 Desk and Chair Combos For Every Age And Budget7/30/2020 
I want to start this post by saying that the dining table is a perfectly great and sometimes the only option for a SFH (schooling from home) space. However, if you are a parent facing the harsh reality (as many parents are) that normal school will not be in session in the next month (and you do have a little extra space to spare), you may be thinking about a more permanent school workspace. One that will make your home feel a bit more in control (remember control? haha wasn’t the past fun??) and the dining table reserved just for meals. Now I am not a parent but after watching and consoling my friends and family who are, I wanted to round up some solid desk/chair option for kids of all ages. It was the actual least I could do. Summer is almost over so let’s get right to it. Alright, little ones are up first. 
If you are like Emily, your kids are in school but their studies are less about good grades and more about exercising their little brains to prepare them for the big leagues… elementary school. Sure there are cute workbooks and flashcards to go over but arts and crafts are still A BIG part of the curriculum. So instead of opting for a desk, think about getting a play table. Extra points if it has storage! 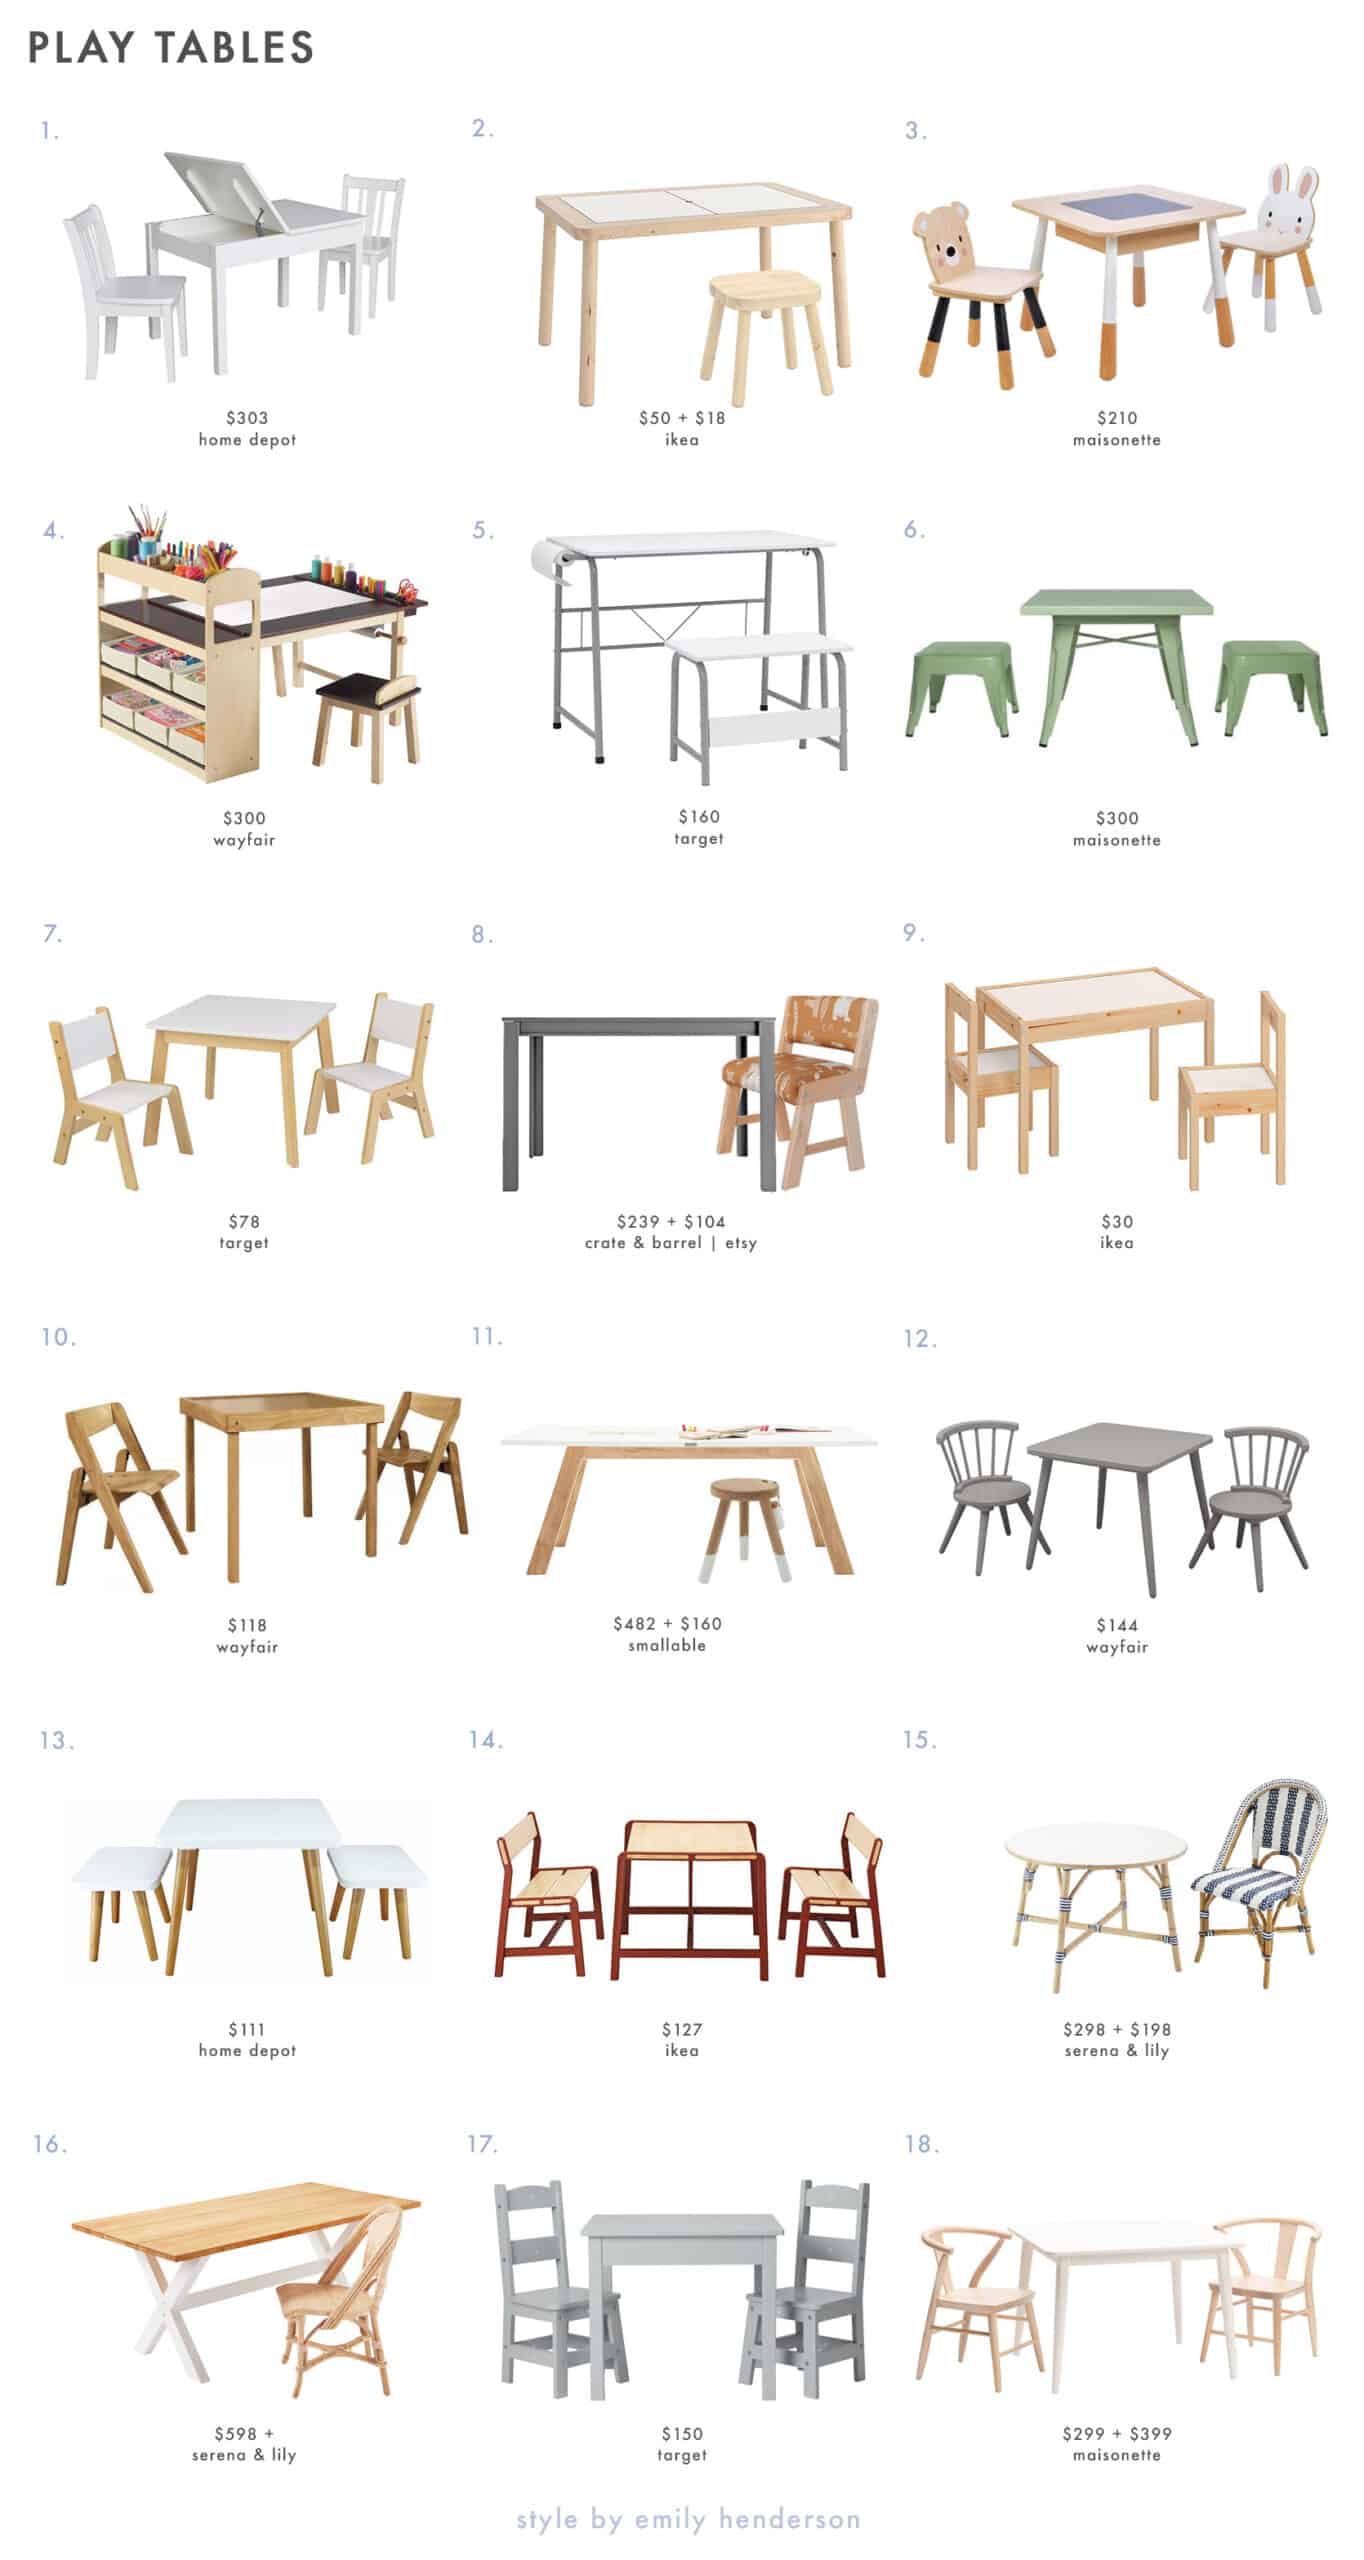
1. Jorden Lift-top Storage 3-Piece Ready to Finish Child’s Table Set | 2. Children’s Table & Children’s Stool | 3. Forest Table and Chairs | 4. Emilio Kids 3 Piece Arts and Crafts Table and Chair Set | 5. 2 Piece Table and Bench with Paper Roll | 6. Lemonade Playset | 7. 3pc Modern Table and Chair Set White | 8. Large Charcoal Adjustable Kids Table + Kids Chair | 9. Kids Table And Chairs | 10. Aghacully Kids 3 Piece Table and Chair Set | 11. Maxxi Mini Table Natural + Oriente Stool Natural | 12. Nicklas Kids 3 Piece Windsor Writing Table and Chair Set | 13. White and Maple 3-Piece Easel Kids Table and Chair Set | 14. Child’s Table with 2 Benches | 15. Kids’ Riviera Play Table & Kids’ Riviera Chair| 16. Kids’ California Dining Table + Kids’ Sunwashed Riviera Chair| 17. Melissa & Doug Wooden Table & Chairs | 18. Crescent Table & Crescent Chair Pair I just think it’s worth a mention how chic children’s furniture has gotten. I mean #10 and #15 (hello mini wishbone chairs!) are too much for my heart. But when it comes it’s cuteness #3 and #14 are so sweet. However, being a parent makes you put practicality as the main priority, so if you don’t already have a ton of storage #1, #2, #3, #4, #10 and #11 are your top contenders. Now let’s get serious because the kids are bigger and the math is harder… 
This next roundup is for kids that are still not ready for the actual “big kid desk” but are in need of a more proper desk. The grind starts early people! And while I am clearly no expert, I feel that creating a work desk for your “not super little” little, is a good way for them to practice sitting at a desk like they would in a regular school setting. This is not me shaming any parent that doesn’t have a desk for their kid. Because let’s be honest, what is best for you sanity is best for you child:) 
1. Black and Wood Kids Table with Drawer and Chair | 2. Architect Table Pink + Little Architect Chair | 3. Blue Kids Table + Galento Paris Kids Desk Chair | 4. 2 Piece Arts and Crafts Table and Chair Set | 5. Bohème Desk + Adjustable Weaning Chair | 6. Study Furniture Set | 7. Règine Desk + Kids Chair Suzie | 8. STUVA + Metal Children’s Chair | 9. Kids at Home Desk & Stool | 10. Kids’ Desk + Kids’ Chair | 11. Growing Chair and a Multifunctional Table | 12. Adjustable Mobile School Standing Desk + Industrial Activity Chairs (Set of 2) And yet another classic “Jess can’t choose a favorite because she is annoying and can’t make a decision to save her life.” But really. LOOK at how cute these all are. I will say that the price of #1 is incredible and would blend with almost any style of home decor (10 points for that). #5 is a very sophisticated and CUTE setup and I would happily put that combo on display in my home. Plus the chair height is adjustable. And speaking of adjustable furniture, the desks for #9 and #12 also can grow and your kiddo gets a little taller. Pretty great AND practical. Alright, it’s big kid time. That ranges from middle school to well I guess college with the quarantine still fully in place. The great thing about this category is that eventually, these pieces can be yours if you want! So HOT TIP: Choose with your kid (and you) in mind. Also, the sweet room/desk setup on the left belongs to a now very grown 16-year old Grace that just this past year got a full room makeover and Sara and Julie are shooting this week! Stay tuned and hopefully, you are more patient than me because I CANNOT WAIT to see the photos. Until then here are the combos for your kids (and you) 
1. Hampshire Olive Green Kids Desk + Adelai Office Chair | 2. LILLÅSEN + LÅNGFJÄLL | 3. Oslari Wood Writing Desk + Furlicious Faux-Fur Airgo Swivel Desk Chair | 4. Meredith Desk + Lourdes Task Chair | 5. Ada Glass and Wood Writing Desk + Upholstered Rolling Desk Chair | 6. Studio 34″ Wall Desk + Camden Office Chair | 7. Alex + Petal Office Chair | 8. Sloan Desk + Wingback Swivel Desk Chair | 9. SKARSTA + Channel Back Office Chair | 10. Helix Walnut Desk + Cooper Mid-Century Leather Swivel Office Chair | 11. Amherst Wood Writing Desk + Velvet Leighton Upholstered Office Chair | 12. FJÄLLBO + JÄRVFJÄLLET | 13. Trestle Desk + Velvet Mid-Back Task Chair | 14. LINNMON / LERBERG + FJÄLLBERGET | 15. Rooney Wall-Mounted Desk + Faux Leather Leander Swivel Office Chair | 16. Parsons Desk + Ergonomic Office Chair | 17. Kids Parke White Desk and Hutch + Kids Class Act Brown and Gold Desk Chair | 18. Industrial Storage Mini Desk + Green Upholstered Office Chair | 19. Mid-Century Mini Secretary + Velvet Office Chair | 20. Wood Writing Desk + Tufted Parker Upholstered Office Chair | 21. Reclaimed Pine Workstation + Sherpa Ivory Airgo Swivel Desk Chair | 22. Amelia Desk + Edith Velvet Desk Chair | 23. Troy Modular Corner Desk + Steelcase SILQ Office Chair | 24. MICKE + ALEFJÄLL Ok hands down #1 is my favorite combo. That chair is the desk version of one of my favorite dining chairs that Julie featured in her Comfortable Dining Room Chairs post. Those leather-wrapped arms give my goosebumps! #4, #7 and #21 are also some of my favorites but something that was really important to me was to make sure they were all the chairs cushioned. It’s the only way! One thing I have been mulling over now that I have been working from home full time is an adjustable standing desk like in #9. Have you all tried them? Thoughts? Do I need one? I know that some of these prices are steep but remember one day soon it will be YOURS, so buy in that mindset if you are wanting to purchase anything. Ok so now your kids are guaranteed to stay quiet all day long and get incredible grades. Did you know it was that easy? Ha just kidding but I hope that if a SFH situation is upon you or even a WHF, that you got some good ideas. Let me know what you think in the comments. Are you finally setting up a “real school zone?” Let’s talk classroom ideas:) Love you, mean it. Opening Photo Credits: Photo by Tessa Neustadt | From: A Playful and Bright Playroom Reveal The post It’s Back to School… Well Back To Homeschool: 54 Desk and Chair Combos For Every Age And Budget appeared first on Emily Henderson. Originally from Emily Henderson https://ift.tt/3gqeMMJ 
I think all dog owners can agree that once they become a part of your home and life, your world is forever changed. Not just because they are human’s best friend but because they will absolutely take over your home if you let them. I’m not the strictest dog parent so needless to say my dog has won this battle. It’s fine, I surrender. However, so long as I have a 60 lb lap dog in my life, on my sofa, and in my bed, I will be damned if I don’t at least attempt to save the decor and design of my home. This means searching for the most design-friendly dog accessories out there, so I can perhaps maintain a tiny bit of control. I’ve put off purchasing a lot of the dog accouterments but as the design of my home comes further and further along, I needed to find what’s best for my dog, my home, and my sanity. Here we go… 
1. Forest Dog Bed | 2. Contempo Lounge Pet Bed | 3. The Wolf Nest Linen Dog Bed | 4. Riviera Dog Bed | 5. Moderno Pet Bed | 6. Animal Print Memory Foam Dog Bed | 7. Quilted Orthopedic Bolster Cat & Dog Bed | 8. Modern Mud Cloth Natural Dog Bed | 9. Wild One Bed | 10. Indigo Mud Cloth Dog Bed | 11. Isla Dog Sofa | 12. Fringe Studio Textile Lines Pillow Pet Bed I have to admit that I love a floor pillow in place of a traditional dog bed. They are subtle and great for small spaces as you can layer them on top of a rug so it doesn’t take up a significant amount of floor space. Something like #6 would be very cute layered over a cowhide rug and people won’t even realize it’s secretly a dog bed. Personally, my pup will lay/sleep on basically anything but over the years I’ve noticed he prefers the beds that have a ridge so he can lay his head on it like a pillow, so #7 and #9 would be his preference I’m sure. But as I mentioned before here, a great trick is to have throw blankets (that you aren’t super attached to) layered on rugs and on the floor for them to snuggle up on. This is a great way to keep them off furniture as much as possible. 
1. Dove Marine Rope Dog Leash & Charcoal Stripe Dog Collar | 2. Found My Animal Classic Hemp Dog Leash & Making Shapes Collar | 3. Emerald Velvet Rope Leash & Hunter Green Rope Dog Collar | 4. Coral Dog Collar & Coral Dog Leash | 5. Navy + Brass Recycled Materials Dog Collar & Royal Navy Rope Dog Leash | 6. Chambray Dog Collar & Grey Cotton Rope Dog Leash | 7. Custom Leather Dog Collar & Black Leather Dog Leash | 8. Wild One Collar & Wild One Leash | 9. Sage Box Lounge Leash This roundup was very timely for me as I have not upgraded Gus’s collar and leash combo since we adopted him. It’s something I’ve been wanting to do for a while but never felt like a big enough priority to spend money on. BUT NOW, after seeing the options out there I think it is time. He would look so handsome in #5 and #7 but I also love the look of #9. Has anyone had experiences with any of these brands or products?? If so, you know I love a real customer review so let me know. 
1. Concrete Pet Bowl | 2. Ceramic Peet Bowl | 3. Waggo Dipper Dog & Cat Bowl | 4. Handcrafted Ceramic Raised Dog Cat Pet Bowl | 5. Dog Bowl for Small & Large Dogs | 6. Wild One Bowl | 7. Ethical Pet Stoneware Crock Pet Dish | 8. Raised Dog Bowl | 9. Concrete Dog Bowl The difference that purchasing these dog bowls made in my kitchen is pretty unbelievable. Before, I was using tin salad bowls in place of actual dog bowls and let’s just say it was not cute and very messy. Now that we have these proper ones I feel so much better and I feel happy for Gus even though he doesn’t know the difference, I like the idea of spoiling him a bit (he’s my baby!!). 

1. Vanilla Veg Tanned Leather Tug Toy | 2. Modern Mud Cloth Natural Dog Squeaky Toy | 3. Cotton Dog Rope Toy | 4. Frisco Plush and Rope Bundle Dog Toy, 6-Pack | 5. Triangle Tug | 6. Medium Rope Tug | 7. Organic Cotton Rope Dog Toy | 8. Bolt Bite | 9. Sheepskin Bone Squeaky Plush Dog Toy | 10. HuggleHide Bone Dog Toy | 11. Leaps & Bounds Playful by Nature Toss | 12. Jax and Bones Anchor Rope Dog Toy My dog is a pretty big boy so his favorite toys are stuffed animals he can rip apart in two seconds. He also loves a squeaky toy (like the animals in #4) but they annoy me so much so for him, I try to stick with bones and things he can chew on. However, his favorite ball ever is this so if you don’t mind the squeaky sound, it’s a good and cheap option. #5 and #8 are very chic for dog toys and a rope toy is a classic because who doesn’t love tug of war?? 
1. Jar With Lid | 2. 3 Piece Canister Set | 3. Waggo Gloss Dog & Cat Treat Jar | 4. Waggo Dipper Dog & Cat Treat Jar | 5. Colori Canister | 6. Large Ceramic Canister | 7. Niko Large Blue Ceramic Canister with Wood Lid | 8. Textured Stoneware Kitchen Canisters | 9. Airscape Ceramic Storage Container The great thing about treat containers is you can use just about any kitchen food container out there. If you don’t have a ton of cabinet space and will be leaving the treats out on a counter all of these options are stylish options that could easily fit in with normal kitchen decor. I love #5 and #8 and you can’t go wrong with a classic glass jar. 
1. Set of Rainbow Baskets | 2. Culla Bench | 3. Garissa Basket | 4. Woven Basket | 5. Revistero Basket | 6. Mid-Century Cabinet | 7. Jay Tufted Upholstered Storage Bench | 8. Mid-Century Toy Chest | 9. Rope Basket with Lid Storage is always top of mind for me (hello tiny apartment) so I had to include some options here. Now that you have dog leashes, collars, and toys you’ll need somewhere to store them. If your space permits, I think an entry storage bench is a perfect solution. You can keep the leash and toys close by the door plus the bench can be multifunctional. If a storage bench is not a viable option, baskets are a great alternative. I love the ease of simply throwing my things in a basket and closing the lid. Voila! Just like that, I am the best organizer ever. 
That’s all I have for pups but I’d love to know what other pet roundups would you like to see from us. We know many of you are dying for some cat content (which I am sure Caitlin or Sara could certainly oblige) but if you have other suggestions drop them in the comments. See you there. xx Opener Image Credit: Design by Lea Johnson | From: Tour a Stylist’s Mid-Century-Meets-Traditional “Farmhouse” Full of Thrifted Treasures The post Does Your Home And Pup Want Cuter But Practical Accessories? We’ve Got You Covered appeared first on Emily Henderson. Originally from Emily Henderson https://ift.tt/30Wa0zO Design Agonies BE GONE 5 VERY Universal Problems Solved Via The EHD Insider Design Agony Group Chat7/29/2020 
Our design agony posts are extremely near and dear to us. We LOVE getting to have a more personal connection to you all, getting to answer your exact questions, and helping you tackle your most troubling design issues. I mean room layouts are tricky, knowing what to do with a blank wall can feel like a graduate-level algebra question, and sometimes a second opinion can put you at total ease. We know that last one to be VERY true because y’all you have been just as much as a support to us in helping make some very important design decisions as hopefully, we have been to you. SO it was a top priority for when we created the EHD Insider Community that a “Design Agony” section was included so any member could upload a photo and ask the community for help. And let’s just say it might be the best part. Everyone has such great and insightful advice and knowing there is a place to ask, “Hey, is this rug a good fit for my living room” or “Any suggestions for my fireplace reno mishap” or “What is missing from making this room look awesome??” is pretty freaking great. But to be fair we may be partial:) So with their permission, we wanted to take a handful of the agonies our Insiders posted that are pretty darn universal. Let’s jump right in… I want to start with my old friend, Martha. Ok, so sadly we don’t “formally” know each other and hang out with wine, chatting design into the wee hours of the morning. That’s what normal friends do, right? BUT if you head to our ShowEmYourDIY: Kitchen Edition you will see her wonderful kitchen remodel where a light facelift made a HUGE difference. This time though she was inspired by our headboard sconce trend post and DIY’ed one herself. It looks awesome! But she is now stuck with the ever baffling question of “What do I put above my bed??” This is actually a question we get all. the. time. so if you need some examples here and here. But let’s talk about Martha specifically. Here is here bedroom and question: 
How wonderful is this?! Now in terms of the art question, one Insider was curious about the depth of the ledge which Martha replied was only one inch…so not an ideal depth for an art ledge. Another reader thought that something like the MQuan beaded wall piece that Em has used in the past would look great (and it for sure could) BUT Martha wants something a little calmer in texture so here is what Julie (and then seconded by Bowser) recommend: 
The point Julie made about balancing out the “grid” look of the headboard with a single large scale is a winning match. One reader recommended this awesome print that we love and could be a perfect pick. However, Martha wants something that’s unique to her… so vintage is on her mind. We think that’s a great idea since buying vintage is for most of us, our design love language. I also personally think a large scale horizontal textile (vintage or not) could look awesome and also cozy:) Next up is a window treatment dissatisfaction… 
Buying window treatments can be intimating and when you aren’t in love with what you bought is SUCH a letdown. But despite Emilie feeling blah about her relaxed roman shades, we think that they are totally great. The Insiders had a ton of great ideas. Some of which included trying normal curtains, faux panels, a patterned roman shade, rotating the bed to be in front of the windows, etc. But we think her lackluster feelings are coming from a lack of texture and decor in general. By adding in a furniture set up like the one below (one of my all-time favorite EHD rooms) between the middle and far-right window, Emilie would bring in a ton of visual interest which would take that pressure off of the shades to fill that visual hole. 
Or simply hanging some large framed art pieces or a large wall hanging would also bring in that dimension without the need for more furniture. Lastly, we agree with another Insiders suggestion to try the bench at the foot of the bed Next is the search for “the right” coffee table. 
We also know from experience that coffee tables are something people want advice about. Luckily we have a great post with a graphic explaining all the coffee table rules! But let’s look at this real-life agony. Katie has a medium-sized living room where all of her furniture pieces are more or less rectangles (including her rug). Now adding another rectangle (the coffee table) is going to make her living room feel a little too one-note. One thought, a round coffee table! Wait, not so fast. A round coffee table could work but to give us our “2/3rds the width of the sofa” rule, the size of the round coffee table might be way too big for the size living room. Fine, I’ll stop holding out… 
The winner is OVAL! And it wasn’t just Emily that thought so. Every Insider was in agreement. Oval coffee tables are just power players. They give you the width and surface area of a rectangle coffee table but the soft (and usually contrasting) shape of a round or sculptural coffee table. Heck, one of Emily’s all-time favorite and kid-friendly coffee table is an oval. Side note: This agony has a happy ending! Katie took Emily’s/everyone’s advice and bought a glass top oval coffee table and loves it! Shall we tackle a layout agony? I think now is the perfect time. Oh, the sweet sweet frustration of designing for a modern life in an old beautiful home. Our wonderful Insider, Mallory is having a time with her dining room/WFH office that she shares with her husband. Honestly, we get it because this is NOT a straight forward, “try this and all of your design dreams will come true.” But the good news is her vintage home is awesome and where there’s a will there’s a design solution. 
So now that you’ve read Mallory’s plea for help there were a lot of suggestions. One that a bunch of Insiders liked was the idea of a banquette to get the table off of the wall (just like Arlyn did in her dining room). BUT as I said before this space really needs to function as an office for the foreseeable future. One reader had the idea to install two floor to ceiling shelving units (which she could DIY if she’s up for it). I also loved this idea because she mentioned that the constant disorganization and clutter is driving her nuts. I think this is a great option but to not overwhelm the space AND avoid covering the floor vent, they are going to need to be pretty shallow. So after taking in all of the suggestions, she came back to the Design Agony Group Chat with this mockup below. 
So pretty right?! Now I think these are the best two options (and suggestions from Insiders) if she installs the bookcases:
Mallory, you HAVE to post the finished photos on the Show & Tell section of the community site when you are all done! Let’s go back to the classic “but what style lamp would work best” agony… 
Rachel, we understand what it feels like to be uninspired so we are here to help! We agree that while that lamp is very cute, we think that something more modern and contrasting will give you what you want. Also, we sure do love that Rebecca Atwood fabric First, let’s see what the Insiders recommended… 
1. Emilie Table Lamp with USB Base | 2. Modern Plated Brass Wall Sconces | 3. Thebes Table Lamp |4. Blossi |5. Emilie Table Lamp with USB Base I like all of these! Actually number #1 is surprisingly pulling at my heartstrings. Plus it has a USB portal. WHAT? But on the other hand, I do think that something modern, sculptural, and dark will give Rachel the fun playful mix and match style she is looking for. 
1. Conical Metal Wireless Charging Desk Lamp | 2. Arum Table Lamp | 3. Flowerpot VP3 Table Lamp | 4. Streck Table Lamp | 5. Curvilinear Mid-Century Table Lamp I wish I could pick a favorite but I can’t. Why I think any of them would look sick is because they will all provide a bold but neutral moment and their delicate frames will contrast the bulkier furniture and decor that are already in the room. Now I hate to even dare let these words pass through my lips but fall isn’t that far away. And while a mudroom isn’t something my southern California upbringing required (no snow and light rain), clearly the rest of the country HIGHLY values a solid mudroom. Emily’s first mudroom was in Portland and she learned a lot. So when Lilly asked the community’s must-have mudroom essentials, Emily and the rest of the group jumped in to help. 
Here is the list:
Do any of you have any other items you’d like to add to the list?? Ok, now this last one is more of a fun Ask The Audience for Emily’s friend because it’s fun and it was quite the split vote on the community… 
So what is your vote: Keep the wallpaper or strip it ASAP! Cast your vote in the comments:) Alright well that’s enough agonies for today. HA! Just kidding we never tire of helping solve the world’s design questions. I hope that some of these helped with your own agonies or at least you were comforted that there isn’t one person on the planet who is designing their home and isn’t stumped by AT LEAST something. And was this all just a sneaky ploy to get you curious again about the wonders of the EHD Insider Community?? I’ll never tell! But seriously it’s SO awesome to have a huge group of design-loving people to dump your questions on. It’s basically design therapy. If you want to check it out and haven’t head HERE and if you want to read about why we chose to great it head HERE. Happy Wednesday! Love you, mean it and wear a mask. Opening Image Credits: Photo by Veronica Crawford | From: Our LA Playroom Update With Solutions That Work For Us + Another DIY Fail The post Design Agonies BE GONE… 5 VERY Universal Problems, Solved Via The EHD Insider Design Agony Group Chat appeared first on Emily Henderson. Originally from Emily Henderson https://ift.tt/30RfNGU Saving For Your Dream Kitchen? DIY A Mini Version For Your Kids (Imeldas Here To Show You How)7/28/2020 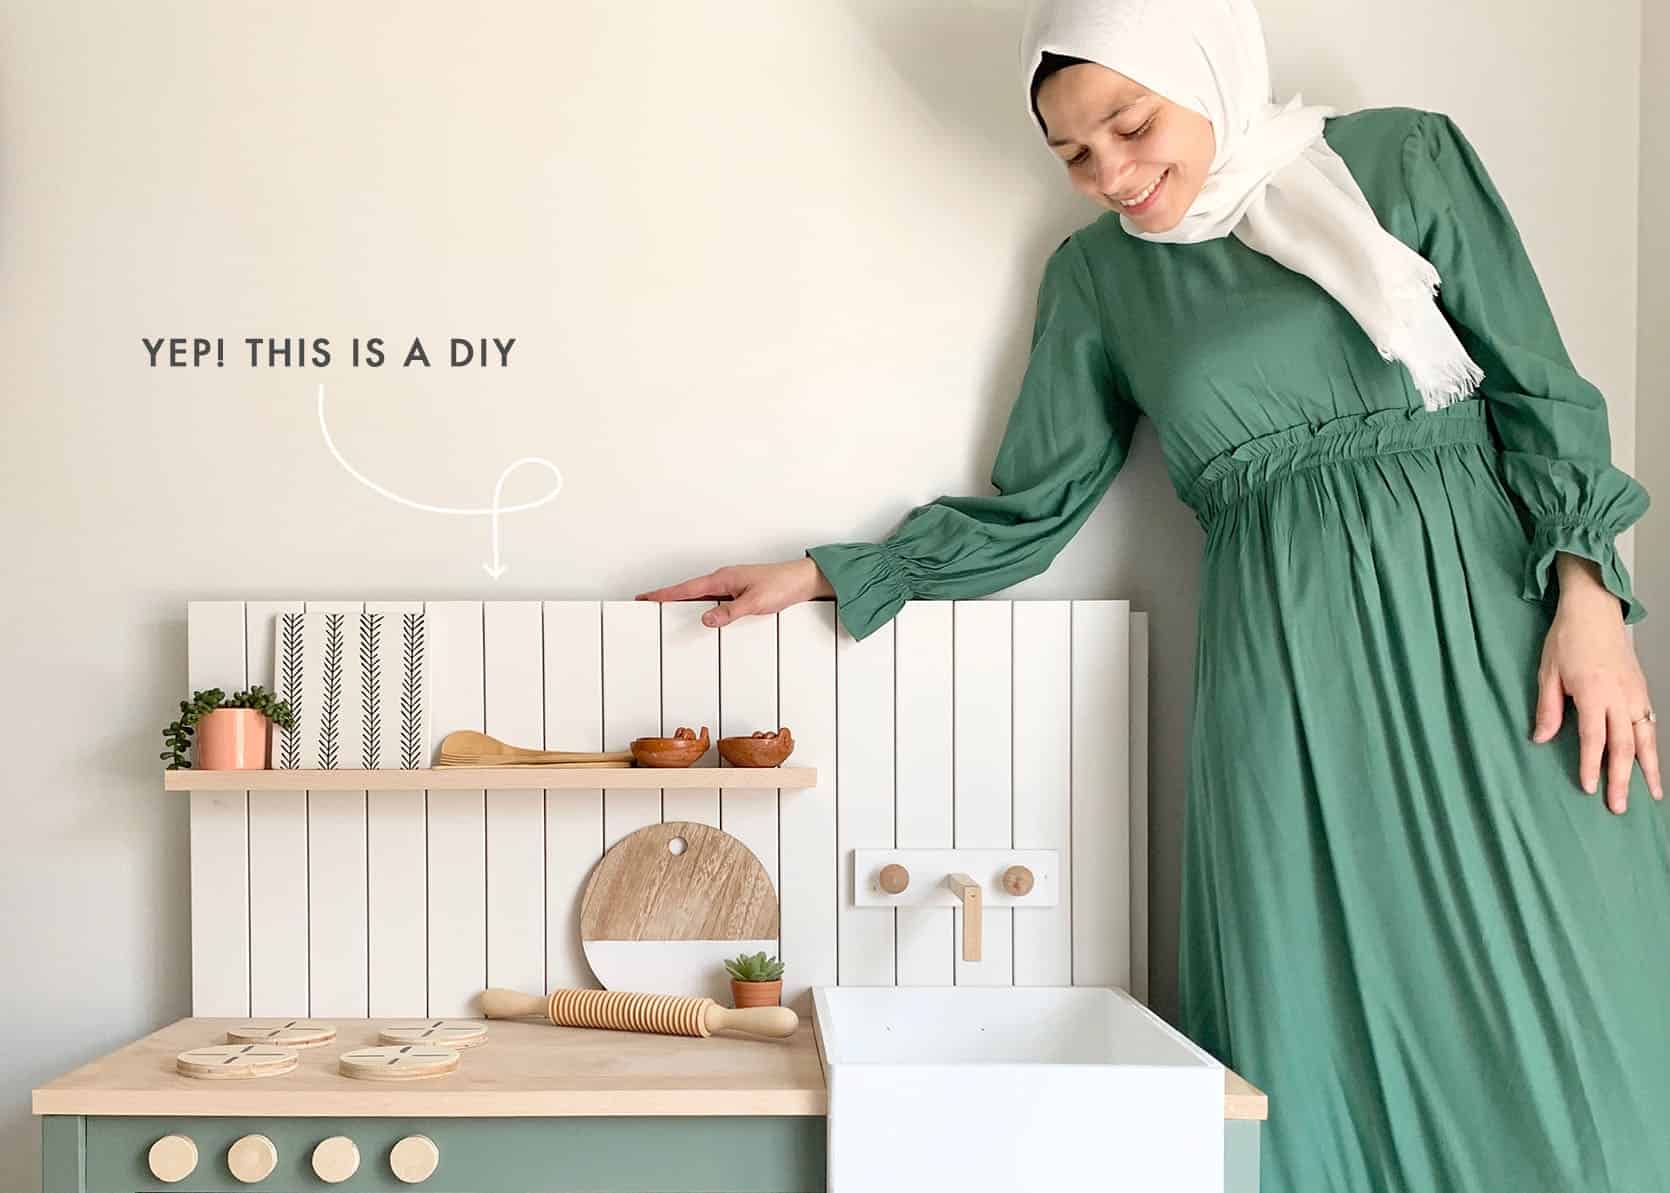
In an editorial meeting a few weeks ago, Sara asked us if we had seen this play kitchen by Imelda Cervantes. We all quickly grabbed up our phones, scrambled to Instagram, and saw that what Sara was so excited about…The coolest play kitchen ever. So we reached out and asked if Imelda would walk our readers through the steps and boy did she ever! Now, this isn’t necessarily a DIY for beginners but whether you are a seasoned pro or a newbie you will get A TON of ideas and very helpful tips. Imelda, take it away…. This year I was faced with the reality of having to celebrate Eid, a holiday observed by Muslims following the end of Ramadan, in my home due to COVID-19. My DIY buddy Hana, and I challenged ourselves to create an awesome Eid gift for our loved ones and that’s when I decided to build my kids their own personalized play kitchen. Ever had a dream kitchen design in mind but knew that it was far from reach?! Yup! I know that feeling too well! Inspired by what I envision my real kitchen to be, this play kitchen presents itself with a modern and boho feel! 

The first thing I like to do when starting any new project is sketch up a draft. I took my tape measure and held it up against my bedroom wall to get an idea of how tall and wide I wanted this kitchen to be. My initial measurements were 40 inches wide and 42 inches tall, but I made a few adjustments along the way and ended up with 38” tall and 36 ½” inches wide. I decided to sketch my kitchen in 2 pieces, top and bottom. Once I had my measurements and sketch done, I began to make a list of all the supplies that I would need. 

I began by cutting some leftover ¾” birch plywood into 2 pieces. These pieces will serve as the sides of the play kitchen and measured 14” wide by 17” tall. I set the pieces to the side and cut my 2 square balusters to make 4 legs that measured 19 ¼” each. I had a team member from Home Depot cut my 4 x 8 ft Sande Plywood in half to make the transportation easier. I then took my circular saw and cut the back of my kitchen. My initial back piece was 40” by 40” but I modified the measurements and changed it to 34” wide and 37 ½” in height. I took my measuring tape and drew 2 outlines that will serve as a guide to cut out 2 sections from kitchen back to attach and connect the sides. I outlined 2 openings on each side measuring 1 ¼” wide and 17 ¼” tall for where the legs would go. To cut these openings I used my jigsaw and a spare 1” X 3” board to help get a straight cut. Once these pieces where cut I began working on connecting the legs to the sides of the kitchen. I made a total of 6 pocket holes, 3 on the right and 3 on the left, on the 2 side pieces using my kreg jig and drill. I used my clamps to hold the jig in place while making the holes. I then connected the legs and sides using 1 ¼” Kreg pocket hole screws. I left a 2” clearance space on the bottom of the legs because I preferred an open space between the floor and the play kitchen. I then took my ½” sande plywood and cut the bottom piece of the kitchen, 14” in depth and 35” wide. 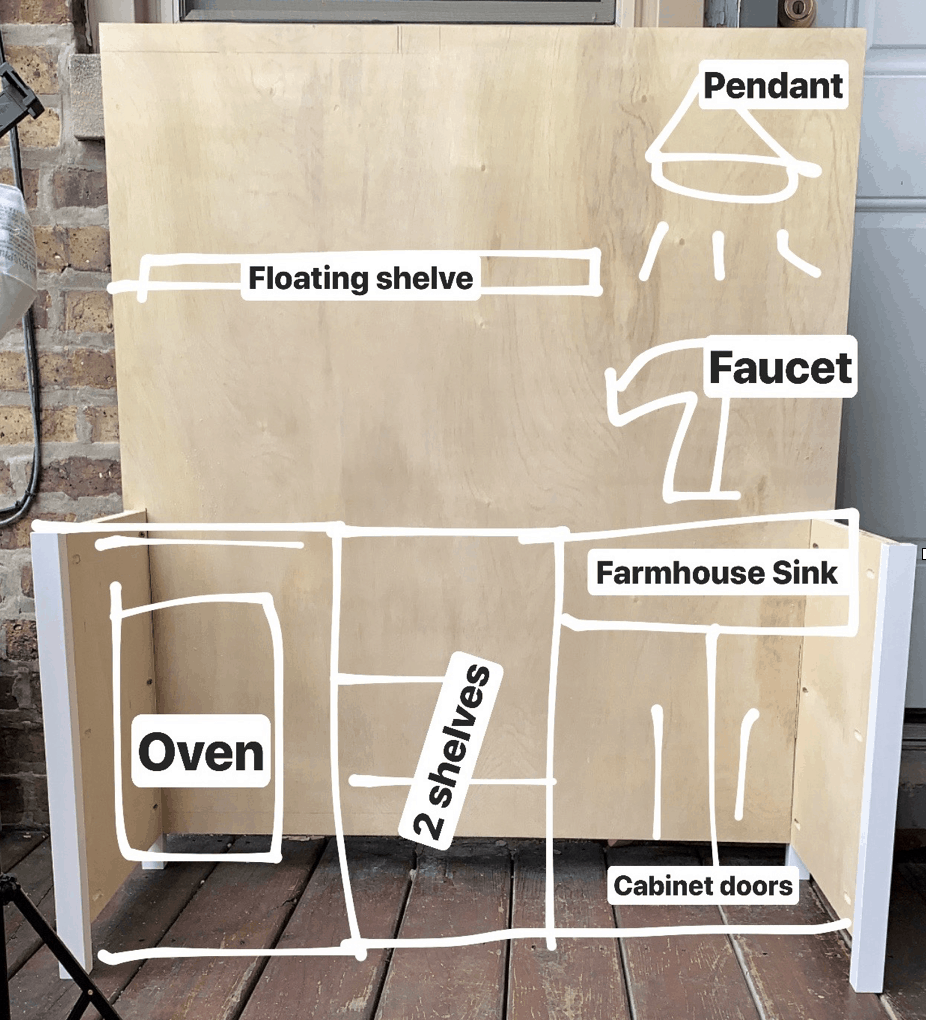
Before connecting the pieces, I took a picture and tried to visualize what the kitchen layout will be like. The following step was to connect the sides and bottom to the back. Once again I made pocket holes, this time to the back and the bottom of the kitchen. 
Now that the structure was done, I cut out the face frame using 1” X 3” Primed Pine for the top, where the oven knobs would go, and 1” X 2” for the remainder of the frame. 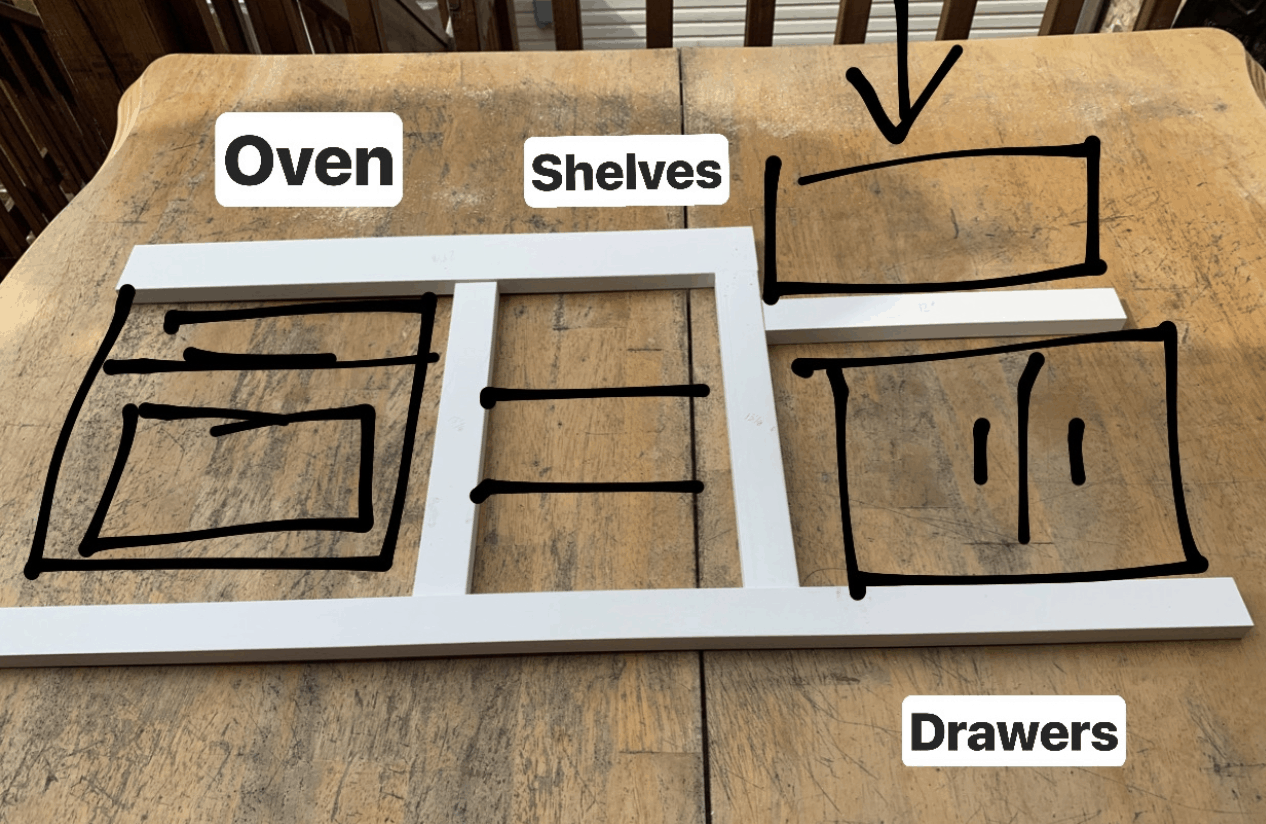
I ended up adding two more pieces on the sides of the frame. I made a total of 7 cuts: (1) 1 X 3 – 23 1/8” (1) 1 X 2 – 35” (1) 1 X 2 – 12 1/4” (1) 1 X 2 – 9 1/2″ (3) 1 X 2 – 13” Before installing the frame, I built the shelves that will be inserted in the middle of the kitchen. I wanted to add shelves in all 3 sections but only did so for the middle section. I cut my 4 pieces and put them together using my kreg jig and screws. I installed the shelves and then worked on the front face trim. I took all my 7 boards and used pocket holes and 1” kreg screws to connect them. I added a few pocket holes to connect the front face trim to the sides of the kitchen. 
I attached the face trim with both pocket hole screws and 1” brad nails. I used my 18 gauge nail gun because it makes the nail holes very small and easy to cover. After the face was installed, I painted the back top of the kitchen with primer and white paint using a brush. At this point, I was considering a honeycomb backsplash but ultimately decided to go with shiplap. I am so glad I did! While the paint was drying, I cut my primed MDF casing boards. I used a total of 16 pieces for the shiplap style backsplash and they were 17” in length. To install these boards I used my nail gun and 1-inch nails. To space them out I used a pile of 4 business flyers. 
I used my ½” plywood to create a box that would be used as the sink. I put it together using nails and wood glue. I covered my holes and gaps with plastic wood. The sink measured 12” wide, 15 1/2” in-depth, and 6 ½” in height. I used my router to round up the edges of the sink and then sanded it. I used my bullseye spray primer to prep for painting. Once dried I sanded and applied a second coat of primer. For the paint, I used a basic trim white color to go over it and it only took one coat to cover well. I set the sink aside and built my door frames. I used 1 ½’ primed pine and used wood glue and pocket holes to put them together. I made 2 smaller doors that would go under the sink and 1 bigger door that will be used as an oven door. For the oven door, I wanted a clear “glass” look. I decided to use an empty laminated pouch and used thumbtacks to secure it to the back of the door. Once built I painted the doors and installed the everbilt hinges. For the door handles, I used 5/8” square dowel. I decided to leave them natural and did not stain them. I used wood glue and 1” nails to add them to the doors and plastic wood to fill in the holes. 
For the color, I mixed 2 paints. I used Behr Pinecone Hill and added a bit of white to lighten up the green. I then painted the frame and doors. 
Next, I worked on cutting my countertop. I used ¾” birch plywood and sealed it using Minwax Matte Water-Based Polyurethane. To cover the plywood edges, I used my wood veneer edging. I also added the same edging to the floating shelf that I made and attached with pocket holes. I attached both the counter and sink with my nail gun and wood glue. Finally, I began working on the small fun details: stove grates, knobs, sink faucet, and floating shelve! I was finally realizing that all the work was worth it! Because seriously guys, this took a lot of patience!! Haha I used my circular jig and router to cut out my circles for the stove grates and stove knobs. I used 1/2” plywood for both. I painted a simple design to get my look complete. The stove knobs were left natural and both grates and knobs were installed with wood glue and my nail gun. For the faucet, I made a simple design using my square dowel and for the knobs, I used two 1 ¼” Birch Wood Round Cabinet Knobs. I attatched these pieces to a board and then nailed the board to the shiplap.
At last, my play kitchen was done! I have never been more proud of my work and my kids were so excited to play with it. Made with nothing but love, this play kitchen is now a token of joy in my home. Credits: Design and Photos by Imelda Cervantes The post Saving For Your Dream Kitchen? DIY A Mini Version For Your Kids (Imelda’s Here To Show You How) appeared first on Emily Henderson. Originally from Emily Henderson https://ift.tt/3g8Kg9T 

Designing a space for yourself can be challenging in a whole host of ways. Even if you’re an experienced designer (which I am not), when it comes to your own home deciding which direction you want to go in can feel like you’re trying to shove everything that represents you into one house or space. Adding another person and their design aesthetic to that mix can make it feel almost impossible to design a space that you’re both happy in. Trust me, I’ve been trying for the past 4 years, and still haven’t found the best method for designing a space that both Mac and I feel equally represented in. 
And so far the designed spaces in our home have definitely leaned more into my own aesthetic (which is a whole other issue of its own). So when it came to designing the office, I really wanted to bring Mac into the design process in a more meaningful way. This is the room that he spends the most time in on a daily basis, so I want it to be a space he really loves and enjoys. A space that feels like him. But Mac isn’t an interior designer, so asking him to design the office of his dreams and letting him have full design-freedom wasn’t going to work either. He’s not an interior designer and doesn’t know where to start – from where to look for pieces, to figuring out how they go together in a space. Mac is actually a designer (he’s an associate art director at Scholar, an animation and advertising studio), so he has a very strong design eye, and a good sense of what he likes and doesn’t like. But translating a pinboard of ideas he likes the “vibe” of to a real room, piece by piece, wasn’t something he knew or even wanted to do. After combing through a lot of “interior” inspiration photos, it was clear that the architecture and overall “vibe” of space was what spoke to Mac the most. He might not like a single piece of furniture from the photo, but the giant floor to ceiling windows, an insane custom built-in, or some other awesome architectural element was what he was drawn too. And clearly, we have none of those things on our office, nor the capability to do those things. The office is just a box, with orange peel walls. It does have two big windows though! 
But ultimately, it’s about as standard a room as you can get, so we were going to have to try and translate Mac’s inspiration to attainable design elements. So I decided to try and treat Mac like a design client. I asked him to pin a few images that weren’t so much aspirational as they were functional – what were things he’d actually to see in the office? Here’s what he pinned: Desk space – and lots of it. He has two monitors and a laptop open 24/7 on his desk for work, and a needs to be able to spread out. He also wants storage – he hates the idea of having a stuffed attic or garage. If we can’t fit it in the house, why have it? So some sort of shelving where he could display important things he’s collected, but also had closed storage that could house other items (like all his D&D stuff) would be important to incorporate. Mac’s taste definitely leans more modern and clean than mine, but he also loves vintage, so he’s not purely about that modern minimalism that’s sharp and desaturated. I think “organized” would be a better way to describe his aesthetic. So desk organization and functionality will be something he would really value in this space. We had chatted about a possible dark accent wall or paint color, and that was something he was open to, since he usually tends to opt for dark tones when given the choice. 
We had also chatted about having the office double as a guest room. So a sleeper sofa would provide both lounging space and functionality. But the office is small, so we were going to be super limited on what would work. All I knew is that it couldn’t be another velvet sofa, for Mac’s sake. The first thing I had to figure out was a floorplan layout. The room is small and square, and we wanted to fit a lot in there. My new favorite hack? Using the Ikea Planner online software to block out floorplans. I’m not using any Ikea products in the room, just literally using the software to layout the floorplan. I just create my room, and then use “floor obstacles” to see how big all the pieces are, and if they’ll fit. If you look at it in the 3D view it’s just a bunch of boxes, but overhead it’s perfect for getting a good spacial idea. This helped me figure out which pieces I had pinned would work, and which were just gonna be too big. 
The next step was putting together design options to have him go through with me. I’d love to say that this was a super easy process of presenting him with two options, having one conversation about which pieces we both liked from each, and settling on a final design plan. It wasn’t. First, I’m not a designer with client experience. Second, he’s not really my client, he’s my partner so there are a lot of emotions involved. And third, we both want to like this space, so it’s not as easy as a designer just trying to please a client. I was, in a way, always a client of the space too. And we both generally have different ideas of what we want our spaces to look like. And me repeating “I just want you to be happy in the space” translated more to “this is your generous crumb of design input, the room where you get to do what you want, so just tell me what you want.” But, in the simplest terms, I did present two designs to him, we discussed, and we combined elements from both designs to create a final design plan. DESIGN OPTION #1
For this first design I proposed painting the walls “Goodnight Moon” by Clare, but keeping the ceiling and window trims white to keep it from feeling dark and monochrome (a look we intentionally went with in our TV room). Mac had pinned that sturdy wooden desk from Article a while ago, and we’re planning on reusing the office chair from our previous office. We’re also going to keep the vintage coffee table we used in our previous office, but I wanted to throw in a more colorful vintage rug to bring in some more color to this space (but also something with a flat pile so if Mac’s office chair had to roll over it there wouldn’t be any issues). That sofa from Blu Dot is actually a sleeper, but not a traditional sleeper. Between Mac’s desk and the sofa we could really only accommodate a sleeper sofa that opened up to 70 inches max. That’s not a lot of room, but this sofa opens up to only be 66″ long. It’s like a hybrid between a futon and a full-size sleeper bed, and will work perfectly for the few nights a year we have guests. Plus, I liked the contrast of the modern sofa design with the vintage rug and coffee table. Same goes for the ceiling light fixture (from Rejuvenation), which I liked that it tied in a brass element to the brass globe lamp from Article, and all the wood in the room, but still felt modern. Mac has tons of awesome movie and design-related art that he wants to display, so the art is gonna be all him. He has a Pinterest board filled with vintage posters he’s been wanting to get, so we’ll be sourcing a few cool things and getting them framed with Framebridge. Lastly, that cool wall shelf from Rejuvenation is wall-mounted and so pretty. It provides both display space, but has a section with doors for storing more unsightly items. DESIGN OPTION #2
In this version, I opted for a paint color I’m obsessed with called “Current Mood”, also from Clare. It’s a bit lighter than Goodnight Moon, but still has that moodier tone I thought Mac would be into. I paired it with a bit more of a subdued vintage rug (I searched through just about every vintage rug Revival Rugs had and there are a lot of good ones), that still has a lot of deep saturated color. And brought in the same Blu Dot sofa, but in a darker option to jump off the walls a bit. Mac really loves that shelving option from Article – it’s got a cool modular feel, and lots of little areas that feel like display spots. But even more closed storage (this guy has a lot of D&D material, ok?). I paired the shelving with a black and brass standing Article lamp, and a super modern ceiling fixture from Rejuvenation in a color I knew Mac would be into – Black. I also brought in a leggier desk (from Lulu & Georgia), in a dark color, to try and reduce some of the brown wood in the room. THE FINAL DESIGN PLAN
After reviewing all the options from the first two designs, we finally pulled together a final design. It took a LOT of conversations, mixing and matching pieces from the two design boards, and just like, only a few frustrated tearful events. All in al, this was one of the smoother design processes. We’re gonna go with Goodnight Moon on the walls and baseboards, and keep the window trim and ceiling white. We’re using green in a lot of other spaces in the house and felt like we needed to shake it up a bit. Blue isn’t Mac’s favorite color, but this inky navy hit a sweet spot of dark and moody, while not being ultra-saturated. And even though we’re using a darker color on the walls, we decided to go dark on the sofa as well. We’re really into the fabric, and kind of liked the cohesive dark look that the sofa had against the wall. Plus the rug, with its deep colors, brings a bit of lightness and saturation to the couch area. Mac spent DAYS deliberating on which vintage posters were going to grace the walls of this space, and after agonizing for too many hours, he’s settled on these two vintage Japanese posters in more neutral tones. He’s also got an amazing A24 poster, that’s already framed, that will go on the wall next to his desk. Mac really wanted to go for something sturdy in the desk department, so we’re going for the warm wood desk, which also is 71″ long so will provide a lot of great desk space for him. And we’re going with his dream shelving to make sure he’s got enough display and storage space. The shelving will come into the window a bit, but functionality is going to win out on this one. We’re also going to add two art ledges above Mac’s desk to bring in more space for smaller art and collectibles. It’ll be one more spot Mac can share a bit more personality in the space. Lastly, Mac liked the first ceiling light fixture just a touch more, but felt that the brass and wood felt a little too mid-century for him. SO, I popped an all-black version on the board and we both kinda nodded our heads like, “yea, that’ll work.” It was one of our cohesive design decisions, haha. And that’s where we’re at now. We have some baseboards to finish up, and then it’ll be painting and installing. It’s a super quick project, but one I’m really excited to tackle. Is our couple’s design method seamless? No. And I don’t know if it ever will be. But I definitely don’t want Mac to just throw in the towel and let me have carte blanche because I want this house to feel like both of us. And he doesn’t want to hold up every single design decision by making me feel like he hates all my ideas. But this room did come together a little easier than the last one, so maybe with practice we’ll get there. And then I’ll write a book and become famous and solve this same issue for couples everywhere, and people will ask me to officiate their weddings and name their babies after me. Until then . . . Opinion time! Who thinks we’re crazy, who’s on board, and who has the secret to cohesive couples designing? Opening Photo Image: Photo by Tessa Neustadt | From: Sara’s Office Reveal The post A Moody, Movie Themed Office Design On A Tight Timeline appeared first on Emily Henderson. Originally from Emily Henderson https://ift.tt/3f43jR9 The Kitchen Coronavirus Built: A Jaw-Dropping DIY Kitchen That Truly Proves The Skys The Limit7/27/2020 

Whenever I reach out to a designer for a potential home tour or a new contributor I’ve never met I get a little star-struck. As I am writing the first DM or email, I can feel the adrenaline and slight nausea taking over. It’s completely comical but I mean, who wants to be cool and collected all the time?? I guess not me. Ha! So when I first caught a glimpse of artist, Katie Sarokhanian’s DIY ORC kitchen, I DMed her immediately asking if she would consider letting us show off her insanely brilliant kitchen (y’all just look at that first photo!). And you can bet I was holding my breath as I hit send because this kitchen is what imagination, a love of design, and some real DIY confidence can produce. So basically magic. Katie will give you the whole story about this kitchen but ultimately what was originally supposed to be a non-DIY kitchen reno, was flipped on its head because the pandemic hit. So instead of letting herself get defeated, she did it on her own at night while her kids were asleep. I only dream of that kind of productivity! Ok, enough from me, here is Katie answering my 100 questions about her totally special kitchen… 
Did you have any specific inspirations for these two spaces?My inspiration comes from my love of the old world European design, like an English countryside manor, but ironically fused with a funky sculpture from the 1980s. A tension lies there, but a happy one for me. Are you a “plan everything out before” kind of designer or “play as you go”?I’m a play as I go designer, and a play as I go person. I’m terrible at making life plans, and, likewise, it feels unnatural to make design plans. For me, creating a room and a home is more like an ebb and flow of “eureka moments” and “let’s-just-try-it-out failures” that organically, eventually, (and perhaps melodramatically), grow into a comprehensive design. 
Did you always plan on a pink and mustard color palette?Not at all! I had lived with some cabinets and pink lower walls in the kitchen for a few months, and I knew I loved the color in there. So I just continued the pink. The mustard yellow ceiling was a completely last-minute decision (actually it was the last thing I did in the kitchen!), and I decided on yellow after sitting and staring brooding, and thinking that the room needed some pizazz. I used my artist acrylic paints, to mix a yellow that I liked on pieces of paper, and then brought the paper to the store to have color matched. Umm GENIUS! And talk about a hot tip. As an artist is it crucial to have your space be inspiring to you or do you look at it more as an expression of your artistic self?I think that the answer is both! Though, I am not sure that the decor of my home is completely an expression of myself. At least I hope it’s not! Perhaps as a whole it might tell you a bit about me, but I prefer to include a lot of things in my home that are an expression of another person or of another time. For instance, choosing art by an artist unlike myself, old furniture made in a time I never lived, artifacts of past decades that I only have read about or seen in movies. The culmination of which inspires me; it all together instills a sense of wonder. What was that artist thinking when they painted that? Sculpted that? Designed that? And who bought this antique chest, and what did they put in it? What was the artist thinking when she weaved the colorful story into this antique Persian rug all those years ago? More importantly, I want this symphony of human creativity (to make an overly grand description of the decor in my house), to instill a sense of wonder in my children. The house that makes the background of their young lives becomes the fabric of their happy, golden-hued childhood memories. It shapes the way they think, and the way that they view the world, and perhaps shapes what beauty they will pursue in their life. I can still remember what my wallpaper looked like in my childhood bedroom, the furniture, and the sound of the creaks in the floorboard, even after all these years. A home becomes a part of you, no matter what. More than anything, I want my children’s home to give them that– to make them wonder about the deeper things of this world, and to marvel at the beautiful things of this world. I firmly believe that interior design is an art, and what could make people wonder about the world more than being surrounded by beautiful art? For instance, consider the tile on the wall of the kitchen, with the different marbles and onyx and the contrasting arch. I want my kids to look at that and to wonder what marble it is, to wonder where it comes from, to ask why it has lines and different colors and striations. I tell them that marble is beautiful because it has suffered. It is beautiful because it endured periods of intense pressure and periods of peace, it was made from ordinary limestone that suffered through intense pressure and fire. I explain how there are small impurities in the calcite of limestone, that, though they are impurities, metamorphose into beautiful colors, but only after undergoing intense pressure while growing under the earth. So, when my children eat breakfast and stare at that marble wall their weird mom made, I want them to remember that there is beauty in suffering, and I want them to remember that their whole lives. So–yes, I firmly hope and believe the design of a home can be inspiring! What was the intention behind your wonderful scallop details? Was it to add some extra whimsy, are scallops a motif in your home elsewhere, or do you just like them and wanted to add them into the design?I saw a scalloped, metal, vintage range hood in a fabulous designer’s kitchen on Instagram (@astridreifer). I scoured the internet and the flea markets for a long time looking for a similar one to use in my kitchen, but I never found one. So, thus, the scallop trim idea was born. I know you are an incredible artist but for the scallop border did you freehand paint them or use a stencil?First, for one side of the trim, I tried to use a compass, tracing with a pencil then going back with an angled paintbrush, and it worked well! But it was terribly monotonous and boring. So, I free-handed the rest. It turns out I liked the look of it being almost perfect, better than looking perfect. (Or perhaps I’m just making an excuse for my laziness.) 
Were you able to do basically whatever you personally wanted or were there choices that the family chimed in on?In a moment of creative rage against a kitchen I did not love, I splatter-painted the kitchen floors red about 6 months prior (and when my husband was out of town!). I absolutely loved the red floors. My husband did not. Our compromise was that I got to remodel the kitchen myself if I returned the floors to walnut-stained hardwood. Or, as my husband called it, “normal kitchen floors that normal people have’. It looks like you DIYed everything! Is that true or did you hire out for anything?I hired out the fabrication and installation of the quartz countertops. That was all! The rest was me, after the kids went to bed. (And my husband helped too!) I am in total awe. What is the story behind your floors? I know that in your dining room you did that awesome splatter paint design. Did the kitchen have that same flooring? What was the replacement process like?I know I already touched on this, as I explained the marital compromise on the kitchen over the choice of flooring but if I knew how grueling the restoration of the wood floors was going to be, I might not have agreed to do it! I still get horrid flashbacks whenever I hear the sound of a drum sander… The whole process involved scraping the paint, renting a commercial floor sander to finish, and spending way too many hours trying to strip the stubborn bits of paint remaining under the toe kicks. Then staining, and sealing. So you seemed to have kept all of your original appliances. Did you vinyl wrap all of them?The fridge is painted (I did that a few years ago using self-etching primer, matte black paint, and a brass towel rack.) On the oven, I used vinyl cling, in matte black, and a brass grab bar. How did you install the brass handles to your appliances?Both times, I just made sure to search for a replacement handle that had the same hole-to-hole measurement as the original appliance handle. For the oven, it was super simple and easy. On the fridge, the bottom freezer handle, although the right hole-to-hole measurement, would keep getting loose because it would be pulled up and out, and the upward motion was not designed for a towel rack. So I just used a bit of epoxy and added two small matching brass screws, and screwed them right into the fridge door. It has been over two years and still solidly attached! I read on your blog that you had to replace/add some cabinetry. Was it hard to find the matching cabinet fronts to our original cabinetry so you decided to really make them different with the shapes? Or did you always want to add the shapes to some for the cabinetry?I took out the upper cabinets over both sinks and removed the soffit that went all the way around the kitchen. The cabinets over the oven I mostly kept, but they needed new doors, and new cabinets to replace the space left when I removed the soffit. I don’t know why I added the shapes, it just seemed a bit boring with the slab doors. I always loved the mid-century brutalist dressers and credenzas, and that’s what I was thinking of when adding the shapes. I tried a lot of different renditions before deciding on the circles and arches. This house was also built in the 1980s, and I wanted to give a nod to that. 
What tool did you use to cut out all of those amazing shapes (on the cabinets and scalloped hood trim?)The wood cutouts on the cabinet doors I made with a jigsaw, and the scalloped wood trim I bought from a woodworker on Etsy. My eyes are so wonderfully overwhelmed with each incredible detail but your marble walls are just, well I don’t have the words to describe my love for them. In terms of the process, how did you go about breaking up the pieces and installing them onto your wall?I installed the tile as you would normally, with mortar and grout. But I made the tile by breaking square tiles apart with a rubber mallet (several at a time), grinding the sharpest parts with an angle grinder if necessary, and adding them piece by piece. Not at all methodically. It was adding one shape here, then one shape way on the other side, then waiting until the right piece broke in just the right way to fit it where it belonged. It took a long time, and made a big mess, but it was so much fun. It felt a lot more like an art installation than a home improvement DIY. 
What was the grouting process like and what kind of grout did you use?I used large format tile mapei grout with the pink marble in a sand color, and used white mortar with the other marble (the same that I used to glue the tiles to the wall.) I did that because there were some larger gaps between the tiles that regular grout may have not done well with because the white mortar looks more natural to me than the colorants added to grout, and I because had to sand down the whole wall after installation (because of the irregular shape and thickness of the tiles), then seal it all together afterward so I knew the mortar would be sealed. Now I only ask this because I know our readers are going to want to know how do you keep the marble clean, mainly behind the stove. Is it pretty low maintenance?I hope so! I jest, but yes, it’s all sealed and easy to wipe down. Someone once sent me a photo from Pompeii, Italy, of a centuries-old room with this kind of marble installation. Needless to say, my backsplash will probably last a good while. I had previously laid marble tile in the same manner on a floor in my bathroom, and it’s very durable and easy to clean, even with my rambunctious children, dog, and cat. 
What made you want to do your natural wood accent nook?I’ve always drooled over a deVol kitchen (their New York showroom) that had a shelf and rod set up like this, so I tried to recreate my version of it. My instinct was to paint it all, but I think the natural wood adds a more masculine look in contrast to more feminine-feeling pink and brass. Not to mention it is an incredibly useful set-up for my busy kitchen. I’m also pretty obsessed with your plaster pendant and may need to make one of my own. For a medium level DIYer would you say it’s pretty doable? Any tips?For sure doable! I had no idea what I was doing and just went with it using the materials I had on hand. Since then, I’ve played with other plaster sculptures, and if I did it again I would use a product called Plaster Cloth, which would be way easier, faster, and less messy. Is the awesome swan faucet (?) vintage? It’s SO cool!No, I bought new! Found on Amazon actually, and it is great quality. It is a normal faucet, and we had to make some changes to make it work for our water filter line, but it was worth it. Were there any ideas you had to shift or compromise due to the quarantine?This was originally going to be a complete gut-job on the kitchen. But since COVID happened, we couldn’t make a remodel happen. So it was either push it back a couple of years or do it myself. It took a bit longer to get building the materials, since I ordered it all online–even the lumber– but a lot of what I used I had on hand or could order delivered. What was the biggest challenge/undertaking of the kitchen?Definitely the wood floors! I would rather spend a year doing nothing but installing marble tile on the floors piece by tiny piece, than sand and restore wood floors again. 
Do you have a favorite part?The marble is what I’m most proud of, but the shelves and brass kitchen rod wall has been the most life-changing. It organizes everything I need to prep every snack and meal, and looks beautiful too. I know you used so much vintage but if possible would you be able to share any of the resources you used. Paint colors, stain color, hardware, lighting, etc? Also the wood shelves and brass hook and rod storage:)The wood wall can all be found on my blog post here with linked sources (scroll to the end of the post.) Otherwise… The Pink paint is Rosewater by Behr Pendants are West Elm Marble tile is from Floor and Decor Sinks are black granite from Amazon Campaign Hardware is from Home Depot 
Is there anything you would want to change down the road?Eventually, I want to replace the old appliances if they ever break, but until they do I’m satisfied with the way they look. I need to fix some paint and drywall work now that it’s all said and done and I notice the imperfections… but otherwise, it turned out to be my dream kitchen that I never actually dreamed of! What would you say the over budget came out to for this?It’s hard to say, since a lot of the materials I already had (most of the lumber, even about half of the marble tile I had leftover.) But with materials I did buy, (stock pantry cabinet box, tile, wood, renting the floor sander, paint and stain and installation materials, lumbar, sinks and new faucets) it cost me about $1800, plus the cost of the countertops and installation, which was $1900. Lastly, I am in utter awe that you not only completed this insanely beautiful and creative kitchen while under quarantine in eight weeks but ALSO while needing to be a parent. I live alone and after nearly three years only have half of my apartment done. Any tips?Oh easy! I just ignored my children for a couple of months. (I’m joking!) People ask me all the time, and I honestly don’t know the answer, I just do it! I don’t watch TV hardly ever, and I cut out showering and sleeping, and that helped a lot. But in all seriousness, when life gets more challenging (and it definitely was more challenging once the kids had to be kept home from school and learn online via me and we couldn’t hire childcare, inter alia,) I think it is in those times when creativity is needed the most. Working on the kitchen gave me the much needed creative outlet that allowed me to get through the first couple months of the pandemic– in fact, I don’t think I could have done it all without the kitchen remodel. “The kitchen that Coronavirus built!”, or something like that. 
Jess Again! All I have to say is that obviously Katie is an artistic superhuman. I can’t thank her enough for letting us make everyone’s Monday better by featuring her kitchen. And I don’t know you, but all I can think about is where can I put a marble mosaic in my apartment?? Happy Monday everyone. Love you, mean it. Credits: Design by Katie Sarokhanian | Photos by Kelly Christine The post “The Kitchen Coronavirus Built”: A Jaw-Dropping, DIY Kitchen That Truly Proves The Sky’s The Limit appeared first on Emily Henderson. Originally from Emily Henderson https://ift.tt/32Z3n2b 
It’s Sundaaaaaayyyy! We hope you’re doing something like making chocolate chip pancakes and listening to the classic hit ‘Sunday Morning’ from way back when Maroon 5 was… well, let’s just say that song is from their best album. Anyway, we hope you’re having a great weekend, and let’s get right into this week’s goodies. UP FIRST, we have an absolutely stunning home tour. And can we talk about the kitchen pendants?? We must have a crush on them because they’re giving me butterflies. Also, make sure you scroll to the last photo because that paint color is absolutely delicious. To quote Arlyn’s new blog (which you should most DEFINITELY check out if you have not already), “I like my rooms like I like my hot dog: with mustard.” Now on with the show… From Emily: I just started watching The Great and it may be one of the few shows that Brian and I actually both like equally right now. The writing is insane and the production design sends us to a world far outside our four walls, which I think we all are looking for right now. From Jess: “Good” scents (I use quotes because that qualifier is subjective) are more than just a way to make your home (or body) smell good. They can be time machines that slam you back into time or feeling that was really special to you. Heck, I still take a quick sniff of my mother’s perfume whenever I feel like I need a hug. It’s been very useful during quarantine. But this past Monday I received my order from Redoux – a bar of soap and a candle. It was my first time ordering from them so I didn’t know what to except (aside from rave reviews) when I opened the box. I put my nose to the candle and was immediately at ease, but not in a “ooo this smells good” kind of way (which it did) but in the “why do I know this smell?” way. Then I looked at the card that accompanied the candled and the scent was described as “The nostalgia of summer in New York.” In an instant I realized that’s what my ease was. A scent of happy memories of warm summer evenings in New York. I almost got misty before I was like, “Jess, it’s a candle. Get ahold of yourself.” Basically I am now a forever customer. Actually I’ve already ordered two more. I’ve truly found my summer candle and cannot recommend it enough. I know this sounds like a totally biased review but with the combo of Bergamot, Geranium, Ginger, and Sandalwood, it’s a no-brainer amazing candle and I hope that it too can remind you of simpler, beautiful summer evenings. (Also the soap smells AMAZING but in a normal, not tear-inducing kind of way:)) Also from Jess: I need help! My favorite t-shirt is no longer available and most of the ones I have are not doing great. Apparently wearing them non stop for four months will do that. So I would LOVE some suggestions. Here’s what I want: Flattering for a larger chest, longer than a cap sleeve, doesn’t have a boob pocket (sorry Madewell), lightweight, and is a medium length. Too much?? Fingers crossed it isn’t. I really appreciate any and all recommendation:) From Caitlin: 4 months ago, back when quarantine was just starting (it feels like YEARS ago), we did a roundup of our favorite comfy clothes for staying inside. Sara recommended this lightweight sleeveless romper and AHH, I have loved it ever since! I’ve literally worn it almost every day this week (the team can attest from our daily Zooms). It’s so flattering for regular life (I ordered an XL because I was worried about it shrinking or being clingy but it does neither of those things! Honestly could have gotten away with a medium or large) but also IT’S A GAME-CHANGER for laundry day. It has such deep pockets — I use one for my detergent pods and one for all my quarters — and it’s breathable enough that I don’t feel like I’m going to pass away as I haul 60 pounds of weighted comforters and towels down the street to my laundromat. Target is just SO GOOD at making rompers that work for straighter body types AND can actually fit boobs and butts. (Remember when all of EHD bought the same one and wore it for Halloween? Remember standing in close proximity with friends?) ANYWAY I have my eye on this short boilersuit next and will probably size up again just to be safe unless anyone has any feedback! From Mallory: Sara filmed some IG stories for Em’s Instagram a few weeks ago and when she sent them over to me, I responded with ‘your lip color looks so good what is it and where can I buy it?’ She said it’s this sheer lip stain which I then immediately bought because her lips looked THAT GOOD (hope that doesn’t come across weird). It leaves your lips feeling lusciously soft, cool, and velvety. BOY oh BOY, I love wearing this baddie on the daily. Enjoy! From Julie: In my personal opinion, it’s too hot these days to burn a candle all day while I work. So instead, I just bought this very pretty oil diffuser to keep my office/bedroom/yoga studio from smelling like whatever I had for lunch that day. There are four different scents to choose from and I went with ‘Harmony’ (the world and myself needs a bit more of this right now) which is a blend of amyris – had to do a quick google search for that one, bergamot – like my morning tea, & olibanum oils which gives off a woody, subtly floral and slightly spicy scent. Everyone! My room smells delicious!!! Also from Mallory: I bought this lantern I found on sale at World Market and it is an AWESOME outdoor addition. I had no idea the power of a supple lantern glow until now…10/10 recommend if you can find it in a store near you!! From Sara: Since eyeliner is kind of the only makeup I can wear these days that shows up above mask, I’ve been rocking these little brights in emerald, cobalt, and orange. One more from Caitlin: I just got off the waitlist for Tote, which is an online wishlist that’s currently in beta and Y’ALL I LOVE IT. It’s like a personal gift registry and SO MUCH BETTER than Pinterest for keeping tabs on all the things I’ve found and want to buy! (My Tote is currently just filled with Lex Pott candles and these statues that I keep getting targeted IG ads for but can’t really justify splurging on, and now I can’t wait to send my Tote around at Christmas instead of being like, “uhhh, I don’t need anything???”) ANYWAY highly recommend popping on that waitlist!!! Effortless Composition (very cute home decor) is having an online sample sale on August 2nd – August 4th! Mark your calendars…it’s gonna be a good one! Well, that’s all folks. We’ll see you next week! xx Opening Photo Credits: Design by Sascal Studio | Photo by Angus Williams | via Apartment Therapy The post The Link Up: Caitlin’s Comfiest Romper, The TV Show BOTH Emily and Brian Like, and The Perfect Lip Stain appeared first on Emily Henderson. Originally from Emily Henderson https://ift.tt/3jAimWt |


 I will love


